Before I do the continuation of creating the custom picture frame molding I just have to show you the completed piece. As I mentioned in the first installment of this blog, my wife Diane; painted this from a picture she took on our recent vacation to Rome. I love the quiet, yet dynamic way she captured the nuns bending over the fountain. The way she used the cobblestones as an eye path plus the light on their habits leaves you with no doubt as to what the center of interest is in this painting. When I saw it in her studio I thought their world needed to be contained in a quiet, elegant frame so that was my goal. Do you think it was met?
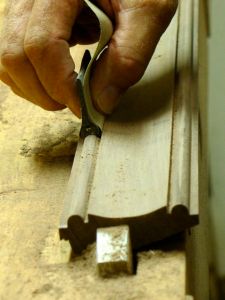
In Part 1 of this blog I worked through how to create a molding with depth out of 4/4 stock. Basically cutting one side at an angle after doing whatever profile work you desired. Then the area between these profiles was coved on the tablesaw. There are a number of ways to smooth out this cove. If you make your final pass at a slow rate of speed and a very light cut sandpaper is usually enough. If not you may want to try using a goose neck scraper. My favorite sanding block for things like this is an old school, chalkboard eraser:
It has to be the original chalkboard eraser, not a cheap imported one because these really hold up well. I started with 100 grit paper then progressed to 150 and 220. The only precaution here is to make sure you don’t flatten out the beads at the edges of the molding. Prior to mitering the pieces to the required size I use an appropriately sized tadpole sander to finish it off.
I prefer to use biscuits when joining picture frames that are only mitered. This gets tricky since the back of the frame has a beveled edge. You’ll need to hold the biscuit joiner flat against the non-beveled surface to join them properly. Experiment first on your MDF sample pieces to make sure of the correct surface and location of the biscuit. The beveled surface also makes it difficult to clamp the frame together. I raise the frame up about 1/2″ with non-stick plastic spacers to center the band clamp on the corners.
Since there is a tendency for the center of the frame to raise up as the clamp is tightened that problem needs to be addressed as well. My solution for that was to separate my assembly table so a caul could be placed across the frame and snugged up slowly to line up the mitered corners. Liquid hide glue was used for this.
One of the things that happens pretty commonly when making your own moldings is that there will be some inconsistencies in the profile. Perhaps if you have a power feeder this wouldn’t occur but it’s usually not too big of a deal. One corner had some noticeable inconsistency that was fixed with a #6 back bent gouge for the bead and a flat chisel for the outer edge. Putting this at the bottom corner of the frame will conceal it from 99% of the viewing public — after all it’s the painting they’re looking at, not the frame.
The finish on this frame is natural Watco Danish Oil followed by a few coats of my sanded in topcoat. Keeping with the old school methods a simple gimlet is used to pre-drill the holes needed for screwing the clips to the frame and also attaching the wire. I number all of my custom frames and this is #72! I’m pleased with the finish even mounted in front of the sawdust collector. You can see that by using this process you’ll be able to transform a 3/4″ thick piece of wood into a custom molding with an increased depth.


Beautiful painting. I am always impressed at the ability to capture a specific mood in a painting. The frame is not to bad either. Actually I noticed the frame first and then the brick in the lower right of the painting pulled me into the nuns. I have always considered frames to be the most challenging work, much more so than the dovetail.
LikeLiked by 1 person
Thanks for the compliment Orapass, had to chuckle though that you noticed the frame first. That’s what happens every time we go to a show. When we went to the Sorolla show in San Diego I was reprimanded by the security people for taking a picture of the corner of a frame. I think I got a pass since there was just a tiny bit of painting showing in my photo! Agree with you on frames being a challenge, hmmm; maybe I can dovetail one — now you’ve gotten my creative juices challenged!
LikeLike
John,In all the years I have been making frames…Why do you angle the rabbit for the glass/print/etc.??Unless for a better seal at the glass/frame interface?
LikeLike
Hello Robert, if you check out the first part hopefully it’ll make sense! The angle isn’t intentional and on the final frame pieces it was planed square (#78 Stanley). After beveling the back side to set the frame back from the wall the rabbet is cut laying flat on the tablesaw with the blade left angled. This makes the inner edge 90 degrees to the wall but angles the other like you saw. The rabbet is “nibbled out” with a few passes on the tablesaw which gives that angled look until planed square. Hope that answers the puzzle!
LikeLike