Work continues on the Monster Truck for Connor’s third birthday and if this is the first post you’ve seen on it I’ll remind you that this was built in July but won’t be posted until after he gets the truck in September. Had to get out of the shop, it’s now 100 degrees in there!
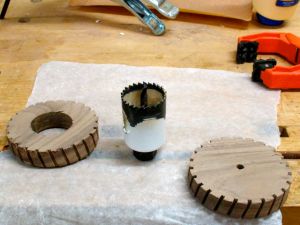
 One of the most noticeable things about this truck are the huge tires — what kid wouldn’t like this thing! They took some time to make, let me walk you through the process. Mine are made out of Walnut and measure 3 1/4″ in diameter. In the book he shows band-sawing them out, then rounding them on a disc sander which I don’t have! Instead, a circle cutter was set for the correct size and 8 disc were made. Next, four of them had a 1 1/2″ piece cut out of their centers; these will become the outsides of each wheel. Now the fun begins. First up was taking the templates I made and gluing them to the inside surface of each disc. A glue stick is a good choice for temporarily attaching patterns to wood. See the disc at the upper left? Before cutting the slots the outside edges were rounded over on the router table to prevent tear out on the next step.
 That step was to cut 24 grooves in each disc at about 15 degrees on the table saw. That was easily accomplished with this quickie jig. Since the wheels are directional that meant two inner and two outer discs needed to be cut with the fence tilted in one direction and then the others went the opposite way. Lets see now; 8 discs times 24 = 192 cuts stooped over the tablesaw and yes, my back’s sore!
After flattening the backs of each and removing any traces of the glue or template they needed to be assembled together. Starting to look like real monster truck tires aren’t they?
 Keeping them aligned was the concern knowing how once the glue is applied things get kind of slippery and hard to control. After considering a few approaches this is the one I settled on.
First off the 1 1/2″ hole saw was placed in the vise surrounded by some wax paper to keep the glue off the bench.
Next up was to put an outside wheel over the hole saw and apply a thin bead of glue.Then the inner wheel was placed over the drill bit in the center. Here you need to be sure the slots cut into the tires go in opposite directions to make a realistic looking tire.
Once the inner and outer tire were centered on the hole saw they were rubbed together to spread the glue. That procedure was followed until four, huge monster tires had been assembled and clamped.
It worked! There was a little bit of misalignment on some of the tires but they’re going to be just fine. Did a little sanding to even up the tread in the center but they’re ready to rock and roll.


Thanks for sharing manufacturing these wheels
LikeLike
You’re welcome Alberto, that’s what blogs are all about and glad mine helped you. My grandson absolutely loved the truck, if at all possible, find a way to make the axles out of metal rod. The truck was accidentally dropped and hit on the corner of the wheel — we had to do some repairs!
LikeLike