

Silver Arm Cuff Presentation Box Completed 11-20-2013
Here is the completed presentation box I was commissioned to build through my Etsy store. The wood is Monkeypod, dimensions are approximately 3 1/2″ deep and tall by 4 1/2″ long. The finish is multiple coats of Platinum shellac rubbed out with wax. The box is lined with 100% wool felt and is hinged with concealed brass pins. Joinery is all hand cut and the project took about eight hours of actual work time. I’m not considering all of the time developing this project and the many conversations I had with my client — all in all; a very satisfying experience. Isn’t that what woodworking is all about?
One of the requirements for this project was for every interior surface to be lined with felt. This box is for a custom made, silver arm cuff which is under construction now. This arm cuff will slide down into the box and have minimal clearance all around creating a secure containment. Lining the bottoms of boxes is pretty straight forward, simply cut a piece of mat board to fit and wrap with the fabric of your choice. Usually this will be secured with some sort of adhesive (I prefer a spray) and then you’re done. Bringing the material up to the sides was a different challenge and very little was found on the net so I’ve created this tutorial showing how I completed this task.
 The felt I’m using is 100% wool and is superior to the synthetic variety you’ll find at most “big box” craft and fabric stores. You can purchase this from FeltonTheFly who has an Etsy shop; here’s a LINK to her store. When doing something new it’s always wise to start with a trial piece. In this case some white felt from Hobby Lobby became my pattern piece. You can see the general shape in this picture.
 One thing that helps with this process is to use a cutting mat and a rotary cutter. For most of my other work I use a box cutter and scrap of plywood to cut the material on but borrowed these from my wife. The mat doesn’t dull the blade and the rotary cutter won’t pull on the materials. When this is put into the box there was a lot of waffling as you can see. This is solved with a piece of mat board cut to fit inside the bottom giving you some structure.
The mat board piece for the bottom should slide in and out of your box easily. Unless you’re lucky you’ll be making a number of trial fittings so you want that to go in and out of the box without too much hassle. Although the distance from the bottom of the box to the top edge is almost 2 3/8″, the felt needed to be about 1/8″ less. The mat board is already attached to the felt with some double stick tape. I’m using a Scotch brand product designed for the picture framing industry. You don’t want to use the foam type or the product designed for scrap booking.
 You’ll find that where the felt meets in the corners there is too much material and it won’t lay flat. To solve this, cut a very slight wedge shaped piece from the felt. My guess is that the exact amount you’ll need to remove will vary with the thickness of the felt. It tapers to the top of the piece, you can see how thin of a piece needed to be removed for this project. Here’s where that rotary cutter is ideal, using an X-axcto knife here just tears the fabric. Trial and error, only the front and back pieces needed to be tapered for this project.
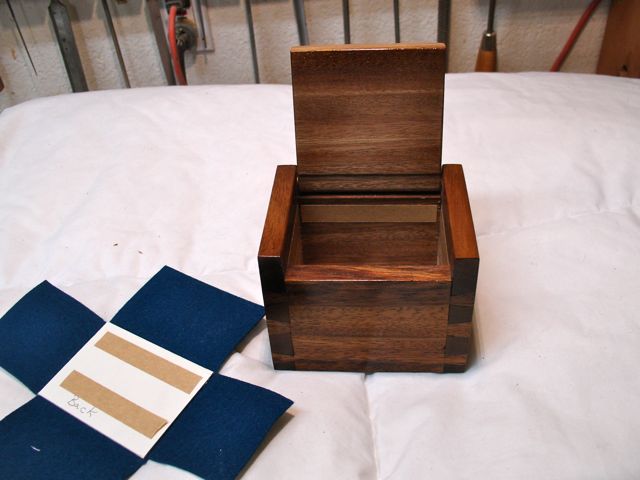 Once the felt fit correctly, two pieces of the double back tape were applied to it. You can see too, a line of tape applied to the inside of the box that is just slightly below the top edge of the felt. Only remove the backing from the tape applied to the mat board as you begin to slide the piece in position.
-

- Try to push into place evenly.
-

- Bottom seated in the box.
After your felt is securely attached to the bottom of the box it’s time to do each side. This box is pretty small so I wished my fingers weren’t so large! Start by peeling the backing off of one side at at time and pressing the felt onto the tape. There is a little bit of “wiggle room” since the felt and tape both have a bit of give.
 If you press the tape firmly against the box sides, removing the backing is not a problem. Work your way around the box, smoothing out any wrinkles as you go. The final step to this was covering the underside of the lid. Tape was placed around the perimeter of it and the backing removed one strip at a time to avoid any wrinkles.
Next thing you know — you’re done!

OK! So, NOW there’s something good about lining a box on the net.
Thanks for the tutorial!
LikeLike
Thanks Bob, it was a challenge and I was concerned about how the inside edges would look but pleased with the results. The positive comments I received from my client confirmed that it met his approval as well.
LikeLike
Pingback: Applying Felt on Box Sides — not just the Bottom! | Woodworks by John
I bought a flocking kit from Rockler and love it! No more worrying about cutting and applying felt. Of course, its not as soft as felt, but comes close. Though most of the time I try to make the insides visually exciting with exotic hardwood, so flocking or felting the inside is not something I want to do.
LikeLike
Haven’t flocked in a long time! Like you said it’s a shame to cover up the beauty of the wood plus it’s not as forgiving as felt. The first convo I had with him he wanted a padded box but that’s something I haven’t tried before and not too sure I want to take on.
LikeLike