
Well, this project will go down as one that really had me thinking things through even more thoroughly than usual. I tend to be very detail oriented and have been told I even pre-worry about things — guess that explains my bald head! In my last post I mentioned how sliding lid boxes generally have the lid groove in the pin board but this one has it located in the tail boards. Figured that one out but today’s wrinkle is having to cut the center out of the bottom board to allow access for the bell mount.
 Let’s talk about today’s progress. I’d like to keep working on the project but am forcing myself to let the glue dry the 24 hours the directions call for. You’ll understand my wanting to have the optimum strength as you read through the post. The first step was to cut the groove for the sliding lid. I love using Lee Valley’s Box Slotting Bit to cut the groove for box bottoms and lids, it simplifies the process. It’s a matter of clamping the box together and running the bit on the inside of the box. I generally do it in two passes. Notice all of the markings on the tape to identify the proper sides. I wanted to be certain of the orientation of each of the parts.
 The lid will slide in from the top of the box so after cutting the slot, I used the slot location to trim the Walnut piece with a saw. This is followed by carefully planing to the required width without planing on the finger joint. Notice I even wrote “cut off” with a sharpie to keep myself organized.
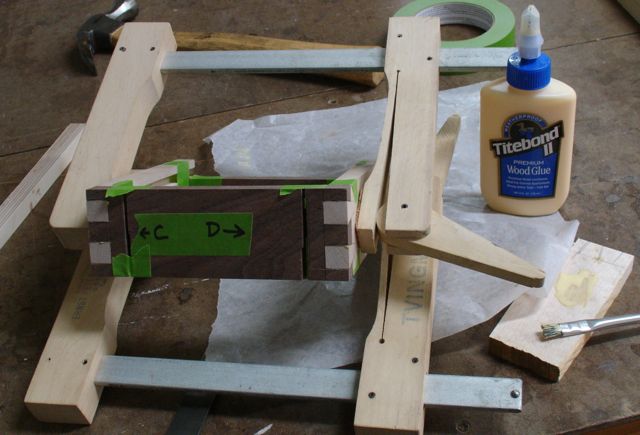 Now it was time to assemble the box. Generally speaking, liquid hide glue is my glue of choice for dovetails and finger joints. It has a longer open time and does not cause the wood to swell up making assembly difficult. However; this box is going outside so an exterior rated glue is called for. To make the glue easier to work with I heated it to reduce the viscosity just as you do with the liquid hide and it worked! The glue spread on easily and the joint went together without a fight. Look close, see that cut line about 1″ in from each edge on the Walnut piece? That was yet another concern. The piece labeled C-D will be the bottom of the box and the area between those partially cut lines will be removed after everything is assembled. I figured I need the strength of that piece to clamp everything securely so partially cut through to guide a dovetail saw after all is in place.
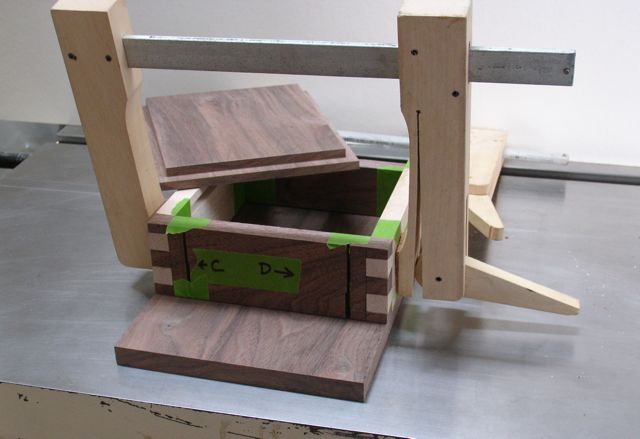 I’ll need to fine tune the slot and the lid but I was able to cut the lid to rough size. As much as I’d like to do that today it’s wiser to wait for the glue to cure completely. The sliding lid will have a half circle with a radius of 2 1/8″ cut from the bottom of it to show off the beautiful casting of the bell. It’s placed on the piece of Walnut that will be the mounting board.
I’ve been thinking about the best way to mount the box to the board. As you can see, there is very little area at the bottom after the center is cut out. The dovetails are tight so I’m thinking it’ll be safest to not put any screws into the short piece of Walnut that will remain. Another consideration is wood movement, not a problem here in the desert with single digit humidity but this is going to Oregon which is known for its rainfall. I’ve decided to go with stainless steel, sheet metal screws in oversized holes. Why sheet metal rather than brass wood screws? There’s no taper with them so I’ll eliminate the possible risk of the 1/2″ thick side splitting as the screw is turned in. I’ve had that happen even when using a tapered drill bit. The oversized hole will allow for some wood movement and with a sparse amount of glue should eliminate the possibility of the mounting board splitting. Of course, it is wood and will have a mind of its own but hopefully this design will give my client years of enjoyment.
