
The last custom order I received from my Etsy store was one that involved primarily hand tool work. The only power tools on it was preparing the rough stock for the dovetail joinery. This latest order is almost a direct opposite as it will be primarily power tool work. Each type of work has its own set of technicalities and procedures. Whereas the success of the hand tool work relies, to a large extent, on my ability to control the tool being used machine tool work relies on how well I’m able to set the tool up to perform the work.
I mentioned this project briefly in a previous post, it’s a request for a black dyed box that will open similar to a shoe box. Lucky for me, this client hasn’t been in a rush for it because I wanted to experiment a little to make sure I could produce what she wanted. She had sent me a picture of what the box should look like along with the dimensions required. I had some black dye that I used on one of Diane’s picture frames but wasn’t sure how it would work on the ply. Well, to shorten up a long story I built an example, sent her the pictures, she approved of it and ordered the box. Like I tend to do whenever I receive a custom order is to make several of them of various sizes to add to the stock on my store. I’ve experimented with using Mixol universal tints with clear shellac and some of these boxes will be finished that way. But first, all of the pieces needed to be cut to size.
I’m using 1/2″ thick Oak plywood that is good both sides and has a plywood core. I’ll be making an additional, six boxes besides the custom order one. The process begins by cutting the plywood to the required width. Next, a sled is used on the tablesaw with the blade tilted at exactly 45 degrees for cutting the pieces. I’ve been using one of those electronic angle cubes to set the tilt on the blade and find it’s easier than using a combination square. Here’s a tutorial set of photographs to illustrate my process:
-
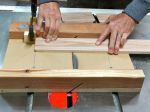
- Stop block set for longest piece — cut it.
-

- Piece is flipped over to have miter cut in the proper direction.
-

- Spacer block is put between stop block to cut the shorter piece.
There are a couple of things I’d like to point out. First of all, as each piece is cut I lay it out in order so that when the box is assembled the grain direction of the face veneer will be continuous around the box. After experimenting with various ways to mark them I’m finding that painters tape and a sharpie work best for me. Pencil is okay but sometimes it’ll stay in the grain of the wood only to show up when the final finish is applied. Grain will be an almost perfect match on three of the four corners with the last one being very close. This sled set-up is one I’ve shown before but if you haven’t seen it the spacer block is the difference of the length between the long and short sides of the box. As an example, if you were making a box measuring 5″ x 8″, the stop block would be set at 8″ and your spacer block would be 3″. Works very well for me!
After all of the pieces are cut to length they need to have a kerf cut on the mitered edge to accept a spline. I have some mahogany plywood that just happens to be the same thickness as the kerf made by a Tenryu blade — lucky me! The stop block locates the position of the spline and the blade is adjusted so that it cuts about 1/4″ into the edge. The splines measure 7/16″ wide which allows just enough room for glue and some adjustments if needed.
-
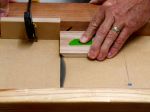
- Mitered edge being cut, note the stop block.
-
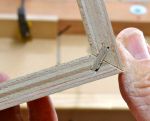
- Test fit of spline into the saw kerfs.
-
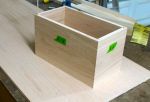
- Custom ordered box dry fit together, note tape with markings used to keep grain continuous.
Next step will be cutting the pieces for the top and bottom of the boxes. Here we’ll be using that L-Shaped fence on the tablesaw to cut rabbets all the way around them so you’ll be able to see how that works out.

One day, I’m going to dust off my table saw and give this a whirl. Nice explanation of technique.
LikeLike
Pingback: Floating Nightstands with Box Miters - Next Project