
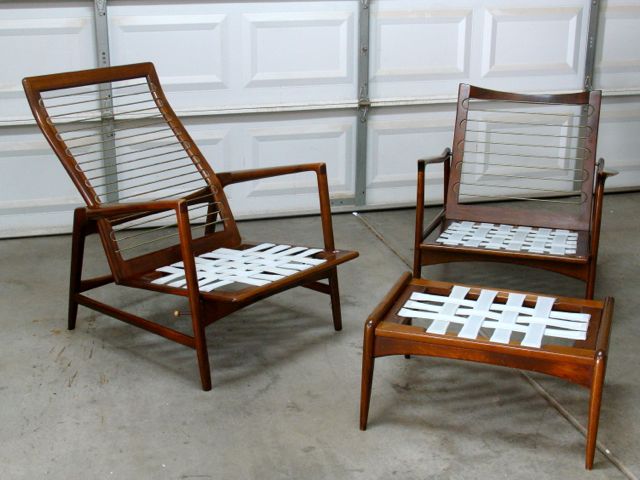
Refurbished, Re-Strapped, & Ready to be Returned
In my first post regarding these Danish Modern chairs made by the Selig company I gave a little bit of the company history. This set, consisting of a recliner, chair, and ottoman were entrusted to me for refurbishing and they are now complete. When you think of how long ago these chairs were originally made in Denmark and the fact that they’ve been in use since the 1950’s their condition is amazing.
During the time I had them I learned quite a bit about their construction that I’ll share with you now.
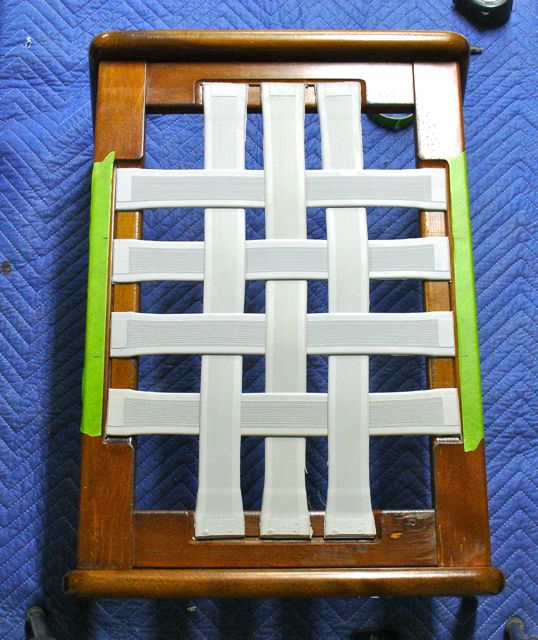
The first unique thing about these chairs was the webbing system. The initial plan was to make a wooden frame to insert into the recess and then use conventional webbing to make the seating more comfortable. They had currently had plywood pieces tacked into the openings. After some research I discovered the Evans Company that still imports the original, Fagas Straps used by the Selig company from Denmark. Of course, when I first started doing the research I had no idea of what a Fagas strap was.


Ottoman
The Evans Company imports many different sizes and each strap is marked with their item number. Wisely, when I made out my order I noted which straps go to which piece of furniture. I was anticipating a lot of arm work but it wasn’t too difficult pulling them tight and snapping the angled clip into the slots. There was some friction to overcome as they became interwoven, the rubber tending to grip together. Marks were made on some tape to get the spacing as even as possible.
Chair Joinery
The way this chair is put together is pretty interesting! First of all, the curved back on the recliner is laminated. I would have expected to see thin pieces laid up following the width (2″ or so) of the chair but instead it appears that pieces were cut from some 1/2″ thick material to the shape of the back. These were then laminated together to form the curve, five of these are used for each side.

Reclining Mechanism
The reclining mechanism is interesting as well. We’re used to seeing recliners with springs to move them into a position that’s comfortable. This chair has a lever on one side, when you move it a pin retracts out of a series of holes drilled into the bottom of the seat. The holes are on both sides of the chair bottom and tied together with a rod attached to the inside of the front stretcher. The chair is able to slide back about 6″, you can stop at any position. The back pivots and is connected to the seat with a piano hinge and that’s how you adjust the angle of the chair. The mechanism works only when you’re sitting in the chair, it seems to need the weight to operate smoothly.
I was trying to understand how this chair was assembled. Traditionally I would have guessed mortise and tenon — that would be my approach. However, the members are so thin and delicate that strength could be an issue. Add to that the fact that there isn’t a square surface to be found and mortise and tenon joinery becomes more of a mystery! I found the secret somewhat accidentally. The only looseness I found was on the recliner which would tend to make sense because of the moving parts. What was strange though is that the loose movement was up and down rather than in and out. You would think that a loose joint would move in and out, not up and down! What I discovered can be seen here in these photographs:


As you can see, these chairs are put together with keyhole brackets, something still used today. A common application would be to attach wall brackets, shelves, mirrors, and even cabinets. Here’s a LINK to Rockler Hardware which carries them to this day. The one side that was loose on the front stretcher was the one I wanted to tighten up since it affected the operation of the reclining mechanism. I was able to lift it up just enough to get a screwdriver in there to tighten those two screws slightly. It did take a bit of trial and error to have the screw protrude just the right distance and achieve a tight fit. The rear is a different story, the screw hole itself is worn out so the screw wouldn’t tighten properly. I suppose it could be completely removed so you can drill out the hole, put in a dowel, and then re-drill for the screw. I imagine that assembling these chairs is somewhat like that proverbial Chinese Puzzle, the pieces probably need to be loosely assembled to one side then carefully aligned with the other side and nudged into place. Probably take a couple of people to do that properly so my choice was to “leave well enough alone”; the chair is pretty solid as it sits so I’ll leave it be.
Glad I took on this commission although it’s not in my area of expertise. I’ve found that no matter what you take on you’re bound to learn something along the way and this project proves that out.

Hi John,
a very interesting blog post. Particularly the company search.
Thanks!
Volker
LikeLike
I’m about to refurbish my father’s recliner and ottoman. Years ago he replaced the straps by stapling elastic straps to the frame. I wish he had not done so. At the same time he reapolst r ed the chair with some awful ’80s fabric.
I’m going to order the proper straps and get new apolstry and possibly foam. For the most part, it’s still in very good shape for its age.
LikeLike
Hi Chris, the straps aren’t inexpensive but they will bring the chair and ottoman back to it’s original glory! My client had her cushions completely redone and loves the results. Glad my blog helped you locate that company that still sells them in the states.
LikeLike