
I’ll start out by saying how impressed I am with the packaging and directions that came with the saw. I’ve already mentioned how Woodworker’s Emporium here in Las Vegas provided free delivery, free installation of the optional mobile base, and cut the rails for me at no cost so I can mount the sliding table when it arrives. I know I’ve mentioned it before but they are just another reason I prefer to shop locally and from “mom & pop” types of businesses whenever I can. So, on to the SawStop!
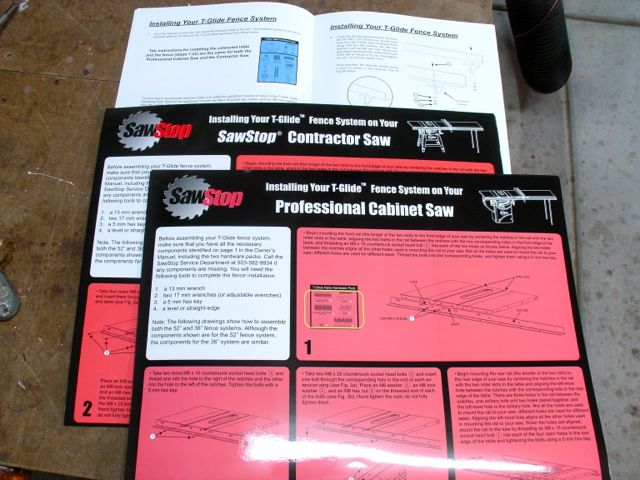
I’ve already mentioned how impressed I was with the packaging, now let’s talk about the instructions, check this out:


The manuals are full color, printed on thick, glossy paper, and spiral bound so you can lay it open flat. The hardware is packed in a blister pack and is identified by the size and type of fastener plus the step number of the written instructions. They have all of the needed information on setup and trouble shooting plus parts breakdowns of all the components. Also included is an assortment of allen wrenches used for the assembly. There is a separate, 33 page manual for the fence system and table extension. Oh yeah, almost forgot the another manual for the mobile base, not glossy but good none the less!
I took my time and got top end of the saw assembled yesterday and left it ready for this morning. I had one slight panic moment when attaching the dust port to the saw, I realized that I left my connector on the Jet and it’s now long gone — luckily I thought I had an extra one hidden in a cabinet and I was right! It’s the FazLok system that allows me to connect the dust collection hose from one machine to another without the hassle of clamps. Glad I remembered that spare, hate to have to order just one!


Today found me ready to assemble the rest of the saw. It went pretty well but there were a few “no duh” moments! As complete as the directions are, they can become overwhelming. In addition to the manual there were a couple of large, fold out, laminated cards to enhance the process. My first “no duh” moment came with using them. In the manual the difference between the contractor style and cabinet saw is pretty clear.
Read the Fine Print!
However, the cards; not so much. If you look closely, the two cards look pretty identical except one says Contractor the other Cabinet. I was reading the manual for the Cabinet style and didn’t realize I had the contractor card at the saw. Nothing made sense, holes and bolts that seemed clear in the manual didn’t correspond to the card I had at the saw. I called their customer support to help clear the air. While I’m on hold I discovered my error but hate to admit it — it took me a while. Let’s blame that on senioritis shall we? Customer support answered promptly (another plus for SawStop) and I sheepishly explained the purpose of my call. He told me that it’s a pretty common call they get and they need to figure out how to remedy that. My remedy was to throw the cards away and simply use the manual, it’s easier to read anyway.
The other “no duh” moment came when I was putting the rails and T-Glide fence system together. There is a cursor to on either side of the fence and the directions say you use the right one when the fence is on the right side of the blade and the left one when the fence is on left side of the blade. It finally dawned on me that since my rail had been cut to accommodate the future sliding table I can no longer use that left side cursor since the scale has been cut off of the rail. Am I getting rummy?
Aligned, waxed, and ready for work — almost!
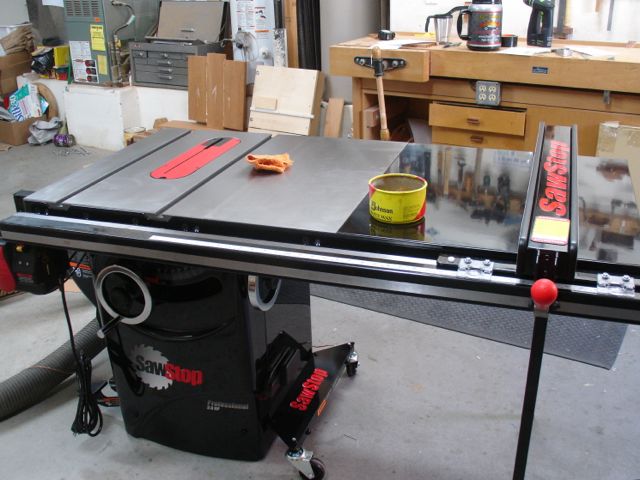
After the rails were attached loosely it was time to align the entire assembly. Once that was accomplished a coat of wax was given to everything except for the cabinet itself, that would be overkill even for me! I do usually wax the top of my machines a couple times a year and am careful to never place cups or sweaty hands on them. While the wax was drying I gathered up all of the packing material, glad tomorrow is our recycle day because that would be a lot of stuff to keep around! Also have some extra nuts, bolts, washers, etc. so will keep them in a baggie. I’ll probably need some of the hardware to install the sliding table. Now it’s time to check this saw out.

Height is identical to Jet
The first thing that has been pointed out from my Facebook post is that the saw seems to be much smaller than my old one. Well, not having a left extension wing and reducing the out feed table to 36″ rather than the 52″ of the Jet does make a difference. The top is 27″ deep compared to the Jets’ 29″. It also appeared to be lower but I’m going to say that the black color is the reason for that illusion! You know how they say black is a slimming color. You can see in this picture that my out feed/assembly table is the same height as the saw which proves both the Jet and the SawStop are the same height.
The guard is a beautiful piece of work but after 50 years of using table saws, usually without one I’m not sure I’ll use it very often. Maybe when doing a lot of ripping to help contain some of the sawdust — it just seems to be in the way! Many years ago I wrote a blog about this subject and showed how I modified the Jet guard/splitter assembly to allow me to have the safety of a splitter without the hassle of the guard. Basically by cutting a part of that guard assembly to make a “fin” that projected up about 1/2″ I had a fixed splitter without the hassle of the guard. The problem with that was that I still had to physically remove that modified splitter to make dados and grooves. Most saw manufacturers are now incorporating a riving knife which raises and lowers with the blade. That’s what I’ll be using the most on the SawStop.


In the 70’s, as a carpenter we’d just cram a 16 penny nail into the kerf as we ripped boards with our Skilsaw but I’m sure OSHA would frown on that practice!
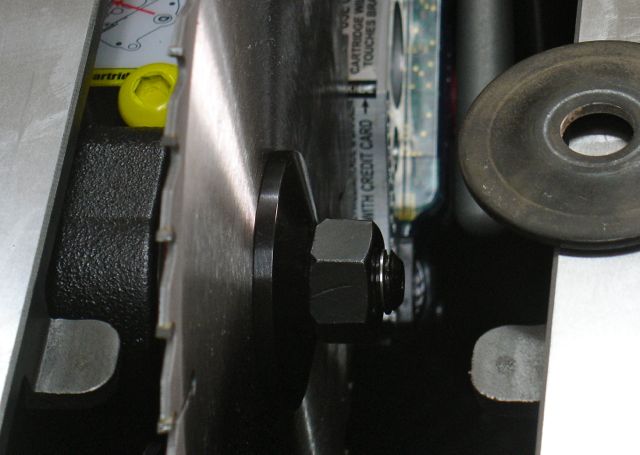
Difference in blade washer/flange thickness
Another feature I really like is the thickness of the washer securing the blade to the arbor. An issue I had with my Jet is that this washer deformed in time which created a slight wobble in the blade, you can see the difference in this picture. I ordered a couple of the Jet washers and that’s on the top of the table.

Delta Tenon Jig
The last of the concerns I could think of was whether or not my old Delta tenoning jig could be used on the SawStop. At first glance it seems as if there is ample clearance between it and the blade. I recall modifying it to fit the Jet so I’m sure I can do that again if needed.
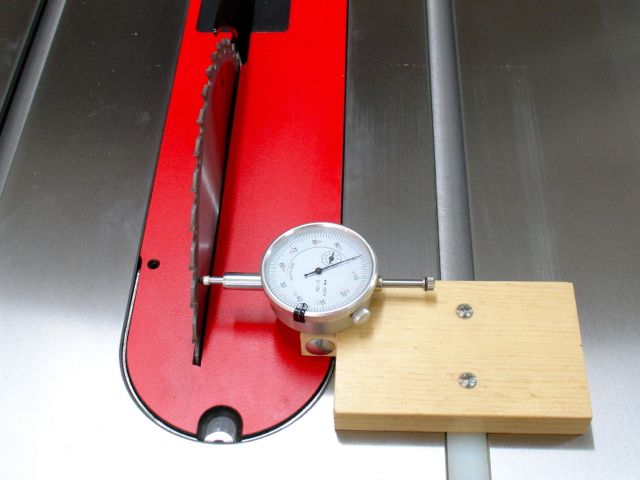
Checking blade run-out
After adjusting the fence and the indicator it was finally time to make some cuts and I’m liking how it works! The sawdust collection is more efficient due to the placement of the hose and collector right by the blade. Most other saws simply allow the sawdust to fall into the bottom of the cabinet and be sucked out of the bottom. A friend of mine asked about the blade run out so that was checked with a dial indicator and showed about .001 difference between the front and back of the blade. The blade that came with the saw is acceptable but doesn’t compare in the quality of cut I get with my Tenryu Gold Medal series blades. I’ll keep it for rough cutting and construction type projects.

SawStop with Sliding Table
All in all, as far and as much as I’ve done with this tool I’m impressed. The final evaluation will come when I get that sliding table and put it through the paces. It may be a challenge to reconfigure the shop to accommodate that but what’s life without challenges!

Love the riving knifes on my bosch contractor saw. That is a pretty saw stop! If I only had the room :).
LikeLiked by 1 person
Great review John.
How does the safety system really works? I’m quite amazed of the technology this days. How about the assembly process? Does it need a another hand or a its a one-man-job? And judging from this pictures the aluminum wings looks flimsy, Is it?
LikeLike
James, first off those wings are very heavy cast iron construction and beautifully machined. Total weight of the saw is close to 400 lbs. so really substantial. As far as assembly I covered that in my blog — very well illustrated manual and parts organization. My wife helped hold a straight edge when I leveled the wings and extension table but other than that doable by one. If you go to SawStop’s website or YouTube there are many video’s on the safety system, we did it at our local woodworking group and it’s impressive!
LikeLike
I’m jealous! I don’t think there is anything more exciting than getting a new tool! Well…maybe one thing but at my age… I remember using Jamie’s and they are great. I have a 1983 or 4 Delta Unisaw and the SawStop was far superior.
LikeLiked by 1 person
Pingback: SawStop One vs. Finger Three — stitches that is! | Woodworks by John