
Having a somewhat limited size shop means that you need to be creative in your space regarding tools and placements and even whether or not you need that tool or if something else can suffice. That’s my feelings towards a dedicated router table. Knowing that the majority of my work uses hand powered tools and I’d rather use a beading tool to scrape a bead than a router anyway! I do use the router extensively for box making with the Lee Valley slot cutting bit though so it is a tool I use. 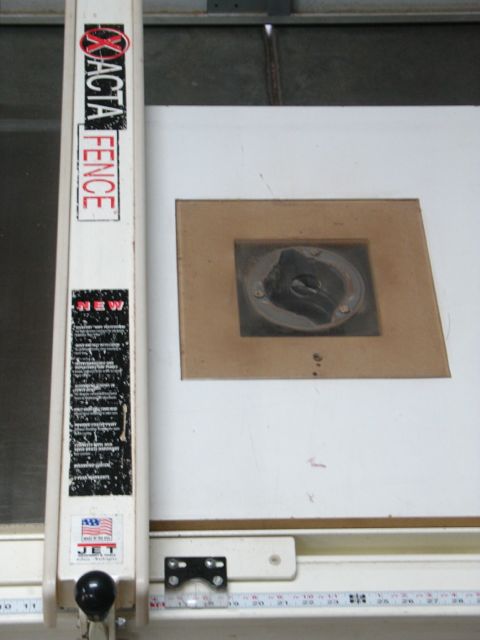 As you know, I recently replaced my aging Jet cabinet saw with a SawStop with sliding table. I needed a way to have a router table in my new set up. At the left is how I made one to fit the Jet. What I did was to attach a Porter Cable base to a 1/4″ piece of plexiglas. A recess was routed into the table board of the saw to insert the router. The advantage to this is that the bit could be adjusted before dropping the router into the hole. A disadvantage is that sawdust tends to work its way under the plexiglas which results in an uneven table to push your materials on, it also would interfere with the fence. Then there’s the visual, I mean sure it’s a tool but that’s a rather unsightly looking hole. Have you seen the shiny black finish of a SawStop? I just couldn’t bring my self to cut a hole into that beautifully finished “tool”!
Here’s how I went about it for the SawStop. The table itself has some reinforcements underneath so I made sure the router would clear those. I also wanted to have ample room on the fence guide bars to use the fence as a guide when needed and attach the auxiliary fence I had made before. The Porter Cable base mounts with 3 holes so masking tape was applied to the top, the base was positioned squarely, holes were center punched and then drilled out. The screws are 10/24 and a hand countersink was used to set them flush with the top.
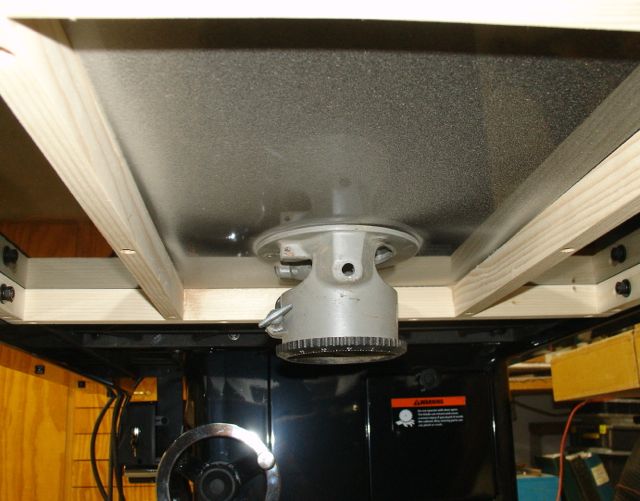
P/C Base Mounted under the SawStop
With the help of my friend who crawled under the table and guided the screws into the holes, the base was secured to the underside of the table board. We made sure that the clamp to tighten the router is at the front of the saw. That’s the end of the first step.
Dust Control & Making the Hole
Next up was to get the hole started for the router bits. Started out with a small, V-groove bit and slowly fed it through from the bottom. I used progressively larger diameter bits to enlarge the hole until it is now 1 3/8″ in diameter. This created lots of dust which was controlled to some extent by clamping the vacuum to the fence.
Here’s a few pictures of the finished process, the fence is one that was made many years ago that really works well. It measures just under 5″ square and is made of MDF. There is a hole at one end (2 1/4″) which fits my shopvac hose. Inside there is a baffle and it’s pretty effective in taking the bulk of the sawdust from the work. It’s reversible and held to the rip fence with some clamps from Rockler. It can be adjusted easily by using the tablesaw rip fence as a guide when you use bits without a bearing. With a bearing guide bit it eliminates the need for a starting pin.
If you use this to create your own router table there are a few considerations. Since the table board is about 3/4″ thick and the bottom of router bases is only 1/4″ or so that effects how deep of a cut you can make. I’ve had problems both ways in the past. Some bits are so long that with the 1/4″ plexiglas on the Jet it wasn’t possible to make a very shallow cut. Others are so short you may not be able to get the full depth you want. Time will tell how this will work out for me. That’s the nice thing about creating your own tools and set-ups — you’re the Boss!

Pingback: SawStop Sliding Table Jig and Other Shop Happenings | Woodworks by John
Pingback: Drawers Continued — Bottoms and Sliding Dovetails | Woodworks by John
Hi nice reading yoour post
LikeLike