
Tired but happy is the best way to describe how I’m feeling at the end of this long day. You can see in these two pictures that the Armoire is virtually complete, all that remains is the back and bottom dust panel.


Here are the remaining items on my “pick-up” list that were accomplished Saturday:
Drawers and Drawer Bottoms: This began with the classic “wax in, wax out” as the shellac was rubbed out. After sanding between coats, shellac usually still looks kind of rough. My technique is to use Liberon Black Bison wax with a super fine, white scotch pad. I like the finish it leaves behind and the smell of that particular brand of wax.


Once that was complete it was time to fit and install the drawer bottoms. They are made of glued up panels of Alder. First step was running a piece of 1/4″ MDF through the groove to make sure there weren’t any rough spots or glue. Some adjustments were needed and easily done with a Stanley #78 rabbet plane. The hole for the screw used to secure the bottom was made with a gimlet and the screw is tightened just enough to where the washer can spin freely.


Top Panels: Both of these are secured to the cabinet through over-sized holes using brass screws and washers. The front screws are fairly tight while the back ones are loose enough to allow for any seasonal movement. Pretty straight forward but when it came time to locate the holes for the upper one the distance was too much between the bracket and the top to be accurate with a scratch awl. Here’s a new marking tool I recently found during the AWFS convention here in Las Vegas. It’s called a Pica Dry pencil and is available from Lee Valley. A sales rep for Festool was using it and since it’s the same color green as their tools thought is was one of theirs. He told me what it was so I added it to my hardware order. What I like about it is that the lead is water soluble and also comes in colors. It also has a built in sharpener. The only thing I need to get used to is using less pressure as the lead is pretty soft. It’s always been a problem erasing pencil marks but with this being water soluble that problem is gone! They also have red and yellow colored leads which should be more visible on darker woods.


Thankfully my mind was working and I didn’t attach the top yet — I’ll explain later on in this post.
Drawer Pulls: The hardware I chose for this piece was ordered from Lee Valley and it is their Blackrock series. I like the somewhat Asian flare it gives to the otherwise Shaker inspired Armoire. I know there are any number of hardware installation jigs available but the Dutch in me always has me making my own. Really pretty simple, I use a piece of 1/4″ MDF centered between two other 3/4″ pieces that have been grooved to accept it. There are 4 different sized drawers but with this set up you simply flip it over to mark the two sides of the drawers, the picture below should clarify what I mean. Does take some math work but that’s easy enough!


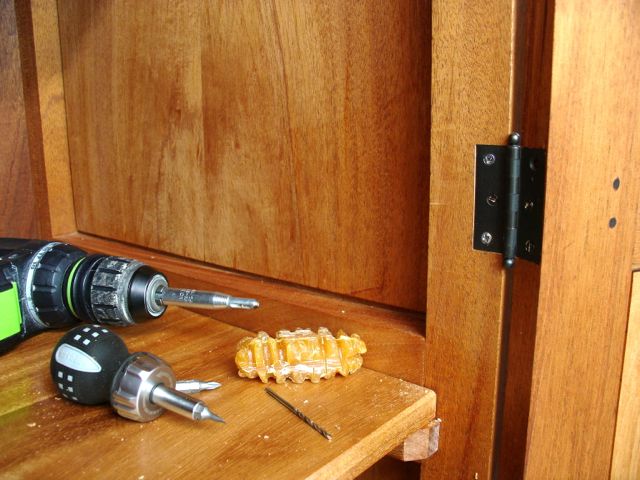
Hinge installing tools
Hanging the Door: I covered this in my previous blog post so won’t go into too much detail. I was very careful and ended up using all the tools you see in this picture. Horton Brass supplies you with steel screws to fit the hinge and then brass screws for the final installation. To keep a period look to the Armoire I specified slotted screws. I needed to first locate them carefully with a Vix bit, then drill the hole deeper with another bit, finally beeswax to make things go without breaking the tiny brass screw. One screw at a time, then check to make sure the door swings freely. Definitely not a mass production process!
Double Ball Catch: I really like to use these, again; these were ordered from Lee Valley. Remember I was going to put the top on earlier but thankfully, my brain was still engaged and I stopped myself. I’ve used these on double doors where you can get into the interior of the cabinet to position them — hmm; only one door here! What I did was install the top catch first since I could get in and mark the locations. Once installed a small combination square was used to transfer that location to the lower latch. Also used the technique illustrated on page 94 of Taunton’s book on installing hardware. They used double back tape to position the catch on the door.


That’s it for now, all that remains is the backs and bottom dust panel. I think it’s now officially wine time!!

Hi John,
don’t hurry – the next cabinet is waiting for you 😉
It is a great work, you have done.
All the best
Volker
LikeLiked by 1 person
Thanks! I may have an order for two, dovetailed boxes. It will be a nice break to do something in 5-7 days rather than months.
LikeLike
Beautiful work. The design and wood color are excellent.
LikeLike
Gorgeous!
LikeLiked by 1 person
Pingback: Wenge + Spalted Maple = Dovetails and Pegs? | Woodworks by John