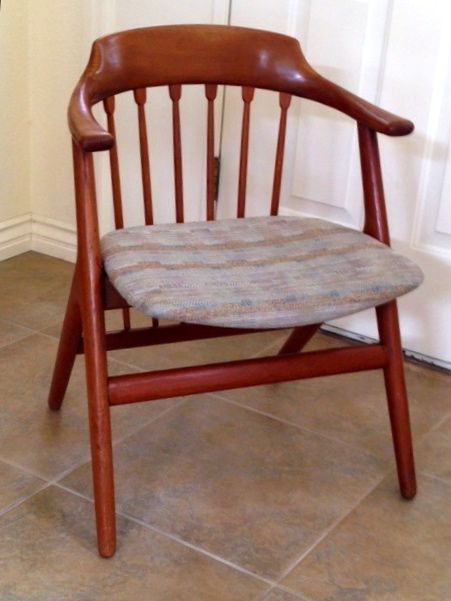
Teak Chair Repaired
In the first write up about the repair work I’m doing on this chair, I mentioned how much I was learning and now that I’m done I’ve gotten more knowledge about; eh, let’s call it early mid-century furniture production. Here is a picture of the chair now that it’s done. Re-assembly was with Old Brown Glue, my favorite brand of liquid hide glue. As I’ve mentioned in the past I like the fact that it’s made in America, allows a long open time, and; if the need arises the chair could be disassembled. Hopefully that won’t happen but at least you won’t have the problem of trying to take apart something assembled with PVA glues or some other type of modern adhesive.
If you look closely at this chair you’ll notice that the stretchers and legs are obviously coped to fit together. There are single dowels for the leg stretcher as well as the ones attaching the arms to the legs. The formed spindles making up the back were all intact and appear to be mortised at the top and simply drilled for the bottoms. Thankfully they were all intact!
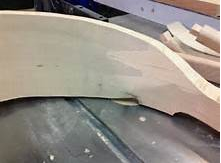
Example of Joinery
The large piece that supports the seat has three dowels at either side. These reinforce the leg structure where the front and rear legs are joined. Just like the back and armrest assembly, they are assembled with a tapered finger joint. Here’s an example of how this joint is made. Due to stresses, as I pointed out in the first blog, there is some cracking along this joint and the fingers are smaller; a few appear to be broken but …… they are holding now. There’s really no fix for that other than remaking the entire piece.
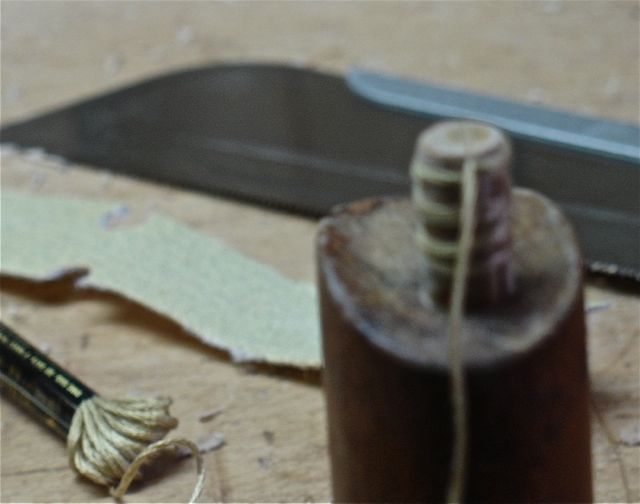
Cotton string on Dowels
Another observation I made was that the stretcher holes appeared to have been distorted as people sat and moved about in the chair over the years. My solution for that was to wrap them with some cotton thread to “fatten” them up. Cotton will absorb the glue, expand, and tighten that up. After cutting a shallow kerf in the end of the dowel to secure it, several turns of the string were wrapped around then brought back into the kerf to lock it in place. I experimented with some 3/8″ dowel stock to see how many winds of string I could use and still be able to fit the dowel into the existing hole.

What’s first?
Well, let’s get this project assembled! You should always do a dry fit first but I really didn’t want to chance clamping things up and then breaking something else in the process of taking it apart again. The desert climate isn’t kind to wood and things do tend to dry out and become brittle. There are half a dozen pieces held together by a dozen dowels and another dozen mortise and tenon joints. Some how or another they all need to be glued and assembled at the same time! I would have loved seeing the jigs used for that in the factory where this chair was made. It’s obvious that there was some misalignment during the process because of the way the coped joints on the legs and stretchers have uneven marks telling me they were forced into place and clamped up pretty tightly during construction.
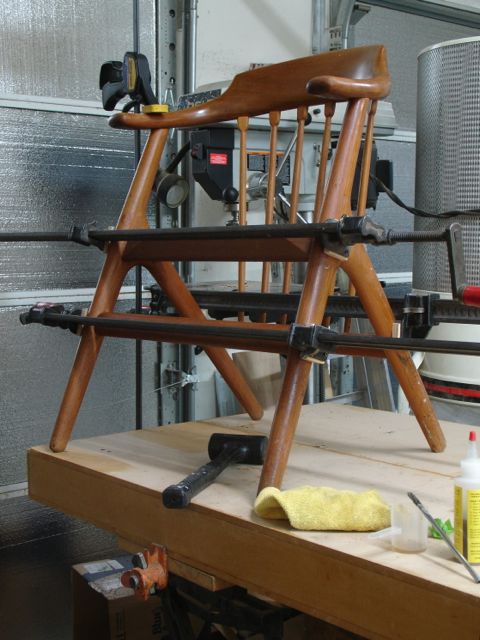
Assembled!
Well, I don’t have the jigs and lots of helping hands so once I came up with the game plan proceeded with it as quickly as possible and here are the results. Not only is the chair clamped together I also clamped it to the assembly table to make sure all four legs are square to the floor. One of the trickier parts was aligning the coped joints of the stretcher to the legs. We’ll let it dry over-night and we’ll see what tomorrow brings.
As I removed the clamps I listened carefully to see if there was any cracking or other unwanted sounds as the clamps were released and the glue did its job, happy to say all went well. I’ve found that by using BriWax and a white scotch pad the surface will clean up nicely without removing any of the patina that has developed over the years. After that I wanted to bring it into the house. Diane noticed what an interesting and un-chair like profile this chair has. It’s very upright, the only support for the seat comes from the large crosspiece between the two leg assemblies. For the sake of comparison I photographed it next to my original design dining chair. This chair is one of set of six. I entered it into the Design in Wood competition in 2010 and was awarded an Honorable Mention.


Everything seems to be in good shape. When you compare the two chairs you’ll notice how closely the legs are spaced on the Teak chair and also that the seat is a bit lower. Mine is at just about the max height for a dining chair and works perfectly under our table. Chair design can be challenging, the height had to fit my 6’2″ frame as well as Diane’s 5’4″ one. My client has seen the pictures of the chair and is currently out of town but will pick it up Monday. I hope it gives him many more years of service.
