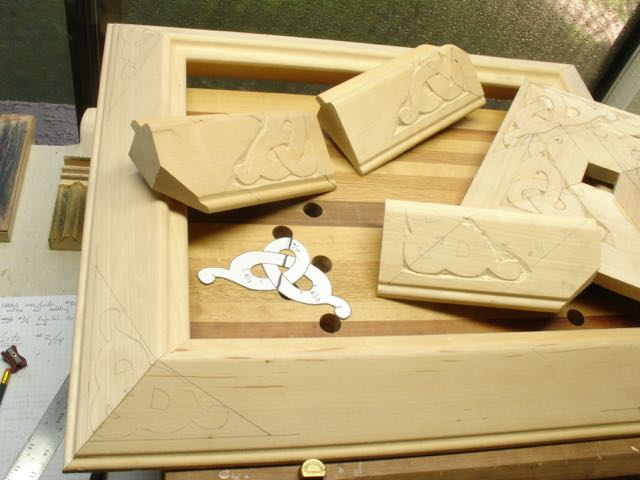
Celtic Knot Practice
Frame designs are chosen for a couple of reasons but one major one is so that I can develop different carving skills. A fairly common theme would include interlaced patterns like those found in Celtic designs. I have a friend, Mike Cook, who does some of the most intricate and beautiful Celtic designs I’ve ever seen so to “be like Mike” I set out to find one to use for a future frame. Mary May has one in a lesson so that seemed to be the right one to choose for my first. Fairly straight forward and after completing the pile of sample ones you see in this picture decided it was time to stick it on a frame. Now the complication I had seems obvious but until actually putting the design on the actual frame it never entered my mind! Mary May carves this knot onto a flat, solid board. After doing it on some flat stock I also practiced on a cut off from the molding which proved to more of a challenge.
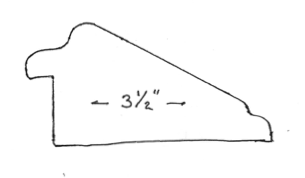
Profile
The frame I chose has this profile and is about 3 -1/2″ wide tapering from almost nothing to 1- 3/4″ in height. Now add the miter to it and you end up with an odd shaped design at the frame corners that resembles two thirds of a pyramid. For patterns I like to use the plastic container material used for salads. It’s easy to cut, flexible enough to press into the coves of a picture frame, they’re thick enough so a pencil traces the edge, and they’re easily flipped over when the sides of a design aren’t exactly the same which is the case here. To make the pattern is easy, use double stick tape and cut it out.


Ready to start
Due to the strange angles at the miter the border around the knot was no longer parallel to the edges of the frame when the pattern is bent over the miter. That problem was overcome by drawing parallel lines for the border. This meant that even though the border is parallel, the knot is angled upwards. In her video, Mary said to treat the outlining of the knot more like a chip carving. Rather than using a gouge to form the radius, an 8mm straight chisel was used to carve around the outline. This was an interesting process, I needed to constantly keep in mind the angle of the cuts in relation to the angle of the molding profile. You can see how the initial drawing looked in this picture. The challenge was to keep the sides straight and correctly angled — that was challenge one!
Next was forming the over/under look and removing the three areas between the loops. Challenging enough on my flat, practice piece but even more so on these mitered and beveled corners. The process was accomplished using the small, straight chisel, a #7 fishtail and a pair of #2, skewed spoons purchased a long time ago and rarely needed — until now! They require kind of a strange angle to cut, made even stranger by the profile of this molding.
I’m pleased with the results. The grain goes in so many different directions it was time to look at it and say “enough is enough!” The real star will be the painting that will eventually find a home in this 14″ x 18″ frame, I just want to add something pleasing to set that painting off in its own little world.
Next challenge — gilding!

Pingback: Share the Completed Frames | Woodworks by John