Mostly Gilded — #9/10 Gouge
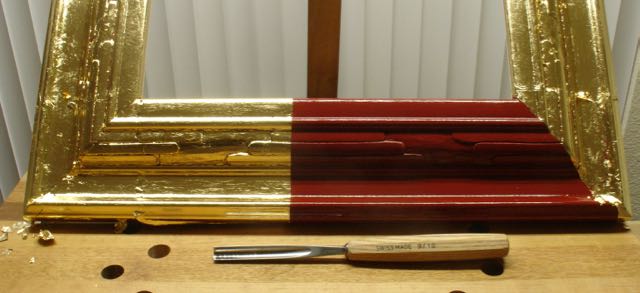
With the remaining, pre-joined frame we brought with us to Scottsdale I wanted a design that bridged Art Nouveau and western style and this seems to fit that requirement. I’m calling it the #9/10 design because that was the size of gouge needed to evenly divide that convex area. The picture above shows the gilding in progress; just a portion of it is ungilded. It was a tricky process between the convex surface, straight cuts, and textured areas!
Designing a carving is the challenge. I wanted to incorporate some sort of repeating pattern in that tricky, convex area of the molding. Looking through the various Pinterest boards at Art Nouveau and Art Deco designs helped to come up with this. If it were in a piece of reclaimed lumber I could see a western, desert type landscape in this frame once completed. This frame is 11″ x 14″ so the short leg was done first. To come up with proportions that were pleasing to my eye, the initial design was drawn on paper. Keeping both sides of the corner the same seemed correct but the center one design was increased proportionally. Sometimes you need to use that math you thought you never would! Turning the two sides into a fraction and dividing; 11/14 gave me about .78 so the center carving was increased by 75% and centered. I think it worked. Here’s a slideshow of the design process:
Now it was time to carve this, challenging to carve a convex surface evenly, I suppose a back bent chisel of the correct sweep would have worked but not having one did the best I could. By texturing the carved out area any discrepancies will be disguised.

Hold, pivot, and never lose sight of the line!
A straight cut is needed where these elements joined the background area the will be removed. A V-tool leaves a valley so that wouldn’t work, I turned to this “specialty tool” I made from an old skew chisel and a golf ball. You can see how it’s held to do outlines for the design, works well for me! When using a knife to make the vertical cuts my hand gets in the way and I can’t see the line, this golf ball handle allows me to hold the tool vertically, pivot easily, and never lose sight of the line. Maybe something like this would work for you too!
Notice that in picture 3, maintaining a straight line with the long bent parting tool was difficult, probably since that surface is convex. Once all of the carving was complete, a tadpole sander with a v-shaped profile was used to straighten it out enough to look hand cut rather then mass produced, production work. After a light sanding the frame was given a coat of red burnisher/sealer prior to the oil gilding process. We have about a week and a half before the lease is up here in Scottsdale and we return to our home in Las Vegas. I plan to at least get this frame sealed with shellac before then, can’t guarantee getting it toned but we’ll see!
