

Alder, corrugated roofing, and heavy duty sliding barn door track — I’m liking this a lot! Not built the way any directions said it should be done but modified to meet the vision I had for the shop storage area. Two, concealed sets of shelving for boxes, paints, tools, etc. and then a center area with drawers for all of those sundry items we need to do our work. The top of that drawer area is the right height for use as a stand up desk. As promised in my last blog I’ll explain how this all came about.
The first problem, if you will, is that this type of track is designed so that you can attach the hardware to the door, slide it onto the track, and then install stops to prevent it from leaving the track. As you can tell in these pictures, my plan has the track between two walls so no way to slide the doors on after the fact. I had thought of trying to lift the track (very heavy) plus the doors into place at one time but with an almost 8′ span decided that wouldn’t work too well. The plan I devised was to pre-drill the mounting holes for the brackets, attach them and the track to the cabinets, and finally put each door in place.
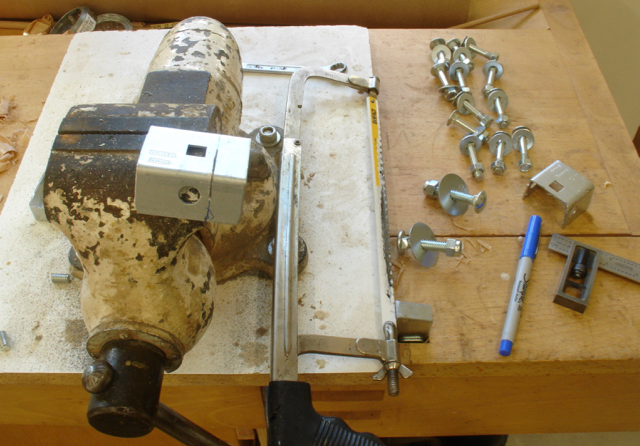
Before the doors were assembled a chamfer was needed to allow the bracket to sit squarely on top. You’ll notice the ridicules set of instructions that came with the hardware. Two pages that covered a bunch of different style brackets. One thing that really stuck out and irked me to no end was that the brackets have square holes which would anchor the carriage bolts provided. However; the directions showed inserting the carriage bolt from the back side which would give you a visible nut on the front. This made no sense to me and even after calling Stanley to speak to their tech guys couldn’t get a straight answer. I can see the problem was that if the bolt is too long it would probably hit the wall.
Can you hack it?
The solution, although not quick; is easy. After drilling a counterbored hole to accommodate the nut and washer on the back side of the door each bolt was cut to length. In my opinion; that’s a much more elegant solution and method then having an ugly nut showing on the outside. Last of all, was to cut a slot for the adjustment bolt. Here’s some pictures illustrating that. The one showing the track with a hanger on one side and the bolt on the other shows the need for the slot. For a typical installation the directions had you drill an oversized hole for that adjustment bolt to fit into.


The next problem was cutting the tin to fit the rabbet of the doors. This wasn’t quite the challenge I thought it would be. Looking on line and at YouTube you’d think it would be darn near impossible. Even tried calling a few, local sheet metal firms to see if they would be able to cut the tin for me but they all declined! I found that an offset pair of Wiss tin snips from Home Depot did the trick. Then it was time to attach it which was accomplished with a four pieces of plumbers tape, stretched tight, and screwed down. I didn’t care for the finish on the tin, just too garish and bright but didn’t want to create a rusted finish either. Check out the picture below, there is a subtle difference created by using a couple of pads of coarse steel wool to mellow out the luster of the tin.


The purpose of the handle is obvious but it also stabilizes the door stiles at the center. My thought is that by screwing the handle to span across the middle of the door that should counter any seasonal changes. The handle was cut on the bandsaw then cleaned up with hand tools.


Now the doors are ready to be hung. After attaching the hangers to the track and cabinet it was a matter of setting one at a time in place. At the right of the cabinet there is some extra space so the plan was to attach the right side door first, slide it as far to the right as possible and then attach the left door. Once both are in place the stops (inside the track) are positioned to set the outer limit of the door travel.


So, there you have it. Now it’s time to go on to the next challenge. All through this project I kept hearing what Diane had told me years ago when it comes to her painting. She told me she has a vision and starts on it until she reaches a problem. Then, she’ll solve that problem and continue work until the next problem comes up — woodworking is much the same but I’d rather face those problems and challenges then follow a set of prescribed plans or, heaven forbid; have a computerized machine do it all for me!

Really clean and practical! Beautiful John!
LikeLiked by 1 person