
In the last blog the table base was in progress. Fine Woodworking had a video series by Gary Rogowski showing the way he built a trestle table which I used for inspiration. As you’ll see, I don’t like to build from someone else’s plan so designed my own table. The video showing how the wedge was made was of great help. You may need to be a member to have that link open for you. Anyway, here’s the assembled trestle of my design:


The wedges were cut at 9° and are made of Sapele. My first instinct was that the mortise in the stretcher would need to be tapered at one end and square on the other but the video from Rogowski showed how that wasn’t the case. It’s 3/8″ and was cut on a hollow chisel mortiser after tilting the table. I only have one mortise chisel, a 1/4″ wide so I was able to refine the cuts made on the mortiser. Rogowski also showed making this simple jig for the bandsaw to cut the wedge. It was cut over-sized then hand planed to fit.


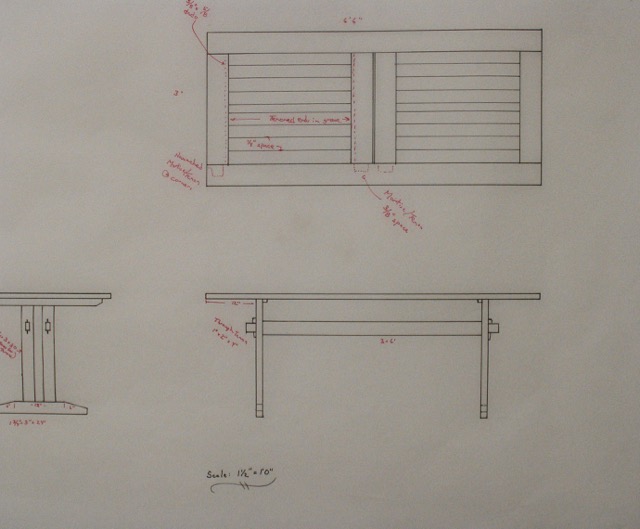
Working Drawing
Next step is creating the top, let me let you in on my plan and we’ll see if it works out! On paper it looks good but the logistics of it are new to me. You can see that the base came out as drawn, now for the top. The length of my clamps (3′ +) dictate that the table is 3′ wide. Since 6’6″ is the total length and I sold my 10′ pipes before we moved here the end pieces need to be mortised into the sides. After cutting all of the mortise and tenon joints to assemble the perimeter, ends, and inner pieces that will be glued up — but wait, there’s more! On the inside of the end and center pieces there is a 1/2″ x 1/2″ groove. The goal is to cut tongues on the pieces that will infill the table. To accomplish that I plan to glue the ends and center piece to one side only.

End and center pieces glued to one side
This proved to be quite a hassle since the clamps only open to 3′ plus about 1/2″. I had to beat the heck out of it before the clamps could get on it with the most important consideration being that the glue up was square. Here’s a picture of the results, I think so far so good — whew! Now, the infill pieces need to be cut to slide into the grooves. It’s a puzzle calculating the width based on the material I have but it looks as if 5 pieces will do it. Notice there’s a 3/8″ gap between the center pieces and the infill pieces will have a 1/4″ gap. The nice thing about this is that these can all be pre-finished before glue up. They will slide into the grooves and center of each board will be pinned from the bottom allowing them to expand and contract with the seasonal changes.
Everything else was pretty straight forward. To cut the haunch on the 2 1/2″ long tenons I needed to use a Japanese joinery saw. Clearing out the haunch which will be visible at the ends was done with an antique Stanley #271. I can see where the improved ones from Lie-Nielsen and Veritas are easier to adjust but this one’s paid for! When ever there are a lot of joints to keep straight I like to use metal marking stamps.


Since I don’t care for surface coatings my choice to finish this is Watco’s Exterior natural oil. It’s a product I’ve used for my furniture for over 40 years and even though Min-Wax screwed up the formula trying to meet EPA standards I understand that now that Rustoleum makes it is almost back to what it was before environmental standards messed it up. That being said, the quart purchased to experiment had some problems where an orangish color came in — I now need to sand the trestle part down which means it’ll still be lighter than the top but at least Rustoleum is sending me a refund to the quart.
