VanDam Floater Frame
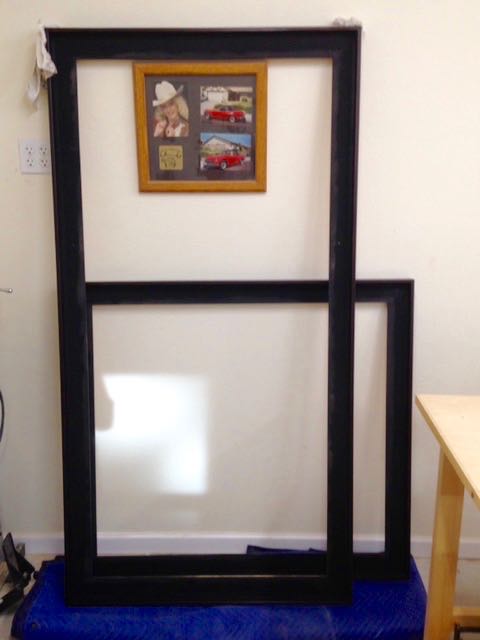
Waiting to go home
I’m in a holding pattern on the two, large floater frames right now. In the last post they were almost completed. Thankfully my client is willing to help with the installation of them and the earliest time he’s available is this coming Saturday. In the meantime they are standing against the wall and I make very sure not to get anything sharp or hard around them. They have a very large dining table and we will lay the frame on it (on a pad) then insert the painting into the frame. Next, 3/4″ spacers will be inserted between the frame and painting and then the frame will be attached through the back. There are pre-drilled, oversized holes for that purpose. The paintings are already wired quite securely so that will stay, there may need to be a relief cut into the frame for the holders to clear but a coping saw should take care of that without any problem. In case you’re curious, the picture on the wall is my daughters graduation picture and the MGB I restored for her; 1996!
New Sharpening Stones
Sharpening, one of the skills that’s needed to work wood successfully and another one of those where there are a bizillion opinions on how to achieve it. Like many of you that have been at this craft for a long time, my first sharpening work was done on an assortment of oil stones. Then, somewhere around the mid-80’s (I think) the Japanese water stones became the thing to use and wow, did they ever give an edge and shine on our blades! If you use them you know their downside; somewhat messy, constant flattening required, and prone to cracking which I’m guessing is a result of needing to pre-soak them prior to use which is yet another downside. The quality stones I’ve had for 5-6 years have developed cracks so I’ve been wrestling with buying another, highly rated water stone or go with something else. One other consideration during this process is that with water stones I didn’t have the ability to sharpen a tool quickly while in use. My habit would be to work with a tool that needed sharpening until it just didn’t perform at all. Then eventually, when there were a number of them it would be time for a long sharpening session.
Ceramic and Diamond stones seemed to be the new way to go. After lots of internet research and asking questions my choice were the DMT Continuous Diamond stones. Ceramic, notably Shaptons were highly rated and in the running but according to what I found out, they too need to be flattened and their recommended flattening plate is $300.00+! After talking with Kurt a couple of times at the Woodcraft store in Chandler, I was on my way to purchase the 3″ x 8″ stones in the Fine, Extra Fine, and Extra-Extra Fine grits. I’ve been using their smaller stones in the fine and extra fine for my carving tools and liked them a lot. You don’t get the “shine” with these that you do with water stones but a leather strop will let you achieve that.
Thought I’d make a slide show of the progress and eventual results of the first session with these DMT stones. Do any others of you use that saying: “if you see something, you have nothing” when it comes to sharpening? Can’t recall who I got that from but basically, if you look at your edge and see something, you’re not sharp. Using Ron Hock’s definition of a sharp edge being where two planes come together you shouldn’t see anything at all. That’s what I meant in the second slide. The plane is an old Stanley block plane that I’ve had for at least 40 years and it’s the original blade. Kurt suggested making a storage tray for them where they stood on edge to save space and avoid banging together, a piece of scrap plywood and some spiral glue dowels got that accomplished! After the final work with the extra-extra fine stone it was suggested to remove the wire edge that is formed by the sharpening process on a strop rather than on the stone like you would with a water stone. That worked and added just a final bit of polish to the blade. So far – so good!
New Work
There’s a potential framing job on the horizon, one that’s currently having a corner sample made up for. It’s for a run of 10-15 frame that measure 4″ x 6″. We’re discussing the finish but leaning towards a satin black over red clay and then antiqued/burnished to give a sense of age. The other thing that I don’t want to share just yet is a wild and crazy carving concept I’ve had in my head for quite some time. Some of you may recall my carved Carhartt Work Shorts and it’s along that same concept. If you’re interested in seeing what I’m talking about, here’s a LINK to the shorts. Tell you the truth, with all of the political and social turmoil/B.S. going on these days I need something which will allow me to escape that. Nothing like getting engrossed in a carving project to make the time and world go away!
Old Work
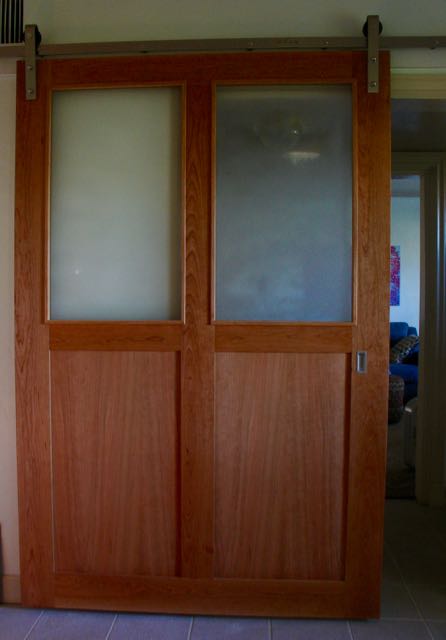
Sliding Door, Alder
I finally had the chance to take a picture of the installed, sliding door. Very difficult to get enough distance in the room but you can see how it looks in place.

Hi John. I’ve been meaning to ask you – what exactly is a floater frame?
Carol
LikeLike
A floater frame is one where the painting “floats” inside of the frame instead of sitting against a lip (rabbet) that is part of the frame — I’ll send you a little picture but if you want to get technical check this: https://woodworksbyjohn.wordpress.com/wp-admin/post.php?post=4976&action=edit
LikeLike
I began buying oil stones, but quickly switched to DMT diamond stones due to the simplicity of use and the cutting action is amazing. Pretty pleased with them.
LikeLike
Check out my latest blog Jeff, I made some holders for the DMT’s which will make it easy to keep them close at hand. Really like not having to pre-plan and pre-soak these like my old, cracked waterstones!
LikeLike