
When I first began making picture frames it was incredibly difficult to find information about the finer points of how to go about it. Most literature was pretty old and when talking with other framers I’d get the feeling that what they were doing were “trade secrets” and not for public consumption! That being said, there were some who were willing to share which was appreciated greatly so I decided that I’d share my techniques. They may or may not be the best way but for now they work for me and if it works for you then it’s all good!

Literal and Subtly Carved Feathers
My wife is working on a painting that has a bird interacting with the model so my first instinct was that hey, this needs some carved feathers! It just happened that on Chris Pye’s wood carving workshops he had a video on a carved feather. Decided to give it a try but found that it was too literal. If you’re familiar with Diane’s work you know she goes for the subtle so that’s always my goal for her frames. Pretty obvious but the top one is the “literal” feather, in your face with bright Dutch gold. The bottom one is what I came up with after a lot of experimentation and that’s what this blog is about, how to get what you’re after.

Profile right off the saw
Not being gifted in the area of drawing I need to find images. This has become quite easy with Google image searches and the ability to copy/paste. Making it even easier now is being able to proportionately enlarge or minimize the size of an image to fit your space. Some of you other old school folks may remember the technique of using grids to do that — oh boy, this is a cinch! Once I had the image, it was time to create the molding. The painting is on stretched canvas and measure 18″ x 24″. The profile shown here is about 3 1/2″ wide and 1 1/2″ thick, here it’s right off of the tablesaw and a smooth plane was used to remove all of the saw marks. Pieces were then cut to size and joined with #20 biscuits and glue then clamped over-night.
To get the design onto the frame you could use graphite paper which works fine but …. I find that locating the design in the exact same spot, eight times is a daunting task. The paper moves, the graphite moves, and thought there should be a better way. For me, that turned out to be using spray glue and attaching the pattern to the thin plastic used for salad containers. This has a number of advantages, first the plastic pattern is much more durable than a piece of paper and can easily be flipped over to do opposing corners. Secondly, by cutting the plastic pattern out with the gouges I have (and annotating that carefully) your process is consistent on each corner. The left hand picture shows the design with the gouge sizes written on it. Before attaching the design to the plastic I made a copy of it for reference. The design was then glued to the plastic and cut out with the appropriate gouge. I’m holding the finished pattern in my hand. Yes, it does take time but now the pattern can be replicated easily.


Three places where measured out to locate the design on the frame. After completing the outline, #2/5 to incise the inside about 1/8″ deep. A small v-tool created the center quill and my goal was to “pillow” the wood from the quill to the outer edge. In keeping with the subtle theme, this design is lowered into the frame and pretty shallow.


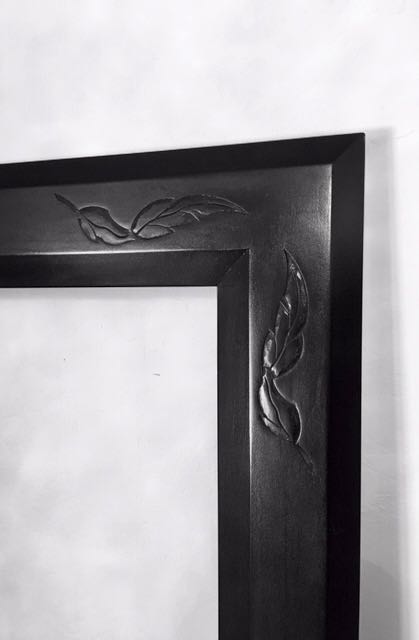 The finishing process could be a complete blog on its own. I find it’s pretty experimental. For this frame I decided to go with a spray on primer rather than the usual burnisher/sealer which is very thick and would probably obscure the shallow carve. This was followed with a satin black. Careful rubbing back with cotton balls and wax created the finish I wanted — subtle red peeking through at the corners of the frame. At first glance you barely notice that the frame is carved so just like with Diane’s work the intricacies and beauty needs to be discovered by the viewers.
