
The Covid-19 virus really changes how we go about our daily business I figured another tutorial on hand cut dovetails may be something my followers would be interested in seeing and hopefully sharing with their fellow woodworkers and friends virtually since our normally isolated manner of working is now even more isolated. I’ve always referred to all of my contacts I have on Facebook, WordPress, Instagram, etc. as my imaginary friends — I hope you’re all well and healthy.
This subject is almost like sharpening tools, ask 10 woodworkers the same question and you’re likely to get 12 different answers! My clients are unable to complete some orders they have with me because of their work layoffs and artists I have frames for have had their shows cancelled. Checked my limited supply of wood and found a piece of Chechem and also some Red Oak so decided to make this little box. Any project is a good one to hone and keep your skills up is my philosophy. This is the way I’ve been cutting dovetails for decades and for sure not the only way but here goes. For starters, I’m a “tails first” dovetailer. I won’t get into all of the various ways of laying them out but these are a bit different in that I’m starting and ending with a half tail. It’ll be a small, lidded box and I like to see a continuous piece of wood when the box is opened.


I start by rabbeting the ends, similar to the old Stanley 140 trick. I used to use the tablesaw but now use a skew rabbet plane for this operation. My preference is to cut both boards at the same time. For the tail lay-out I use a pencil since the pin board will be cut to what is scribed from the tail. Regardless of what type of saw you use for this it’s a good practice to wax it.


Think about the chisel bevel, it will tend to force the cutting edge back. To compensate for that I always cut a little pocket as shown in picture #1. The first 3/16″ or so of the cut is 90° to the face but after that it’s okay to do a slight undercut. I don’t use a coping or fret saw to remove the waste between the tails and rarely need to pare the base. It’s crucial that your cuts are square, adjust them before you lay out the pin board. I’ve found that a small double square like the one from Lee Valley works great for this.

4.) Bottom Groove
The final step in my process is to plow a groove for the bottom to fit into using a small plow plane. The rabbet made for that 140 trick is 1/4″ so a 3/16″ deep groove won’t cut into the tail — much easier than a stopped groove. That takes care of the front and back and the Red Oak was pretty easy to work with. The Chechem was a different story! This piece has been in my stack for some time so besides its inherent hardness, baking in the Phoenix heat didn’t make it any easier to work. Here’s a technique I use when I question how well a board will react to dovetailing. I knew the box would be around 5″ deep and I only had 13″ of the Chechem. Cut it in half, do the pins on one end and if they fail there’s enough to trim them off and start anew — did that twice on the first piece!


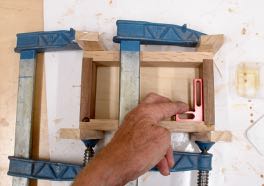
Two tricks here, the first is pretty straight forward and that is to use a piece of chalk in your scribed lines to help you see the piece. The other is this transfer jig I found years ago on the net from I believe, a British woodworker. You can see it in better detail in this BLOG. It’s much more secure than using a block of wood or your plane (traditional way) to support the tail board as you balance it on the pin board. I raise the pin board up in this jig to do the cuts. It’s a minor issue but flip the board around when sawing so that you always have the cut line in your vision.


In picture #1 you can see the jig in use, everything is securely held while scribing the joint. Be mindful of cutting on the waste side of the line, for this small piece the outer pieces were sawed off. Same technique to remove waste between the two pins, relief cut for the chisel bevel then chopped out — a mistake many make is trying to take out huge chunks of wood, better to remove smaller ones and have less work cleaning up.
Clamped up till morning, yea; it’s square!
Last of all, it’s time to glue up. My preference is Old Brown Glue and since it’s a hardwood using softwood cauls covered with packing tape allows the wood to protrude into them. Sorry, as usual I got a bit long winded but hopefully it was a somewhat enjoyable read and you where able to get something from it. I do glue ups on a piece of Marlite which is fairly easy to scrap the glue off of afterwards.

Pingback: Fun with Chisels and a Stanley 271 Router Plane | Woodworks by John