
Just as I thought I was getting a break and could concentrate on the upcoming Summerlin Art Festival I had a request from the Etsy store for a custom box. Really, this isn’t a complaint — I love getting those special orders. They always point me in the direction of my next bit of work and I’ve taken a page from my wife’s playbook to be more efficient. Whenever she gets a request for a custom doll she’ll make an additional 3 or 4 of the same general pattern using different materials and embellishments. Since the machinery part of any project in the shop requires a bit of set up time and adjustments I’m fallowing her lead and making three additional boxes of different wood species and sizes. This order is for a box in the lidded finger joint style and is to be made from Macacauba. Luckily I had just enough of this beautiful wood left to accommodate the size my client requested. This box is to have brass accents in the fingers on the front and back sides. This part of the box adds a lot of nice detail to the over-all appearance but also adds some time. The final effect is worth the effort though.
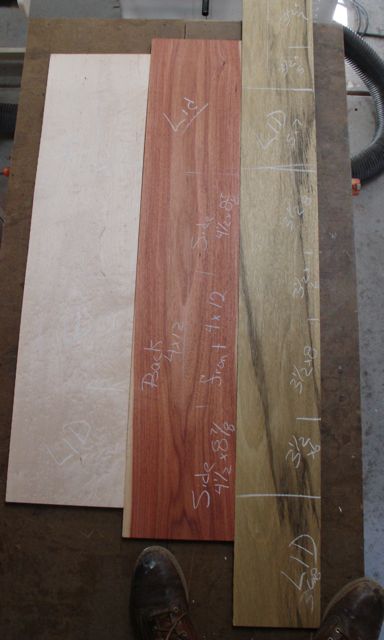 Cutting the piece of Macacauba will be tricky and really require that adage of “measure twice and cut once”. I only have the one board of it and at $13.00 a board foot you don’t want to make a mistake! Add to that I’d have to mail order more from Phoenix and pay additional shipping I really want to be on my toes. The Macacauba is the board in the middle and it’s flanked by a piece of Birds-eye Maple on the left and Black Limba on the right. Difficult to tell but the process begins by roughly marking the boards with chalk to differentiate between the sides and top of the boxes.
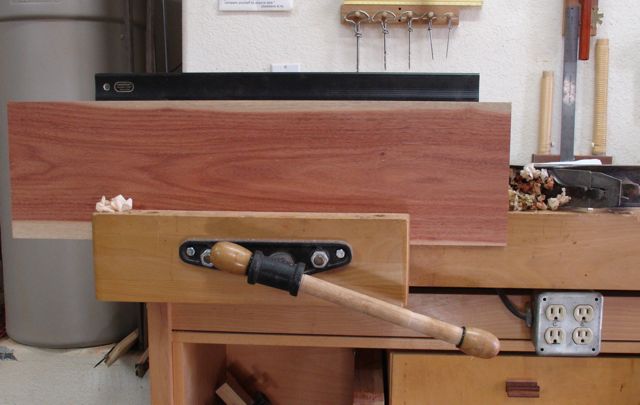 After running the boards through the planer to get them to a uniform thickness of just over 1/2″ it was time to cut them to size. This begins with planing a straight and square edge as a reference point. For that a trusty old Stanley #7 corrugated sole jointer plane in put to work. Here it is with a 24″ straight edge on making sure that the surface is flat. This is the edge that will run against the rip fence. You can see one of the challenges I have on this project. I’m certain my client chose this wood for its red coloration and there is some sapwood streaking that I want to minimize by keeping it on the interior of the box as much as possible — ah yes: measure twice, cut once for sure!
Whenever possible it’s desirable to cut the required pieces for any box in the same sequence it will be assembled. This will maintain the grain pattern all the way around the box perfectly on three of the four corners. A table saw sled and spacer is my technique. A stop block is clamped to the fence for the length of the longest piece. After that piece is cut I’ll put a spacer next to the stop block equals the difference between the two measurements. For example, if the box is 5″ x 7″ I’d use a 2″ spacer. You can see the spacer under my little finger. I keep the pieces in order then identify them with tape on their lower insides for re-assembly.
-

- Cutting Box Sides (notice spacer)
-
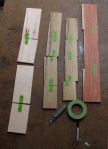
- Box Sides Marked for Re-Assembly
This is one of the tricky steps to this project; setting up the finger joint jig on the table saw to cut exactly sized and spaced fingers. Everytime I do this I tell myself I’m going to come up with a better jig that holds its’ accuracy but for some reason it’s one of those things I never seem to get around to. I’m using polyethylene runners and Baltic Birch so it’s about as stable as can be. In any case there always seems to be some hand work required to fit them. When I do a single box with variable sized and spaced finger joints I find it’s easier to do the entire operation using hand tools. The photos below shows the jig and process I use for this job.
-

- Back side is scribed to prevent blow-out.
-
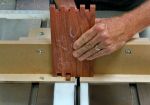
- First piece is cut on both ends.
-
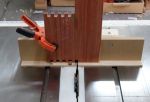
- One Piece Clamped to Jig, All others get first cut.
After all the noise of the tablesaw today will begin with quiet chiseling to fine tune the joints as needed. With the Macacauba box getting brass accents on the finger joints a jig will be set up on the drill press to accomplish that. If I have enough Ebony to make dowels for the finger joints of the Maple box I may use that as a strong accent for it. Well, it’s time to go out and make some sawdust or at least shavings!

seeing this first hand, it looks great
LikeLike