
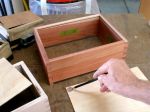
 Here’s where I am on the current series of boxes. The custom order one is the reddish colored Macacauba with the clamp on it. Next to it is a speculation project that is made of Birdseye Maple. In the background you can see the two other spec boxes of Black Limba. Due to the complexity of this style of box I’ve decided to make them more traditional with a raised panel, hinged lid. I’m glad my client was agreeable to a 3-4 week delivery as there is a lot of work we need to do still in preparation for the Summerlin Craft Fair which is coming up this weekend. Feel like Santa Claus — making a list and checking it twice! We had quite a bit of coverage in todays View Edition of the Las Vegas Review Journal, it mentioned both Diane and myself. Really looking forward to seeing how it will all pan out but we know we’ll be better for the experience.
Let me fill you in on some of the complexity of this style of box. My habit is to keep notes on projects in a binder so that I have something to refer to when repeating the same general projects. The cool thing about doing one of a kind projects is that there is the ability to customize my work based either on a clients request or how the wood “talks to me” which can dictate the design. Irregardless though there are certain steps that are non-negotiable. In the last blog we talked about cutting the finger joints, it seems the larger the finger the more chance there is for a bit of misalignment but now that they fit well, next up is cutting the dado’s for the bottom piece. This used to be a time consuming step because you had to cut stopped dado’s on two of the sides to conceal it. That’s all changed with Lee Valleys Slot Cutting Bit, here’s a LINK to it. It’s available to cut either a 1/8″ or 1/4″ wide dado of varying depths. To use it you clamp the box together, mount the bit in a router table, and work you way around the interior of the box. It does create a lot of dust so I hold a vacuum at the same time. When cutting a 1/4″ x 1/4″ or 5/16″ deep dado my preference is to not make a full depth cut the first time around. This seems to produce a better cut and put less stress on the tools. The bottom piece needs to have a radius cut on the corners which matches the cutter. I’ve found that a nickel is just about the right radius, after drawing it on you can file or sand to the line and you’re good to go!
-

- Slot Cutter in Router Table
-
- Drawing Radius for Bottom Piece
There will be brass accents on the corners of the custom order box and the Birdseye Maple will get dowels of Purpleheart which is also the material for the handle. This is done on the drill press and begins with marking the location on one finger then setting up a jig made out of a piece of scrap used to set up the finger joint jig. Like most other things, the initial set up takes more time than the process. Here’s how that set up looks:
-

- Side placed in Jig for first hole. The Pine piece is the Jig.
-

- Piece moved in jig to drill all holes.
 One of the trickiest parts to this entire project is accurately locating and drilling the holes for the concealed brass hinge. Drilling it into the side piece is not a problem, you just have to mark the appropriate corner and use the same jig with a different sized drill bit. You may notice I highlighted the word appropriate; well let’s just say I’m glad I have a dowel making plate and can make dowels of any species of wood to conceal holes put in the wrong location! Here’s the set up for drilling the hole into the lid. It’s important to keep it square. Once these were drilled it’s a matter of relieving the edge of the lid to allow it to open completely and stay open at 95 degrees or so. Only way to go about this is the trial and error method removing a little material, assemble the box, try it, take it apart, until it works as it should.
The remaining work is some of the most enjoyable as far as I’m concerned. Now is the time to plane all of the surfaces with a smooth plane prior to assembly. The lid lifts need to be refined and mortised into the lids and then comes the assembly. The Macacauba box will have brass screws driven into the pre-drilled holes. Those will then be cut off and filed/sanded smooth before the finish is applied. The Maple box will go to the drill press to drill 3/16″ holes for the Purpleheart dowels. I mentioned the dowel plate and if you’re not familiar with what they are, here’s a LINK to Lie-Nielsens version which is what I use. During my teaching career a dowel plate was standard issue for school wood shops. At that time it was used to accurately size dowels you’d buy commercially because then they were over-sized. The norm today is that the dowels you buy are undersized! With the plate you can make your own from virtually any species of wood you like or need.
