
Ever find that whenever you think you’ve completed a project you stop and say “‘except for ……..!” That’s what just crossed my mind as I put in the title to this post. I need to line the bottom of the box before I can ship it out. I just configured a shipping box for it and just came back from Home Depot since I’m out of the styrofoam sheets I use for packing material. Anyway, other than the bottom being lined, here’s the completed box:
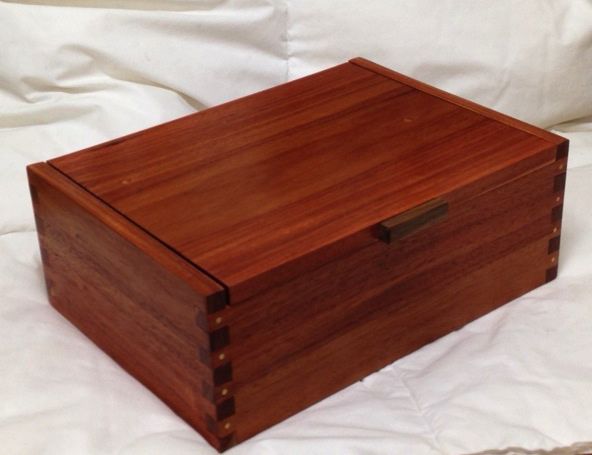
The final steps to this were to insert the brass screws and then file them down after snipping off the heads. As you recall, all of the holes were pre-drilled before the box was assembled using a jig on the drill press that located them exactly. My personal thoughts are that this small, brass detail adds a lot to the over-all appearance of the box.
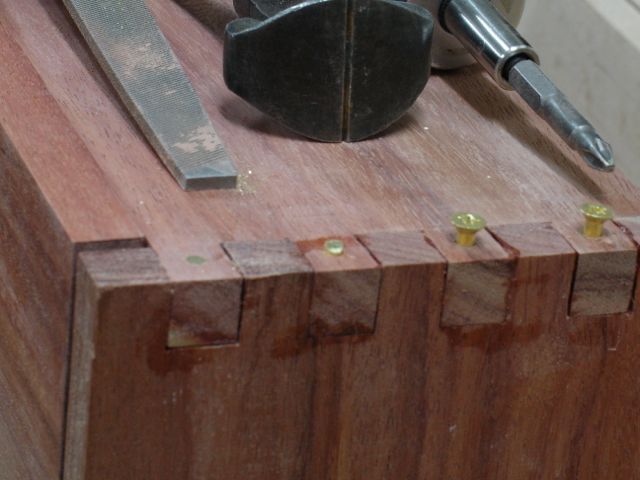 Here you see a sequence of how it goes. I must admit that I’m super cautious when screwing in the brass screws. Brass is a pretty soft material to begin with and then add to that the cheapest brass the Chinese can find and you have a snapped screw in the making! I always pre-drill and bees wax for any screw but since the box is unfinished didn’t use the wax on this. It wouldn’t be a major problem if the screw were to snap except on those rare occasions it’s done that it snapped below the surface so there was a slight divot. The two on the right are obviously uncut, the next one down has been cut with the nippers and the last one has been filed flush. Before sanding I blow the brass skewings off so they won’t get embedded into the wood.
The final step after sanding was to apply the shellac. I mix my own from flakes to keep it fresh then use an airbrush to apply multiple coats. For this series of boxes I used an ultra blonde shellac to preserve the beautiful coloration of the wood. After an initial coat the finish is lightly sanded with 400 grit paper, blown off, and then more coats are applied. I like to wait at least 3 days before using Liberon wax and a white scotch pad to rub out the finish. Here’s a photo of the four boxes built in this series, with the lids propped open kind of looks like a used car sales lot!
-

- Black Limba, Birdseye Maple, Macacauba
-

- Macacauba, Birdseye Maple, Black Limba
The Macacauba box is headed to my customer in Ohio and the others will go on the Etsy store. The Black Limba boxes will be hinged with some stop hinges I have that are also black. The coloration of this wood has a greenish tint to it which I find appealing — anxious to see what the public reaction will be to them.
