
Well, I suppose this title shows you I’ve been watching too many episodes of Chopped where they prepare the mystery basket ingredients two ways! While finishing up the last series of boxes I needed to cut mortises for the lid lifts and the hinges so I’ll use this as a tutorial to share my method. What is a mortise? well here’s a definition found on line:
Babylon English Dictionary: recess or groove in a piece of wood or another material that fits together with a corresponding projecting piece of material; connection, joint
Usually when you think of a mortise the corresponding part (tenon) immediately comes to mind. However, butt hinges need to mortised in and going by the definition above; anytime you cut a slot, recess, gain, etc. to fit wood together you have a mortise. Here are two pictures of the Black Limba box just completed:
-

- Looks greenish rather than black but nice grain!
-

- Open, note black hinges to match Ebony lift.
These were taken with my iPhone and it’s my first ever cell phone so still working on the quality but it does show the completed projects which will go on my Etsy store as soon as I get the photography work done.
Let’s get into the mortises, the largest and most time consuming ones were those required for the lid lift. I used a piece of Ebony that I have and let it determine the size of the lift. Decided this should be cut out using hand tools, really; anything this small would be dangerous to attempt on power tools. The only exception to this was after cutting the step on them while the stick was still around 16″ long, I used the chop saw to cut them to length. It leaves a finer finish than a tenon saw.
-

- First cut held in vise with rip saw
-

- Second cut held with bench hook with crosscut saw
After using the marking gauge to outline the area that needed to be removed, chalk was rubbed over it. After wiping it from the surface a bit of it remained in the scribed lines that allowed me to see what I was cutting. Once cut, they were squared with a chisel. Now it was time to locate them on the underside of the lid and remove the material. This is the mortise, hand cut way in a pictorial tutorial.
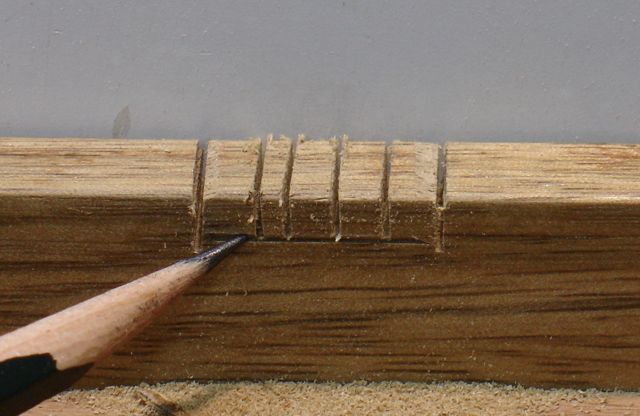
Process begins by locating lift at the center and scribing it’s location. I tend to scribe one side and then move the lift ever so slightly to cover that first scribed line. Now when I scribe the opposite side it’s slightly undersized which leaves you some material to carefully pare away for a tight fit.
 Next I prefer to use a small router plane to scribe the depth. It’s the best way I’ve found to keep from scribing a line that is longer than the mortise. If you angle the plane you can see the lines you scribed to outline the lift.
 Before using the dovetail saw to outline the side I use a chisel to remove a wedge of material the same way I would do for chiseling dovetails. You’ll see that by creating a square shoulder it’ll be easier to start your saw. In such a shallow cut I find it’s better to rely on muscle memory to saw square than to scribe a line that will probably go beyond the depth line.
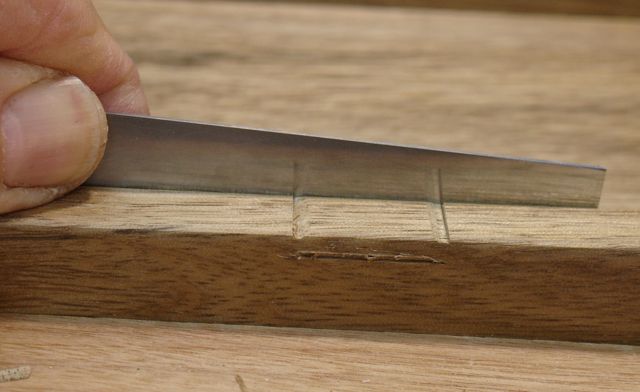
Notice the wedge removed with chisel prior to sawing.
Once those cuts are made, make a series of cuts just shy of the the scribed depth line with your saw, this makes chiseling out the waste easier.
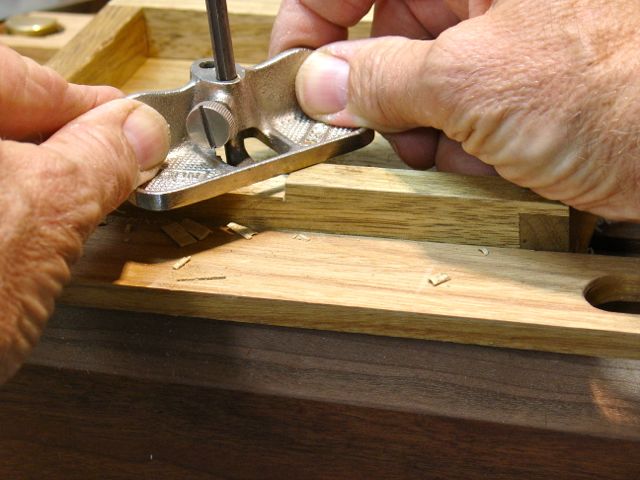
 Once that material is chiseled out all that remains is to smooth out the bottom of your mortise with the small router plane, this is a Stanley 271.
 Final fitting, glue, clamp, and you’re done!
 That’s the hand cut way, for the hinges I use a small trim router with a ball bearing guided bit and a jig. By the way, here’s what my work area looks like when I do these types of things. Being in my sixth decade the back and eyes aren’t what they used to be! This is the carving bench that’ll save your back because you don’t have to bend over all day. I use this for carving, cutting dovetails, and any other work where I need to position the work higher. The light is an LED one that slips over the dowels that normally hold my coping saw.
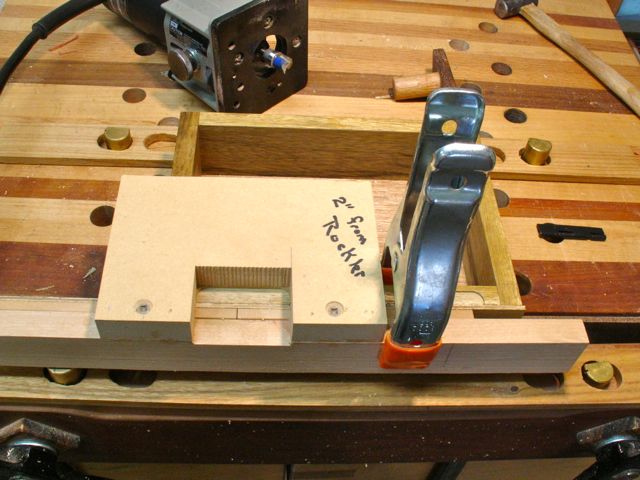
For these boxes I used Rocklers #48106 which although a far cry from the quality of Brusso hinges is about 1/4 the cost so for work like this more than acceptable. It stays open at 105 degrees or so making it ideal for this application. At this level of quality (China’s finest) they can have a bit of variation in length so the jig is slightly smaller than the hinge. This gives me room to fine tune its location if needed. As long as the outside edge of the hinge is consistent on the box and lid, fitting them together goes well. I scribe a line from the outer edge of the box/lid and set the jig there to keep that measurement the same.
 After routing, all that’s required is squaring the radius created by the bit, pre-drill the mounting holes, and attaching the lid and box together. After using these hinges for some time now I haven’t had any complaints from my customers regarding the quality or performance. The only negative thing I can think of is that they’re only available in 2 and 8 inch lengths.

The Balck Limba has a very interesting grain. I’ll have to keep a look out for it next time I am in the lumber store. It’s hard to tell without seeing for yourself what a wood is like. Your comment about the light was timely, I just an hour ago mentioned to my wife that I was going to look out for an Led light to help with my joinery. Any more details on the light you are using would be greatly appreciated.
Richard
LikeLike
Hello Richard, My light has 8 LED’s in it and has an adjustment to change the intensity. It’s made by Q-Ray so I called the Lamps Plus where I bought it several years ago to get info. As luck has it they no longer make that but she suggested a Koncept #K9431 and told me it was even better! She remembered me going into the store with a piece of carving and checking them all out. They aren’t inexpensive but have helped me a lot. Sometimes I’ll only have it on and the rest of the shop dark and you can see what’s going on under your tools. Let me know what you discover, not sure where you are but think LampsPlus is nationwide.
LikeLike
Pingback: Walnut Box Sliding Tray and Miscellaneous | Woodworks by John