
 Assembling projects is always a stressful time and I believe most woodworkers tend to agree with me about that. Think about it; all of your work and effort up to this point can be ruined with one bad assembly error! Although it’s wise to make several dry fits to rehearse the process, label everything, lay out the pieces in sequence, check your clamps, and all of the other things you do to make the process go smoothly there is always the chance of something going amiss. Thankfully, that didn’t happen this morning. I know I tend to stress a bit (okay Diane — a lot) but I suppose that’s my nature. I use Old Brown Glue which is a liquid hide glue which I’ve mentioned before as being my glue of choice since it has a longer open time and, unlike PVA glues; doesn’t swell the fibers of the wood making assembly difficult. I’ll leave the clamps on overnight to ensure a good bond.
 My client has expressed an interest in wood and the craftsmanship of having a custom box made so I thought it’s only fitting to have a solid, wooden bottom for his project. Usually I’ll use plywood for that and line it with ultra suede. This box has a 1/4″ thick piece of solid Walnut for the bottom. In one of our conversations he asked about dating and signing it with a fine marker. I always burn my logo into my work but to this one I added a stamped in date. That’s what I use for picture frames and the trick I’ve found for keeping the letter stamps aligned is to tape down a piece of 1/4″ graph paper and stamp directly onto it.
 The top of the lid panel needed to be chamfered ever so slightly. For this I like to use an antique Stanley #101 plane that came from England. Adam went there with his Dad and brought it back for me when he was in his early teens. It’s stamped Stanley Rule & Level and since the lever cap isn’t painted red it was made prior to 1941. It’s the perfect little tool for this type of work.
 The final step before assembly was to take a card scraper to the top to smooth it out and highlight the beauty of this piece of Walnut. Now that the box is glued up I’ve been checking every hour or so to make sure the panel doesn’t accidentally get glued into the frame. My client mentioned that he may have a future move to Kentucky and with the humidity there it needs to move to prevent splitting. The bottom piece has the same concerns.
In the meantime I’m continuing to work on the other two finger jointed boxes of Monkeypod wood. In one of Doug Stowe’s books he shows a floating panel lid made of 3/4″ thick material that extends above the box sides rather than being contained by it. I’m going to experiment with that design on these boxes. After cutting the grooves all the way around the panel, the outside edges were radiused. When I did a dry fit I thought it would look better to have the top of the box radiused as well so did that on the router table too.
-

- Radius put on box top edge.
-

- Edge refined and smoothed with tadpole sanding block.
-
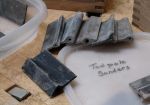
- Assortment of tadpole sanding blocks.
Many woodworkers I’ve talked to are unaware of these tadpole sanding blocks. I started to use them on picture frames where you have different profiles or coves, V’s, reeds, etc. Using this type of sanding block on profiles helps you maintain their shape instead of flattening it out. They’re available from many places, I got this set from Klingspoor Woodworking Shop.
