
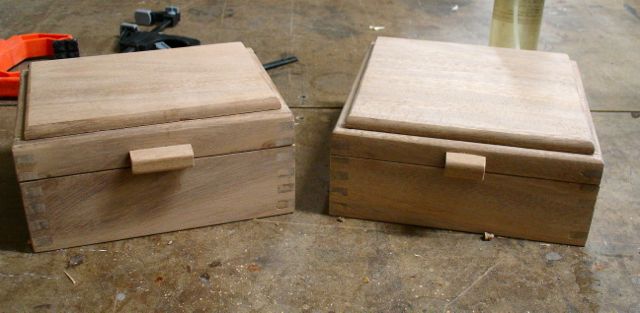
 Thought I’d give a short tutorial on making and installing a simple lid lift in a box lid. These are the two additional finger jointed boxes I’m making while finishing up the custom Walnut one. Trying a new style of floating panel lid with them, any suggestions for a name? It’s a double round over but that seems a little long — roll top box? Open for any suggestions you may have out there. Thought I’d be different and put a long lift on one and a short one on the other.
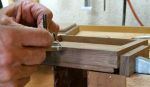
 Rather than doing a lift of a different wood like on the Walnut box (Ebony lift), these are made from a piece of the same wood as the boxes. It begins by creating a radius on the board with a block plane and then cutting a rabbet on the side. A little bit of sanding to refine the shape and then the piece is cut to length.
Here’s a gallery of photos showing what happens after that:
-

- Center lift and scribe location. After scribing the first side I cover that line by sliding the lift before scribing the other side. This gives you a snug fit.
-

- Set a small router plane (Stanley#271) for the thickness of the rabbeted part of the lift.
-
- Use that to scribe the depth on the lid. Easier to control than a marking knife.
-
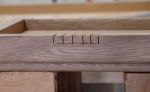
- Make a series of cuts with a dovetail saw and remove waste with chisel followed by the router plane.
I prefer using the router plane to establish the depth. You can see the penciled in lines marking the width of the lift so it’s easier to control the router plane than it is to control a marking knife. I’m finding that the Monkeypod is a little hard to cut cleanly which has me concerned. I just took on a custom order for a small box made out of it that needs to have some small dovetail joinery. What’s life without a challenge or two?
