
I’ve been very fortunate by having a fairly steady stream of custom requests from the Etsy store. The Walnut box is almost done, just needs the finishing steps. I have one request for a type of box that can best be described as a wooden shoe box that needs to be either stained or dyed (my preference) black. There isn’t a time frame on that unless you call sometime within the next 6 months a time frame!
The more pressing request from the Etsy site is for a small, dovetailed presentation box. It will be used to safeguard a custom made, silver arm cuff. I’m known for being somewhat of a dinosaur when it comes to my technology and of course, my love of hand work. I am amazed though at what we can do via the internet. This client and I have had about 15 conversations through Etsy. During that time, he’s sent me photographs and I; in turn, have sent him sketches of my design proposal. Think of how long this would have taken to do with “snail mail” considering that he lives a couple of states away! We were able to finalize the design and have the project paid for in a matter of two weeks — amazing to say the least!
The cuff is going to be 2″ tall and arm shaped; oval like 2″ x 3″. We explored several designs and the final choice is for a box that will completely contain the cuff. It’ll be lined with 100% wool felt in a Peacock Blue that will really play off the silver and the almost iridescent quality of the Monkeypod wood we’re using. Monkey Pod or Monkeypod wood comes from Central America and has some of the appearance and working characteristics of Mahogany or Koa. I had ordered some from Woodworkers Source a while ago to make boxes from. Years ago I used this species of wood for an easel and a picture frame and loved the coloration and grain. I was sent two, very different boards this time and was a little disappointed with one. The other, however, had the iridescent streaking my client mentioned were something he’d like to see.
Size of finished box will be 3 1/2″ x 4 1/2″ with a height of 3 1/2″
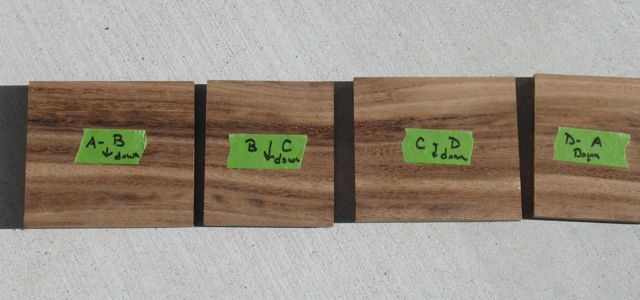
The first order of the day was selecting the wood and carefully cutting it to the needed sizes. As always, they are marked in the order that they were cut so the grain pattern flows around the box. The lid will be similar to the lidded finger joint boxes and pivot on a hidden hinge pin.

Stanley 140 trick with dado head and miter gauge.
If you’re familiar with the Stanley 140 trick I’ve mentioned a time or two when cutting dovetails, it’s a technique I really like to use. Not having a set of skewed block planes I generally do this by placing the board vertical against the rip fence. Remember the wooden shoe box custom order? Well, for that I need to cut a dado and planned the work so the dado head would be in the tablesaw when I needed to cut the slight rabbet for the 140 trick. Although it looks kind of awkward using the stop block and miter gauge did a good job.
 Next up was to practice on the wood to see how well it would react to the dovetail saw and chisels as I worked on the joinery. I mentioned that I was disappointed with the other piece, it tore out and was splintery when machining the finger joints so I was a little apprehensive now that I’d committed to dovetails for this project. My students are advised to do some warmup exercises prior to cutting joints on their projects and this was an instance where I though it best to follow my own advise. The Monkeypod wood cooperated nicely! I’ll want to hone the chisels after figuring out a pleasing layout and do the work when I’m fresh. The picture gives you an idea of the over-all look of the box and the practice dovetail is about 3/16″ at the narrowest part of the tail.
Time to call it a night and dream about possible layouts for the joinery!
