
Topless HDTV Cabinet
The excitement continues as the cabinet is really starting to take shape and I must admit I’m very pleased with the outcome. This has been quite a challenge and I continue to learn from this project. To me, the motivation and interest in building things is as much about the process as it is with the final results. I’ve kept track of my time on this project since that’s something that usually comes up when someone sees work like this. Not counting the design time and “mental pondering” there are somewhere around 75 hours of actual work time on this so far.
Time required to make furniture (or anything for that matter) is hard to explain to those not familiar with the process. For example, my wife is an outstanding seamstress and artist. If I thought of making something like a skirt, I’d think just take two pieces of material, sew them together, add a waistband and a button and you’re done — right!! The steps needed to create things from scratch are numerous. With the mindset of consumers keyed in to Ikea, Macy’s or Target level of goods what we do as custom makers is hard to comprehend.

Top Mounting Blocks
To illustrate that, here are the pieces needed to attach the top to the cabinet. The top will be anchored to the front to maintain that reveal but since it’s solid wood a way for it to move seasonally is needed to prevent it from splitting. Although this photo is kind of distorted I think you can see what I’m talking about. The mounting blocks are attached with screws to the cabinets sides and back. Note the slot in each one, they run from front to back since any wood movement will be across the the face of the top. I suppose a kerf could have been made in the sides to use metal clips similar to those in this LINK but I decided to stay more traditional.

Top Mounting Blocks
Here are the blocks, they take a good amount of time to fabricate. First of all a recess is drilled to accommodate the head of the attaching screw. I’m using drawer front screws which have a large, washer style head. Then, an oversized slot needed to be centered in that recess so the screw can move freely. Next up is drilling the hole for mounting — actually two holes; the pilot and the counterbore to recess the screw into the block. Finally, all surfaces were block planed smooth before attaching them to the cabinet. Time consuming — yes; but so worthwhile in my opinion!
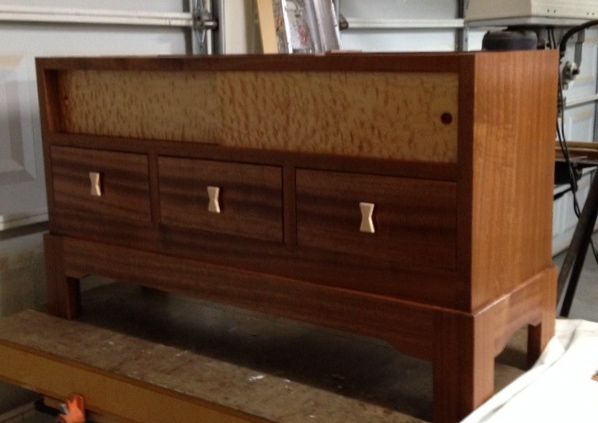
 The design concept of this piece was the use of dovetails through-out. That’s the unifying detail. The pulls were based on that design element and here you can see how it all works together. Obviously the pull is shaped like a dovetail, then the drawer dividers is dovetailed into the shelf and bottom stretcher. That stretcher is joined to the side with twin dovetails. I think one of the more challenging aspects was hand cutting these joints into the Sapele! It’s beautiful in my opinion but the interlocked grain was difficult to work with chisels but that’s okay, just adds to the challenge.

The entire case and drawers are finished with shellac which was padded on; somewhere in the neighborhood of 6-8 coats. Once that was cured, mineral oil and 800 grit wet/dry paper was used to rub everything out and a final coat of Liberon Black Bison wax was applied with a white abrasive pad. My wife keeps wanting to know when this can be brought in and put to use, soon as I finish the top. This promises to be a good arm and shoulder work out! As luck would have it, it has twisted ever so slightly so will require a bit of work with the scrub plane followed with jointer and smooth. At 17″ wide it won’t fit in my 15″ planer so I’ll be doing the entire piece by hand. Guess I better quit pushing keys on the laptop and go to planing!

Very nice piece, John! Have been enjoying reading about its progress.
Regards, Lupe
LikeLike
Gorgeous John! I love the sliding dovetails. I plan on building a bed room set for us our home out of African Mohagany and would like to incorporate sliding dovetails. Beautiful work, I hope to be a master like you one day. Dave
LikeLike
Thanks Dave, your work is in impeccable too. African Mahogany and Sapele are both challenges with their interlocked grain but sure finish up beautifully with a clear finish. Looking forward to finishing the top so the cabinet is no longer topless!
LikeLike