
I’ve been in correspondence with an arts center that specializes in ceramics. What they have in mind are foam lined boxes used to display, ship, and protect some of their finer pieces. Thankfully, they would be responsible for the foam inserts since I know how labor intensive it can be fitting items into boxes. My work creating the pistol cases showed me that. In those, the pistol is fit into a wooden panel and is supported by a layer of foam and deer hide. So, on this project my responsibility is focused on making the boxes of specific sizes.
I prefer using solid wood rather than plywood but the size of some of the items would make that difficult and quite expensive. Can’t deny that it’s much easier and cost efficient to make a 6″ deep by 14″ square box out of a cabinet grade plywood than gluing up panels to make it from solid material. Another huge plus is that with plywood you don’t need to be concerned with the seasonal changes and movement of wood. The disadvantage to plywoods is their extremely thin outer veneer on today’s products. I’ve been working with wood since the 60’s and have seen how much thinner the show face is on a piece of plywood. Nowadays it’s paper thin; it used to be at least 1/16″ or more. Well, just need to be extra careful when working on this project. I’m making this prototype for them out of some Red Oak plywood that I had on hand but we may go to a Maple for less pronounced grain. These will need to be stained and then top coated with a polyurethane so they can be handled.

Exact 45 degrees angle is crucial
Much of the initial work will be done with machinery. The first thing is to make sure the tablesaw blade is set at exactly 45 degrees and opposite pieces are the same exact size. I purchased a CMT, 80 tooth blade especially for this project. It comes highly rated and I need to get the cleanest cuts possible on the plywood. By using a miter sled and stop blocks the pieces will be cut to size as required.
It’s a pretty straight forward process I’ll illustrate with this slide show:
Just an aside, did you happen to notice the miter square in the first photo? I’ve always wanted a small one to use when making boxes and fitting small moldings. The large, 12″ combo square I have is too awkward and the small sized sliding bevel square tends to change and the body gets in the way when drawing a line. Mitered lines don’t need the precision of a knife edge so I thought a wooden one would work out. Priced some and couldn’t really justify buying something I thought I could make so made this one from some Canarywood, Purpleheart, and Birch for the tongue. Check it out!


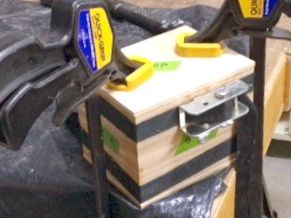 After the box is assembled I’ll need to radius the corners and then comes the tricky part — separating the lid from the bottom. In my next post I’ll demonstrate how to make an integral dust check by dadoing out the inside of the box before assembly. The weather has really cooperated with me on this one! Glue ups are always stressful and doing 4 corners, splines, and top and bottom is a lot of glue to spread. The temps have been in the mid 80’s giving me plenty of time to get it all done. On a box of this size I’ll use packing tape to begin the process and then add some band clamps as a final step. The top and bottom are attached and clamped to dry overnight. Here’s a shot of the piece clamped and waiting for the next steps!
