
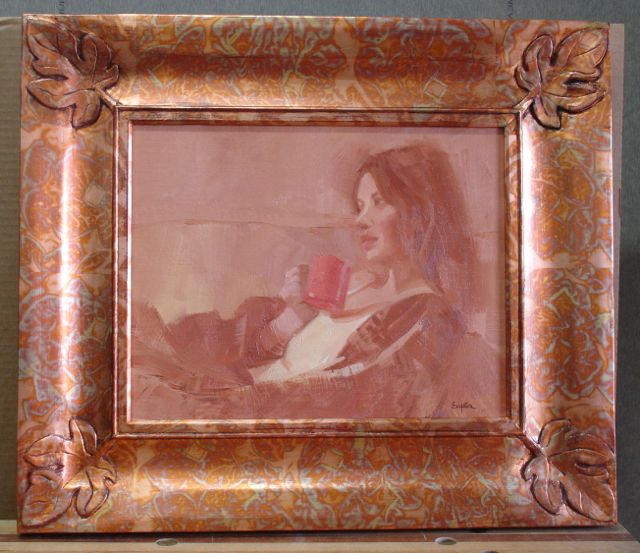
 This painting and frame is the first collaboration Diane and I have had in almost three years! She took a hiatus from painting during the downturn of the economy and pursued other artistic endeavors. I always enjoyed creating frames for her work, it brought us together since we spend a lot of time in our shop/studio pursuing our passions. Although she is not ready to get back into the brick and mortar gallery scene, she has been juried into an on line gallery called UGallery, here’s a LINK to their website. You’ll see this painting without a frame on it; 5 am is its title. In previous posts I elaborated on why I chose fig leafs for the frame and I’d always wanted to try gilding with the veriagated gold leaf, this is a red one from Sepp Leaf and although I was concerned that it would really be garish and over-power the painting we’re both pleased with the final results.

Bondo to repair minor blemishes
This is an oil gilded frame and although I’ve done traditional water gilding using 22kt. gold leaf this is much easier and affordable. This leaf is referred to by a few names; metal, composition, and Dutch gold among them. Being born in Holland I prefer the Dutch Gold label! This comes in 5 1/2″ square sheets and it’s possible to lay an entire sheet once your skills allow you too. You can also handle it with your fingers if you’re careful. Finger nails and callouses will tear it and you need to be very gentle or it will rip; practice, practice, practice! Once you’ve gotten your frame ready for the process, you need to apply a coat of burnisher/sealer. It’s a very heavily pigmented paint that comes in the traditional red and yellow colors used for water gilding. It’s purpose is to seal the wood. However the finish of your frame is after the burnisher/sealer will determine the surface of your gild. You can apply several coats and sand to get a perfect base or allow the brush marks to stay to give the leaf some under-lying texture. A trick is using Bondo glazing putty to patch any small defects.

Burnished with 4/0 wool
After the burnisher/sealer is the way you’d like it to be it needs to be burnished. In this picture you can see that the bottom leg has been burnished. This is done with oil free 4/0 steel wool or a nylon scotch pad. I prefer the Liberon brand of steel wool for my work. You’ll need to remove all of the dust prior to putting on a coat of gilding size, I’m traditional and use Rolco oil based products, not water based. Dust removal is best with an air hose, it’ll get any of the small steel wool particles out of the carving.
For a project of this size, my preference is to use slow set gilding size. This needs to set up for 10-12 hours before you can lay the leaf but allows up to 24 hours of working time. Quick set size is okay for smaller projects but my opinion is that the slow set has more lasting strength. This creates a potential problem with dust — any dust that settles on the frame during the drying time will telegraph through to the leaf. Here’s my solution:


Gilding Slide Show
Diane took a series of pictures which I hope will illustrate the process. It begins by cutting one sheet diagonally to start a corner of the frame. Not having used this type of leaf before I wanted to be sure to match the pattern of the variegation, use a fresh razor blade whenever you cut the leaf. Notice in the slide show how the leaf is first anchored on the inner, sight edge of the frame. I use my finger to gently press it onto the size. Once it’s anchored you slowly move the leaf layer (waxed piece of MDF) back as you press the leaf onto the curves of the frame. All I can suggest here is to practice the technique, it’s something you’ll get a feel for. The final step, once the entire frame is covered, is pressing the leaf firmly onto the frame. I start this with my finger at the overlaps of the leaf and end up with a micro fiber towel. The entire frame needs to cure for at least 24 hours before the toning process.
Toning Slide Show
Last of all, you’ll want to tone the frame down because Dutch gold is pretty garish looking. If you get into frames, the difference between metal leaf and the real gold are quite obvious. This is an area I struggle with because all of your hard work can be ruined with one bad layer of toning. To cut the initial glare of the leaf, lightly buff it with 4/0 steel wool, again an oil free variety. For this frame I used a wash of Asphaltum thinned with Naphtha to mellow out the gold. Works well as you can see in the third picture. I try to keep it simple, bottom line though is that any form of Dutch gold has to be sealed to prevent tarnishing. Shellac is an easy choice for that. I took this series of pictures in the same location and camera set up so you can see the subtle change that took place. Enjoy!

John…Have you ever used asphaltum mix for wood finishing?Like your work.
LikeLike
Morning Robert, thanks for the compliment! Never have tried using the asphaltum for finishing but imagine it would give an “old world” affect, is that right? Would you top coat it with wax, shellac, or something else? What’s your experience with it?
LikeLike
Beautiful! The toned down frame complements the pensive mood of Diane’s beautiful painting
very nicely.
Thanks for the slide shows showing the techniques. Well done.
LikeLiked by 1 person
Pingback: Custom Picture Frame Molding: Part 1 | Woodworks by John
Pingback: Inspiration for a Frame Design | Woodworks by John