

Panoramic Shot of the Shop in Chaos!
This is a panoramic shot of what the shop looked like this morning. As you can see, the car’s gone and things are strewn all over the place — need to organize! But, I’m getting ahead of myself so let me back up to yesterday when I picked up the Sliding Table from Woodworkers Emporium and began the installation.
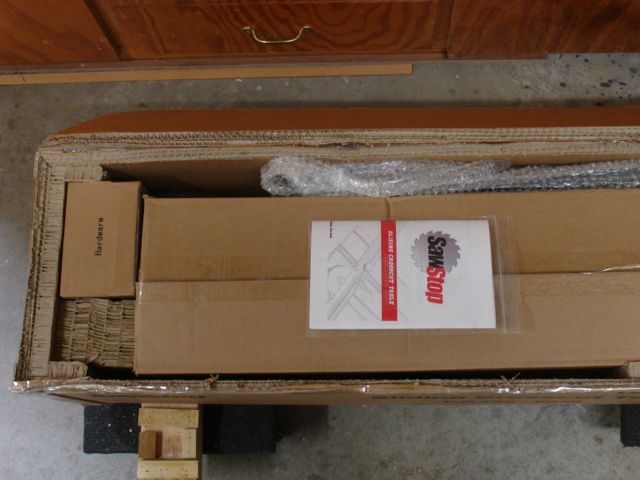
Great packing job
First of all, this thing’s heavy — 85 pounds but I was impressed by how well it was packed, no chance of damage during shipping. The sides of the box have extra layers of corrugated cardboard and any dead space is fitted with blocks of cardboard. This eliminates any movement and possible damage to the finish. The only thing that wasn’t as impressive is the installation manual. It wasn’t nearly as complete or well written/illustrated as the ones that came with the saw. I called tech support a couple of times and they were very helpful, customer service is a big plus for this company. One tech I talked with could see the confusion and said he would point it out to the writing department. His suggestion was to use the on-line PDF instead. I took his advice and it proved to be much better than the booklet.

Third Hand
One thing that was suggested was to be sure to have at least one other person support the table during installation. My wife is pretty strong but knowing it usually takes some time to get the bolts in place I didn’t want to ask her to juggle an 85 pound piece of aluminum while I fiddle around trying to hold the other end and thread a bolt through a hole! No strong neighbors around either so a clamp and a 2 x 4 became my third hand with no problems.
Now it was time to assemble the remainder of the sliding section and that’s when I learned a thing or two. First of all, once the sliding table is attached and the legs are adjusted for the required support it becomes somewhat difficult to move the unit around. I realize now that this saw will need to be in a more permanent location than the old Jet. I’m also realizing that my working methods will need to change a bit, that’s why my sub-title has to do with teaching us old dogs new tricks! Here’s just a few:
- I’m used to reading a scale from the blade to the right side, with the slider it will read from the blade to the left side. Very easy to set a stop for 11 1/2″ thinking that it’s 12 1/2″!
- As a rule, I would use the miter gauge to the right of the blade and use the fence with a spacer as a stop block. This has now been reversed with the slider.
- The controls (power, blade elevation, blade tilt) are in different locations and I haven’t gotten my muscle memory yet to quickly locate them.
- Using the slider means a different stance and position than what I’ve used for the past 50 years or so!
- The accuracy I’ll gain with the slider means less mobility but thinking back, the Jet pretty much stayed in the same position 85% of the time anyway.

Slider Installed; Day One
So, at the end of the day the slider was assembled and had a few trial cuts done with it. Now it’s time for a glass of wine and some relaxation — fat chance of that; this boy doesn’t relax well! I know there are changes to be made to the shop layout and my work methods. My wife (bless her heart) offered to let me have the two car side of the garage and she’d park the Mini in the single side. Appreciate the offer but that may end up being even more work, besides I’m not up to learning too many new tricks!
Old School Sketch Up!
Old School Sketch Up
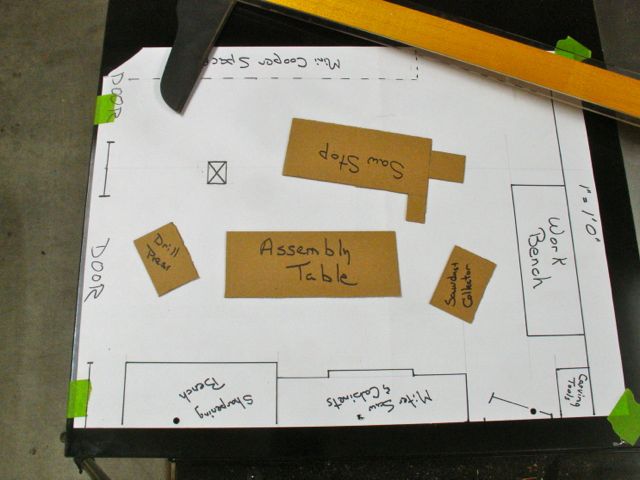
Over the years I’ve attempted to learn various computerized drafting programs and even though they’ve simplified considerably the time required to learn them just isn’t worth it to me. I still use a left handed, Vemco drafting machine and know that changes to a clients project will require a bit of time on my part. For this project though the back of a calendar, 36″ T-square, and large triangle is all that was needed. The paper was taped onto the extension table and I found that using an easy scale of one inch equaling one foot was easy enough. First up was drawing in the immovable items, door openings, and a support post. Next, scale models of the movable items were cut from some light weight cardboard. These were the SawStop, assembly tables, sawdust collector, and drill press. Now I realize that my younger readers may think this is a lot of effort compared to simply (for them!) creating the shape on a computer and then dragging it around with your mouse but this is what I know. After a few attempts this is the format I came up with:
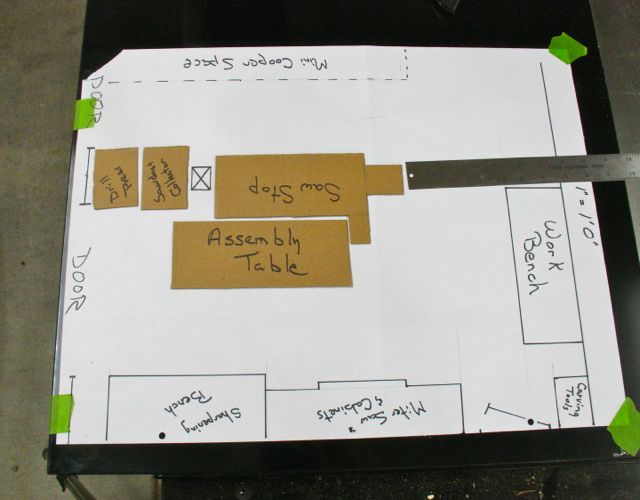
Final Layout
Before settling on this arrangement these are the things I considered:
- First of all, I used to face north when using the saw, I will now face west. This means that the Mini will be behind me but it’s easy enough to pull out to the driveway. Depending on where it’s parked I’ll have anywhere from 4-7 feet clearance — more than enough for most of my work.
- As you can see by the ruler, there is over 4′ of room between the furthest point of the sliding table and the work bench where I spend most of my time. That point is movable and less than 4″ in width.
- There is just over 9′ from the blade to the miter saw cabinet which means I can easily rip sheet goods, the car will need to be moved but — no problem there!
- The drill press doesn’t see a lot of use so being tucked away in the corner is okay.
- The sawdust collector hose feeds through the assembly table and when the bandsaw or planer is used will be easily connected to them. It’s location near the double garage door means it’ll still be easy to empty outside.
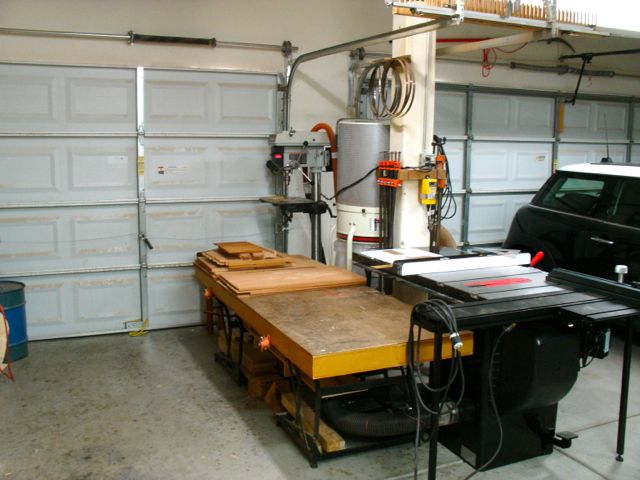
Assembly Table Lower Position
The only problem encountered was with the assembly table. You can see here that the old Black & Decker bench mates needed to be lowered. These have always functioned as an out feed table for the saw and line up when the saw was in the other position. The way the garage floor is sloped (from the outer edges down to the center) means the table is about 1/2″ higher than the saw. The assembly table is a torsion box design so can’t be modified. I’ll either make a new set of them somewhere down the line or take the easier approach of making an out feed roller for ripping. Time will tell on that one. Here are two other pictures showing to illustrate how things are now:


The last thing accomplished was setting the slider so that it cut 90 degrees to the blade. This required a number of trial and error passes which allowed me some time using the saw. Some reviewers of the slider complained about the lack of detents locking the arm at preset angles. SawStops rationale to this complaint is that in time, these detents begin to wear out as much as 2-3 degrees reducing the accuracy. The scale is large and easy to read so time will tell. I do agree with there thoughts on the wear factor based on my own experience with miter saws — time will tell. Once set up accurately though it should remain. The arm has a slot that accepts 10mm bolts so that jigs can be bolted to it. Future plans include a box joint jig and a miter sled. For ripping wide pieces with the rip fence I’ll either need to rotate the arm out of the way or else release it from the slider completely with two allen screws. That seems to be the best option for keeping the 90 degrees intact.
Now it’s time to start using this thing. First up is to size the panels for the Armoire sides — good to get back to woodworking and see if this old dog is up to learning some new tricks!

Great job!! I’m VERY envious of you new slider and table saw. Thanks for a wonderful blog.
LikeLiked by 1 person
Thanks Jay, the old dog is changing some of his ways! Different stance and material holding techniques but I think it’ll be great. Definitely the last tablesaw for me.
LikeLike
Pingback: SawStops Sliding Table to the Rescue! | Woodworks by John