
I’m just about done working on and talking about drawers for this project. I’ve learned a lot which is always a good thing! The first thing on the list was to clean up and level the dovetail pins. Here’s where using the Old Brown Glue has an advantage as far as I’m concerned. You can see in these pictures that even after drying for a day or so, all it took was a wet, paper towel to get rid of the dried glue:
-

- Glue removed with wet, paper towel
-

- How it looks once it’s dry, ready for a block plane

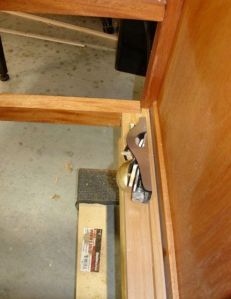
Set up to plane drawers
By attaching a piece of MDF between the bench dogs plus the bench hold down screw I was able to secure the drawer to level the sides and front. This method works well for me.
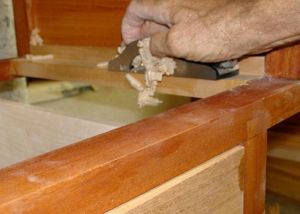
After they were all cleaned up it was time to fit them to the openings. If you recall, the drawer runners were built so they were slightly proud of the frame. This was to provide a bit of clearance and achieve (hopefully) an even reveal around the drawer front. These are inset drawers. Although not perfect, I’m pleased with how they fit. The runners were adjusted as needed by using a rabbet block plane:
-
- Planing the side of the drawer runner
-
- Planing the bottom of the drawer runner
One side note though, the desert with it’s usual single digit humidity can cause a furniture maker forget about the effects of humidity on wood. The two bottom drawers, which I thought fit well; now need to be planed due to our week of monsoonal humidity! The bottom reveal is good but they are snug at the top. I may wait a day or two to see if they will stabilize on their own.

Drawer bottom expansion slot
That means all that’s left are the drawer bottoms. These were made by laminating 3-4 pieces of Alder together that were resawn from material previously used for teaching a plane seminar. Appoximately 3/8″ thick, they were rabbeted on the router table to fit the 1/4″ dado in the drawer bottom. To cut the expansion slot at the back I found another benefit of the sliding table as the picture on the right shows. Don’t think I’d try this with a standard miter gauge for sure! This has been done using a shop made tablesaw sled but this felt pretty safe and secure. The drawers have now been oiled, bottoms shellacked, and it’s time to move on to the door.
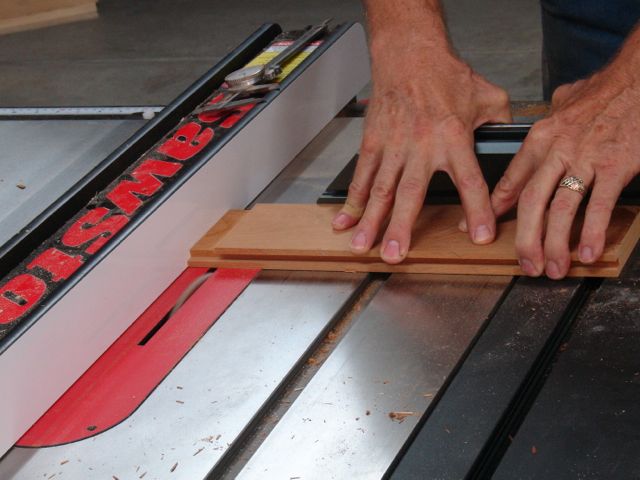
Cutting tenon with sliding table & dado head
When I picked out the Mahogany at Woodworkers Source in Phoenix there was one board that had what appeared to be some birds eye figure in it. This was set aside for the panels in the door. They have been planed and rabbeted so they will fit into the mortised and tenoned door. Like the rest of the piece, they are draw-bored using 3/16″ Walnut dowels. Since I had a 1/4″ dado head set up in the saw for cutting the grooves in the door stiles and rails, thought might as well try using it for making the tenons. Usually I do this with a tenon jig. Once again, the sliding table proved to be an advantage over a standard miter gauge and also a shop made tablesaw sled. The action is unbelievably smooth! The dado head cuts slightly more than 1/4″ so some minor fitting was required to make a good fitting joint. To draw bore it I use my customized punch — a piece of 3/16″ brass rod fit into a golf ball that works great to locate the center of the hole. I decided to try using a Japanese razor saw to fit the haunches for the tenons too.


Clamp just fits between pegs!
I showed how to make the punch in this previous POST. One thing that I didn’t consider was that on the door, the pegs are fairly close together, about 5/8″ center to center. Since they are driven completely through the joint that means, obviously; that they exit on the other side! When I hammered the second one in the sound told me that I had hit something hard — yep, the clamp. Luckily the clamps are about 1/2″ wide so by driving in the two top pegs, loosening the clamp and moving it against those pegs, I then had enough clearance to drive the second set of pegs through. Technically I probably don’t need the clamps since the offset hole will pull the joint tight anyway but I’ve been known to use overkill.
This project has been, and continues to be a great learning process. Very glad this is for my personal use as some of the things I’ve done to get to this point have been questionable, we used to refer to it as “jury rigging” in the Corps. The next challenge is hanging the door with three hinges, something I’ve only done on house sized doors where a couple of whacks with a hammer can make all things right — that’s on the list for next week plus the tops and shelves. Wish me luck!

Hi John,
I am struck by the fact that as a retired teacher of woodworking, you say you are still learning. It’s something I love about woodworking because as many times as I do something, the next time I do it a bit differently. It doesn’t get boring even with the repetition.
LikeLike
Appreciate your comment — as a teacher I worked at the Junior HS level so skills there were basic. Also worked at a boy’s prison teaching construction so have always been a “frustrated” furniture builder/designer. Couldn’t agree with you more about there always being something to learn as we try different approaches to the same problem. One thing I’ve accepted is that my skill level will never meet my personal expectations so that’s a driving force!
LikeLike