
Please Note: Now that I’ve used this for making a frame need to point out one minor problem with this sled. If your molding is long it can cause the front of the sled to raise up. Shorter lengths are no problem, will need to figure out a way to anchor the front of the sled in the miter gauge slot.
Ready for Picture Frames
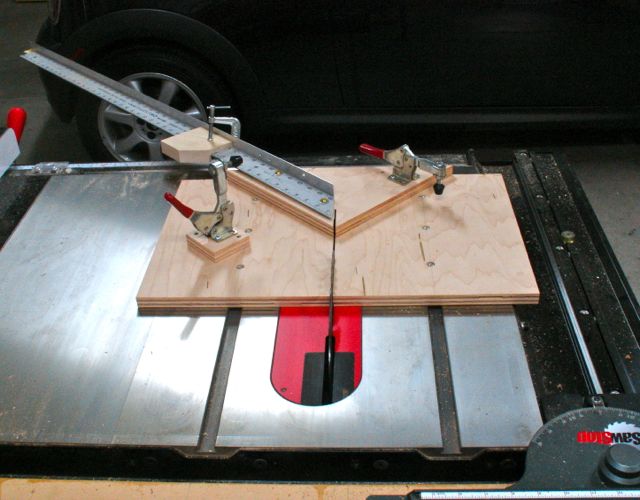
Here’s my set up for cutting picture frame molding on the SawStop. Unfortunately, the sled I had for the Jet cabinet saw couldn’t be modified easily and needed replacing anyway so decided to start from scratch on this one. In the past, my runners are made from UHMW polyethylene and I’ve had no complaints other than it can be tricky getting them to fit perfectly in the miter slots. Decided to give the MicroJig Zero Play guide bars a shot on this project instead. Haven’t made a frame yet but so far I like the action of them plus the ease of aligning everything for this sled. I used two of their bars for this project and some 3/4″ Maple shop plywood I had on hand.
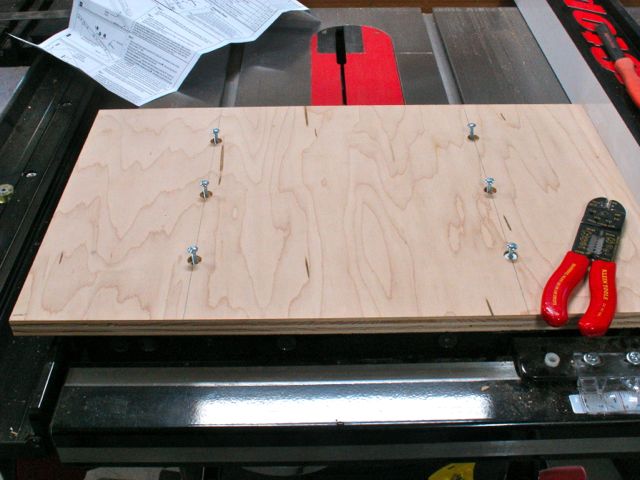
After the ZeroPlay bars are adjusted to fit the slots it’s time to mount the piece of plywood to them that will make up this sled. It measures 14″ x 22″ and is centered on the blade. According to MicroJigs instructions you should first drill a 1/2″ counterbore to a depth of half and inch into the ply. I deviated from this because leaving only 1/4″ of material for the screw to bite into just didn’t seem sufficient. I’m sure they do that so the screw supplied with the bars can be used for either a 1/2″ or 3/4″ thick base. It’s easy enough to cut the 8-32 screws with a wire stripper; much easier than with a hacksaw for sure. I have a box of 8-32 x 1 1/2″ truss head screws for mounting hardware so that’s what was used.
-
- Square set for amount to be cut off
-
- Wire stripper leaves nice cut and threads
Base Aligned to Fence
After drilling the counter bore and 1/4″ through hole the screws were started into the bars and tightened sequently using the fence for alignment. Next comes the part of this sled that I feel makes it so accurate. It begins with another piece of material that has an accurate, 90 degree corner. This will be mounted to the base in line with the blade and is what your molding is held against as you cut. The theory is that even if the alignment is off a bit, because the guide point is 90 degrees your corner will come together more or less perfectly. What you say, more or less!!; yes, I’ve learned that if it is off more than a degree or so one side will be ever so slightly longer than the other when joined even though the resulting corner is as square as can be. If you’re doing outdoor window trim a tap with your hammer on the long point will be all that’s needed to correct that. Picture frames require more accuracy so the more accurately you can align this piece to the blade, the more accurate your mitered joint will be. Seeing how I do mainly picture frames with this set up, that’s pretty crucial. The widest molding my wife generally uses is 4″ so that’s how I determined the location of the guide piece.


I forgot to mention that once your base is secured to the runners you raise the blade so that it is just above the base and cut in to the approximate location of the guide piece. I was able to jam a piece of 1/8″ masonite into the kerf for the initial lining up, attached it with one screw and then aligned it as accurately as I could. Don’t glue this piece down, you may need to replace or re-align as time goes by.
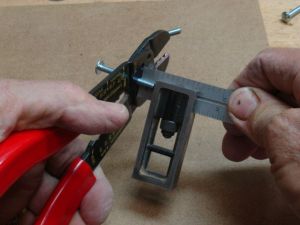
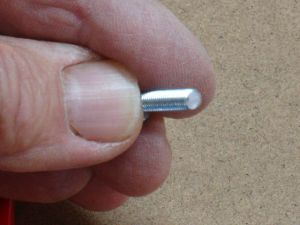
To assemble an accurate frame it’s critical that opposing sides are the exact length, this is best achieved by having some kind of stop system on the sled. The size of if will depend on the length of materials you plan on cutting. My setup is a 48″ aluminum straight edge (garage sale find) that is also supported with an aluminum angle. The length of it makes it pretty awkward to store so it’s removable. In this instance, 1/4-20 brass inserts were used. These can be a hassle to install but here’s a trick I learned some time ago. All you need is a 1/4-20 bolt and wing nut. Since the brass seems to always tear out when you use a screwdriver this method locks the insert to the bolt which can then be installed into the plywood.
Place the wing nut onto the bolt then thread on the insert, locking the two together. Once the insert is fully inserted you use a plier to back off the wing nut, unscrew the bolt from the insert, and it’s installed without tearing up the brass.
In practice, one side of each piece is mitered first. You can probably tell in this slideshow that I’ve riveted the aluminum angle to the straight edge. I’ve also made a stop that can be easily clamped to it. Depending on how you attached the scale, it will need to be calibrated. Picture frames are measured inside of the rabbet so that’s the way my scale is calibrated.
One thing not mentioned are the clamps. I use De-Stay-Co clamps, they are quick and secure the wood well. From time to time they may need to be repositioned depending on the profile of the wood I’m working with but I’d recommend using them so you can achieve the most accurate cut. I’ve found this type of sled to be very accurate and am looking forward to making a frame for Diane real soon!

Pingback: Small Custom Picture Frames | Woodworks by John
What a Great setup! I will definitely be using your method and Jig, Thanks for Sharing! 😉 Bob
LikeLike
Sorry it’s been so long since I responded to and approved your comment. Would you buy the excuse of buying/selling a house plus packing and then tons of papers to read and sign? Glad you like the jig, made one yet?
LikeLike
Pingback: Picture Frame Time! | Woodworks by John
Pingback: Saw Sled Makes Better Miters – woodworkhelp
Pingback: Walnut Picture Frame #201 | Woodworks by John
Pingback: How to Make Picture Frame for Stretched Canvas from 1″ Thick Wood. | Woodworks by John