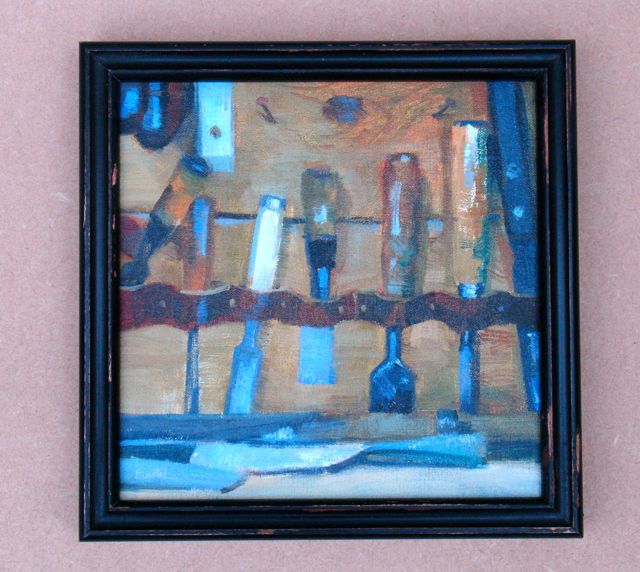
Here is one of the 12 small picture frames with a painting by Diane Eugster. This is one of the thirty paintings she did for the challenge I mentioned in the previous blog. You can probably guess why I choose this one for an illustration!
Let’s finish talking about these frames. As you recall, this project was a need for a simple black frame that showed a bit of age to it. The last thing Diane and I both wanted was to have it look like a shiny one, right off of the import boat. Just for fun, I kept track of the cost ($23.50) and the time (4.5 hours) and figured that each frame has just under $2.00 in materials and took about 23 minutes of time. Honestly, if she sells them for $15.00-$20.00 each we’d be fine with that. I’ll talk you through the final steps in case this is something you’d like to take on as a project yourself. As much as I dislike production line work, this is the only way you can really make these and hope for some kind of profit.

Production Mode
You can see from this picture there was a lot of moving a piece from one pile, sanding (or whatever) and then moving it to another pile. Lots of counting to 4 as each leg of the frame was completed. Here I’m using a tadpole sander to smooth out the cove, this was followed by a block to do the sides, then the top side was done by hand ……. grab a frame, side 1, side 2, side 3, side 4, then stack on the left and repeat!! Seems like a long drawn out process but in actuality it really wasn’t.

Red Primed Frames
A traditional finish would have used actual red clay. For a Dutch Gold frame you’d choose either a red or yellow burnisher/sealer. For these I chose rattle can, Rustoleum Flat Red Primer. Just a note on spray paints aka rattle can finish. It seems that due to EPA standards the formulation of them changes. A bit later, when I talk about aging the finish it used to be that Krylon brand rubs back easier than the Rustoleum product. A fairly minor point but if possible, experiment first. I have a turntable that you can barely see in the foreground, but these were sprayed and then allowed to dry over-night. This was repeated the next day with a satin black finish. Notice the three pieces of the molding between the frames at the right? These are my sample sticks to determine if the black will be ready to rub back and expose a bit of the red undercoat.

Rubbing back to expose primer
Quite some time ago I wrote a blog regarding waxes and how they affect a painted finish. Here is a LINK to it, let me explain it in a nutshell. For final finish on picture frames or shellacked surfaces I’ll use Liberon Black Bison. It doesn’t seem to have as much solvent as Johnson’s or BriWax which seems to have the most. Your goal is exposing a small amount of the undercoat which will give your frame some richness. For this project BriWax was chosen. I’ll use it in conjunction with a white scotch pad and towels. Use those sample pieces to experiment with. In this instance I applied wax to the tops of the frame with the scotch pad, then a clean section of the pad was used a bit more vigorously to wear away the black. Here’s where you need to develop a “touch”; just before the paint starts to abrade you’ll notice some drag on the pad — lighten up and remove the wax. I’ll use the towel to do the sides then buff all of the wax off. Keep in mind that the most wear would be visible on the corners and tops. Some on the inner edges of the cove should be taken back too to replicate years of dusting the frame too. It’s not a fool proof method, I found that in some instances both the black and the undercoat were removed but in my eye, that looked okay too. Here’s a little collage of some of my results, you’re after subtleness!


Last thing to do was attaching a sawtooth hanger to the backs. This gave me an opportunity to orient the frame the way I wanted. There were about 4 of them that had a large piece of the finish come off the inner lip, by orienting that at the top it’s hardly visible. Small, but time consuming step believe it or not.
Back Page Addition!
Have you ever heard of Cottonwood Bark carving? I hadn’t but a good friend of mine is an avid carver. He was one of the founders of our local carving group; Woodcarvers of Las Vegas. Anyway, last Saturday they had a demo/class showing how to make a gnome house from the bark. Diane and I went and for $5.00 each we got a piece of bark and instruction on how to create the project. Lots of fun, just had to share the results of my first ever attempt at this. It was taught by Bob Pearce Jr., he suggested I could make a lean too on the right side. One of my neighbors had done some pruning so I went through his garbage to get my little gnome some firewood — enjoy.


