

la Niña Mariachi by Diane Eugster
Diane recently completed a painting that moved me quite a bit. I would peek into her studio every time I came into the house from the shop. Watching this image unfold was fascinating. She wrote a blog about it and you can follow this LINK to see it if you’d like. The texture and darker palette of the piece inspired me to design a frame that I hope will do it justice. When I mentioned it to her she was all for it so I began to think of a design.

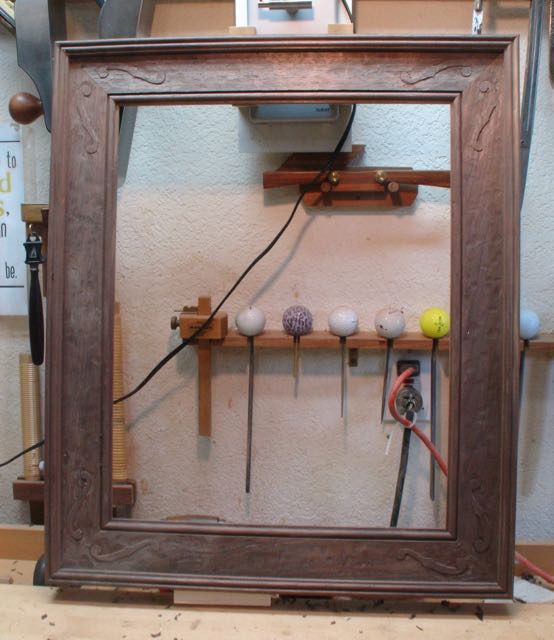
Detail of Frame
Recently, Woodworkers Source had a special on Tropical Walnut. I had heard about this wood and the appeal is the claim it is mostly a nice dark, brown color with very little sapwood. That part is true and when cut it does smell like Black Walnut. It machined pretty well both with a shaper and router and also worked well getting the final finish with a smooth plane. The main difference between it and Black Walnut became apparent when I began to carve the frame. Let me back up here; let’s say I’m a work in progress when it comes to carving but working on perfecting my technique. The design of the frame is shown here, you can see how it was made in this blog. I wasn’t sure if I wanted to do the carving on the panel before applying the banding or after. In the end, I decided to attach the banding and anticipated some difficulties due to the rim on the edge. Now it was time to come up with a suitable motif. We were driving somewhere and it hit me “F-holes” I exclaimed to Diane. Her reply was “I beg your pardon?” Getting her drift I said, no, no that’s the name of the holes in a violin! She didn’t believe me until after we got home and I Googled it as proof. Now that my motif had been decided on the next step was the execution of it.
Like many of you probably do too, an image was found on the internet, downloaded, then sized to fit the frame. For frame patterns that are in the corner you need to flip it over after drawing on one leg of each corner. I’ve found that the plastic containers from salad greens are perfect for this, here’s what mine looked like. Once the pattern is positioned I’ll cut the miter and trim one side to fit against the banding making locating it easier on each of the legs. After drawing it on leg simply flip it over to draw in the adjacent side of the frame. There also happened to be a line on the print which also lined up with the inside of the molding.


Before actual work began on the frame I did a few practice pieces; here’s where I learned about the grain. Honestly, it will change directions not only in the short length of this pattern but also be different from one side to the other! I’d love to hear from any carver who happens to be reading this and get your advice. I understand that ideally, I would have a gouge of the correct sweep and width to first outline the entire pattern. I have found though that I can get away with a sharp V-tool or even a knife to outline things in Basswood but this Tropical Walnut wasn’t going to cooperate with that. My question to you carvers is this: Should I eventually invest in tools so that I have enough to outline virtually any shape I might need? There really isn’t a shortcut to this is there?
My concept for the frame is to have the f-hole be very subtle. Just like Diane’s paintings she likes the viewer to discover things in her work when they view it. After drawing the design, I used a #8/13 to outline the curves at either end. A #8/6 took care of the curl, after that it was a matter of making a very shallow cut with a small V-tool to outline the design.


Work in Progress
You can imagine the difficulties I had due to the edge banding and the radius on the sight edge of the frame. Subtle; that’s my goal. To tie the rest of the frame in with the carving at each corner I choose to use the gouges to create a series of small cuts in the entire piece. This was a technique used years ago on a frame that was gilded and the way the light danced on it was quite nice. After the first few cuts I was committed — no turning back now! Here’s what the frame looks like as the gouges cut little divers randomly into the frame. You know, it’s really hard to be random! My goal here is to have the light play on the ins and outs of the random cuts made with the gouges. Again, the constant change of the grain direction gave me some difficulties.
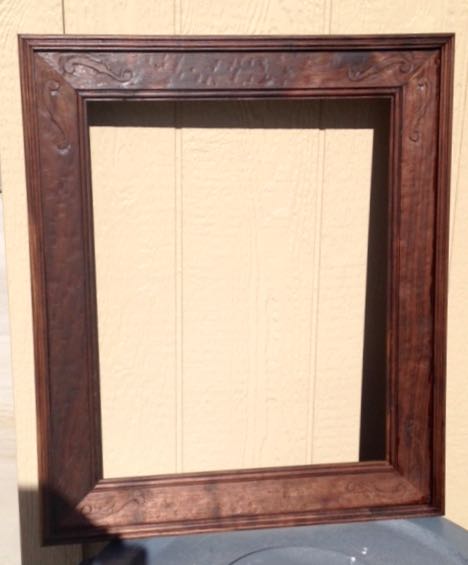
In the Sunlight
The frame will be finished with Watco natural Danish Oil that will be wet sanded. At this point, there is only one coat on the piece and I’ll treat it as a witness coat. I took this picture outside and you may notice little flecks of blue towel that is caught in some wild grain on the frame. My next step will be to carefully chisel those areas smooth and take a critical look at the “random gouge cuts”. This will be done outside in full sunlight so I can really see what I’m looking at. Probably at least one more coat of the oil sanded in followed by multiple coats of my 3 part top coat, each sanded in with successively finer wet/dry paper. As of now, I believe my vision is coming true. The f-holes are subtle, my goal is for them to be discovered as the viewer takes in the painting and the frame and discovers their common theme. Even though this picture shows the frame with its initial coat of oil, it seems to me that what I was after is coming to life.
I’d appreciate your comments, especially from you more experienced carvers on buying tools. I really like the quality and feel of the Pfiel chisels and have recently ordered 5 more fishtails from Woodcraft.

That’s a great looking frame John!
Despite your wife’s surprise, “f holes” were perfect!
Since you enrolled in Mary May’s online woodcarving school, she’s updated her tool recommendations. On the “All About Gouges” lesson there’s her suggested tool list, and a 13 page Q&A document, “30 Amazing Answers to Your Questions About Tools.” She also has an online guide to buying many brands of tools from 9 different North American sellers.
Of course, some of us will go well beyond the basic list … can’t have too many gouges. And YES, fishtails are delightful.
Keep havin’ fun!
LikeLike
Thanks Bob, you were one of the experienced carvers I was hoping to get a response from! I’ll check Mary’s list — appreciate that.
LikeLike
In the French language, there is no confusion between F and the long ſ as the hole (left or right) in a violin is called “une esse”.
More about the long ſ here:
http://typefoundry.blogspot.be/2008/01/long-s.html
with a “how to use” link:
http://babelstone.blogspot.be/2006/06/rules-for-long-s.html
To obtain it on the computer look here :
http://www.fileformat.info/info/unicode/char/17f/index.htm
Nice looking frame.
I also like how/what your wife is painting.
ſylvain
PS I had a “finger trouble” so I hope I didn’t comment twice.
LikeLike
Very cool, I always like learning about the origin of things. I had seen some references that said the “f-hole” is actually an ” long S” like you pointed out. Also read that each violin maker developed his/her own style and that has some effect on the sound of the violin. One of my favorite sayings is “the more I know, the more I realize I don’t know!”
LikeLike
Your favourite saying is one I also quote frequently.
I would never would call myself an expert.
But it is a common illusion when one learn about a new domain to think after a little time that we know it all; probably because at the begining we learn many new things in a short time and we don’t perceive that we have only scratched the surface.
Sylvain
LikeLike
Pingback: La Niña Mariachi Frame Complete | Woodworks by John
Pingback: Scottsdale — 8 Days and Counting | Woodworks by John