

Painted & Trimmed; Waiting for doors and replacement window.
Let me preface this blog by first saying that I am NOT really whining and complaining! I feel so fortunate to have found a wonderful house here in Phoenix that already had an existing out building for my woodshop. Diane and I are loving the neighborhood plus the more diversified living experience here in the city of Phoenix. It’s one of the larger, metropolitan centers of the United States and quite a change from what we’re used to. So many place to visit, shop, and dine at — like a permanent adventure! The shop itself has a lot more work required than I had planned on but I’ve decided to adapt Diane’s attitude and resolve myself to the fact that this is my project. As much as I’d like to be building furniture or carving frames, the shop comes first and it may take another month or so to get it together. What you see at the left is the enclosed porch area which will have a pair of French doors (6′ wide) leading into it, there is a 10′ wide opening which will allow me to get any materials in and projects out.
Well, the title of this blog is Window Woes so let’s jump right into that issue. Although it looks like a great source of light I had a problem the first time I opened it for ventilation — couldn’t get it closed again! It appears to be jammed into an out of square opening and there may have been some sort of counter weight to help it close. I needed to wedge a 2×4 between the frame and the slider to force it closed; not good. Check out these photo’s, notice something weird?


A couple of problems with that other than the fact it won’t open/close. First off to repair a slider and make it operable you need to lift it out of the frame, that post prevents that so if it was ever broken I’d be out of luck. My neighbor was over and pointed out the 1/4″ or so of air space on the lower, left hand corner which would explain the wet, nasty drywall sill. At 6’6″ wide and 4′ tall this is a good sized window. My solution will be replacing it with a pair of 30″ x 42″ single hung windows. I’ll be able to frame them in and trim them out with the same wide moldings used on the new window and door.
Another exterior issue is the berm required for the flood irrigation. I mentioned that in another post but we use canal water to irrigate the lawn which basically floods the entire area with 4″-6″ of water. I had noticed some leakage into the shop — not a good thing! The water enters the property behind the shop and I noticed the berm seemed to be gone on the east side. Here’s some pictures of the work in progress:


In the first photo on the left you can see how it was and the beginnings of the new work. Water enters at the top edge of that picture. Luckily the Oleander roots weren’t too difficult to work through and work went well. Old school, now folks use a laser but I relied on the line level I’ve had since the 70’s. Have about 1 1/2″ of drop in the 30′ or so, we’ll see if it’s successful when we flood in a few days.

Where’s the Stud?
Drywall was installed pretty badly, either the stud layout is off or whoever did it was totally inexperienced. I thought everyone knew that joints had to line up on studs but as this picture at the left shows it wasn’t the case here.

Measure twice, cut once
Another problem was the openings for the outlet boxes. I can understand being off on you first cut or two but you should catch on after that. This is typical; I’ll remove the drywall which thankfully is screwed only, not taped and mudded in and re-use them perhaps on the ceiling. I should be able to patch the holes to achieve an acceptable surface.
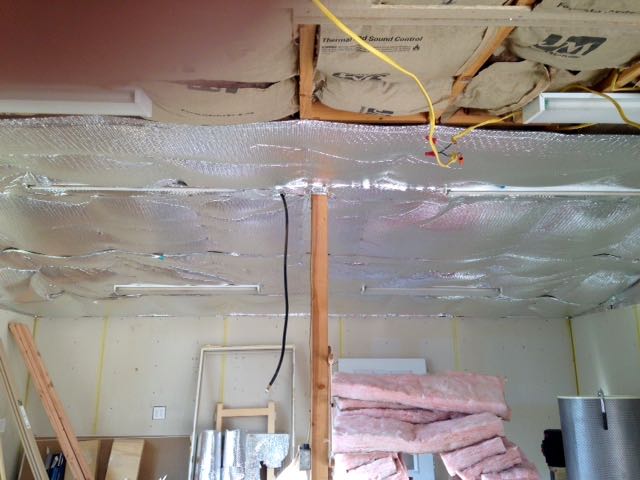
Tin Foil Ceiling
Ceiling, let’s talk about that too. First off there wasn’t any drywall up there, just a foil blanket that looks like something you’d use to stick in your car windshield. As I started to peel it back I also noticed the the electrical connections for the lights aren’t in junction boxes — not too safe. Since I need to remove the lights to do the drywall I’ll nail on junction boxes and rewire according to code. Insulation from the front wall is stacked up and ready to go back in once I add wiring.
So, as you can see, there’s some work to be done. Happy to say though that I was able to use my Jack Plane to trim out the extension on the porch. Needed to customize a piece to more or less match the twist in the 4″ x 6″ beam.


Tomorrow I have someone coming over to give an estimate for a mini-split A/C system and will begin work on the ceiling and electrical. Ready for some itchy times!!

Oh! Are you in for fun…No, I’m not doubting that you can do it all well. You will, but I’m guessing you’d rather be doing your preferred woodworking.
…. and by telling us of all of these little problems, did you just put the local code inspector on alert? Yet more fun.
Keep havin’ fun
LikeLiked by 1 person
Ummm, I hope not Bob! One good thing is my neighbor is an electrical inspector for the City of Phoenix and has offered his expertise in the wiring.
LikeLike
…and if you lived here, you would require at least a 3 part building permit for the work you want to do. Here, they require a permit for EVERYTHING other than laying two stones next to each other in the yard, charge a notable percentage of the actual cost of work for the permit, and charge 5x the permit costs for any fines. (DAHIKT)
It’s a really good system for encouraging people to put off needed work, or to risk not being discovered and do the shoddy work that you’ve found.
All the best.
LikeLiked by 1 person
I would look at the framing after you get the drywall down. From what you have posted already, this person didn’t seem to care too much about things were slapped together.
LikeLiked by 1 person
Pingback: Woodshop Progress — Dilemma’s Continue | Woodworks by John
Pingback: Phoenix Shop Transformation | Woodworks by John