Hallelujah; looks like I’m just about ready to make some sawdust rather than drywall chalk dust and paint drippings! It seems like a much longer time then what it’s been but I began the construction work on the woodshop around September the 14th. and now it’s ready for work. Quite excited to say the least! First up is a combination out feed table and assembly table by the tablesaw. Then I have plans for an eight foot storage area that will combine a drawer unit flanked on either side with shelf units. The plan is to conceal them behind sliding doors. More on that as it happens, I really need to do the storage unit because as it is now, everything I need is in boxes in the second, smaller garage. Can’t tell you how tired I am of going through them over and over to find what I need. If you know me at all you know my habit is to have a place for everything and everything in its’ place — can’t stand to waste time looking for stuff.
Original Entry and Front Porch
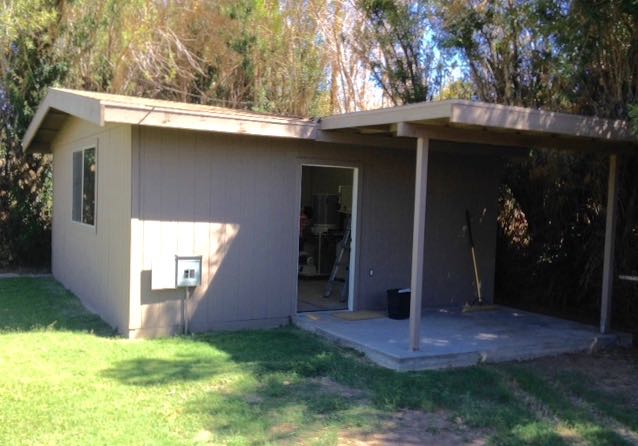
Let’s stay super positive, thought I’d do a series of pictures documenting the before and after, let’s start with the entrance. The original shop building had a single door which just won’t work for bringing in materials and taking out projects. This meant taking out the single door, putting a beam across that opening and eventually framing in what was once a covered porch.


That was a major structural change since that was a bearing wall, if you’re interested you can see the details in this BLOG ENTRY.
The next major changes had to do with the windows. The original structure had one large window centered on the west side. Couple of problems with it other than the fact you could see air around the edges! There is a load bearing post right in the middle of it which meant you couldn’t hardly open or close it and also the counter weight was broken so closing was almost impossible. After taking it out I replaced it with two, single hung windows and added a small slider to the porch enclosure. You can read about it in this BLOG ENTRY.


There was a ton of work done to the interior along with problems I’ve already talked about, mainly the way it was framed up. Not sure how or why the stud and rafter spacing was so goofy but it certainly didn’t follow the standard 16″ on center for walls and 24″ on center for rafters. This presented a real headache when it came to installing the drywall but that was overcome with a bit of grumbling and lots of head scratching figuring out how to get the best yield from the drywall. Here’s a series of before and after pictures — what do you think?


So, it goes without saying that I’m extremely pleased. There’ll be an adjustment period as I figure out how to create an efficient workflow pattern but excited to work all of that out.

Looks great.
LikeLike
Wow! Congratulations on a great transformation. A shop space to be envious of for sure. Its always exciting and a little daunting starting with a blank slate. Have fun with it.
LikeLike