According to the Merriam Webster dictionary Sgraffito is a form of decoration where the surface is scratched away to reveal another color below it. Its origin is Italian and it’s used extensively on frames. This is the second time I’ve created this profile, I wrote about it earlier in this blog about a year or so ago. The reason I’m referring to it as faux is because “scratching” a consistent pattern on an already finished and gilded frame is not in my skill set, this is my interpretation of the technique. The carving is done first followed by a coat of red burnisher/sealer. During the gilding process the gold leaf will tend to crack into the carving which will expose the red sealer.
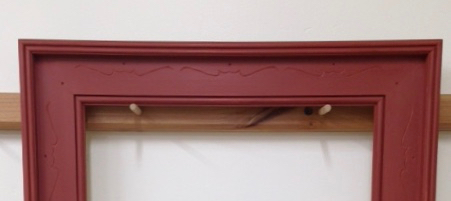
Faux Sgraffito Ready to Gild
This is the last frame Diane needs for the upcoming Portrait Artists of Arizona show I mentioned in the last blog. It is for a 16″ x 20″ painting which is larger than the previous frame made with this technique. I decided to go more with hand tools on this one and embrace that hybrid woodworker philosophy I’ve talked about before. Basically the power tools are my apprentices while the hand tools are used to refine everything. Such a wonderful time working in the shop without the noise and dust of the power tools. That being said though, I do appreciate the ease and accuracy power tools give us and am not quite ready to put them all on Craigslist!
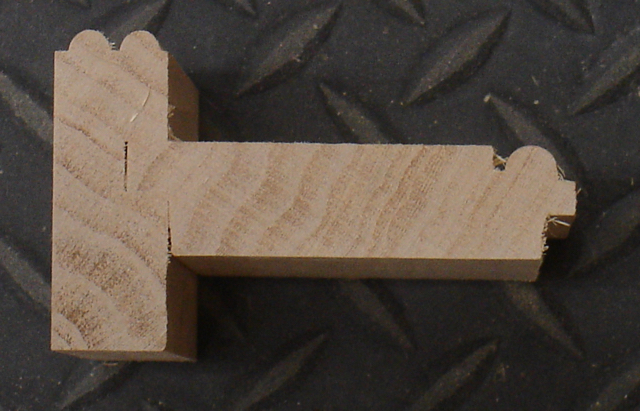
Frame Profile
Let’s start with the profile, basically it’s two pieces joined in a T-shape by a rabbet and tongue joint. The twin beads on the top piece were formed on my 60’s model Rockwell shaper and the single one was cut with a router bit. Now that Lee Valley is offering beading cutters for their small plow plane they could be on my Father’s Day wish list!
Other than ripping to width all other work and joinery was completed with hand tools. The wood used was Basswood so jointing one edge prior to ripping to width on the tablesaw is the first step. In keeping with becoming more “hi-tech” a series of pictures went onto my Instagram showing the view from the four planes used, here they are:


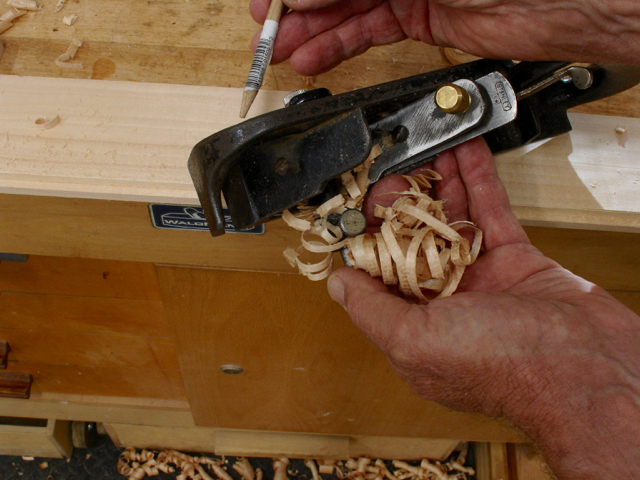
Clearing the Rabbet Plane
The Lee Valley small Plow Plane has proven to be a real delight now that the depth stop issue has been resolved. The shavings just curl effortlessly out of the tool as you can see in the lower right hand picture. Unfortunately, the same can’t be said for my 30’s era #78 Stanley Rabbet Plane. The shavings tend to clog up but were easily cleared with the use of a sharpened dowel. The other thing I discovered is that it is no longer a true 90° so the resulting rabbet isn’t square. I’ve trued up the bottoms of planes before but in this case besides being flat it’ll also need to be exactly 90° to the side. That’s a problem for another day.
This profile is difficult to gild and also to carve. The gilding difficulty is due to the profile and since it’s my own design it’s also my own fault! I’ll be working on that tomorrow and think there’s a solution. To make it easier to carve the carving was done before the side pieces were glued on, that way there wasn’t a lip to contend with. A long bent #12/6mm v-tool works well here, my goal was to keep the shavings consistent to gauge the depth of the carve. The little holes were first cut with a #9/3mm then flattened with a punch made from a nail set.


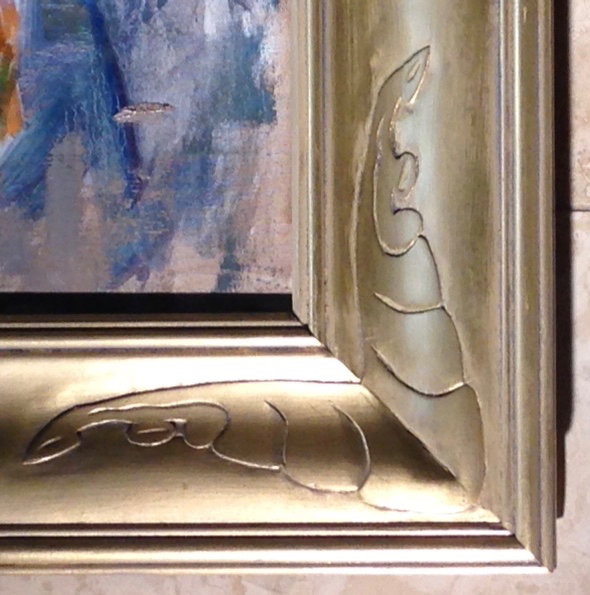
Wedgewood & Lilac Corner
So far things are going well with this frame but you’re always just one step away from disaster! Tomorrow is gilding day and I’m looking forward to the challenge of this profile. I’ll share my success or frustration with you when this frame is complete. I won’t be able to show the frame with the painting in it since there is judging to take place and Diane doesn’t want her work out in public until after that time. The other painting is ready to go, it was titled Wedgwood and Lilac; I can show you the corner detail now that it’s complete.

Pingback: Faux Sgraffito Frame Complete | Woodworks by John
This link might help with the rabbet plane problem.
http://tinyshopww.blogspot.be/2017/03/making-picture-frames-part-2-conquering.html
Although it is difficult to see from your picture what the problem might be.
Sylvain
LikeLike
That is awesome, thanks for sending it to me. I did many of the things shown so the blade was sharp and set up. The body still wasn’t quite 90° so my final solution was buying a Veritas Skewed Rabbet Plane rather than spending more time on it. You’ve probably read that I use the so-called “Stanley 140 trick” on my dovetails and with this skewed plane I should be able to accomplish them rather than using the tablesaw. I listed my old #78 on Ebay and sold it in one day for $50.00!!
LikeLike
As the blade should be (a little) proud, I wander if it is so important for the body to be exactly 90°?
Other interesting post:
https://paulsellers.com/2016/05/rebate-plane-no1-78-filletster-plane/
https://paulsellers.com/2016/05/rebate-plane-1-closing/
about the veritas plane:
https://accidentalwoodworker.blogspot.be/2013/10/veritas-skew-rabbet-plane-2-years-on.html
http://oregonwoodworker.blogspot.be/2016/11/a-skewed-perspective.html
Sylvain
LikeLike
Thanks for all of those links, after setting it up I played around with it and figured out a good method that seems to work for me. If you’re familiar with the Stanley 140 trick this is another use I chose this plane. Having the blade skewed makes all the difference for this operation. I posted this result on Instagram.
Never tried adding a link to a comment hope it turns up!
LikeLike
Pingback: Christine Profile Frames Completed! | Woodworks by John