Ever view this woodworking we do as an addiction? I find that the more I do, the more I look forward to the challenge of taking on another project. I have some plans to make a custom molding for a small (9″x 12″) painting that Diane is working on. It needs to be silver gilded and have a somewhat simple design. I’m starting out with Basswood that I’ve milled down to approximately 1 3/8″ x 3 5/8″. Purchasing the plow plane was partially influenced by this frame design. In the past, I’ve used a beading tool to create moldings but that tool doesn’t cut very cleanly in a softwood like Basswood. When I saw that Veritas now makes beading cutters for the plow plane the thought crossed my mind that maybe this was the way to go. You can guess the rest; go on line, open Lee Valley website, sign in and click that order button!

Auxiliary Fence on Rabbet Plane
After getting UPS delivered the beading cutters it was time to give them a try. They are a little more difficult to control. Unlike a straight cutter, the beading cutter needs to be carefully guided, any slight variation will show up in the bead. Straight cuts are usually used as part of a tongue and groove joint or to inset a bottom for a box or drawer. Since the bead is a detail and variation will be obvious. Decided it would be wise to make an auxiliary fence just as I did for the rabbet plane. As with most things, there are plusses and minuses — the fence helps guide the tool but it also decreases the distance you can go from an edge. Oh well, easy enough to remove if needed.
For the plow plane I had a small piece of Mahogany. Once is was planed to about 1/2″ thick to accommodate the threaded inserts it was time to form it. This is where the fun comes in; doing a small, free-form shape with hand tools. The first step was to draw a shape on the front of the fence then cut it out with a coping saw. Instead of making a template you can simply take the cut off piece to transfer the same design to the rear of the fence. This was followed up with a spokeshave to smooth out the coping saw cuts. I attempted to use an Auriou Rasp but just find that for something this small they tend to tear up the wood — it’s probably going to end up on Ebay soon! A cutting tool like the spokeshave leaves a much nicer finish. Similar to using planes to create a smooth face rather than sandpaper which abrades it.


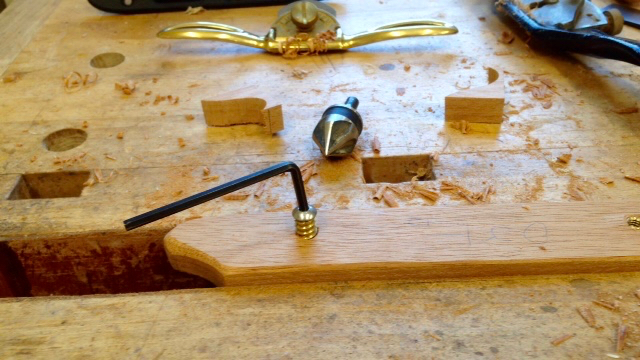
Installing brass, threaded insert
Spokeshave was used to round over the outer edges of the fence as well. Prior to the shaping process holes were drilled to accept threaded brass inserts (10/24) for the screws that will attach the fence to the plane. Those inserts can present problems and you’ll find any number of ways to have success with them. With slotted brass inserts, it’s almost a given that the slots will break as you use a flat tip screwdriver to inset them into the wood. My method is to find either an allen head screw or bolt which is threaded into the insert. Now you have something to get a grip on. Also use a countersink to bevel the hole and beeswax to help the process. Glad to say it was successful! Some final sanding and a coat of wax and we are good to go!
Here’s a couple of shots of the plane in use, this beading bit is 3/16″ in width. The fence really helps keep it all in line but you need to concentrate on pushing the blade securely against the edge, this fence will make that a bit easier.


Next up is cutting multiple beads on about 4′ of Basswood, hope I get the hang of this plane soon!

What size nut inserts did you use on 1/2 stock? I’ve seen .378 and I’ve seen the time knob nut inserts that LV sells.
V/R, Shannon
LikeLike