In the last blog I discussed how this project has gotten away from me and my tendency to get pretty darn obsessive with most everything. I’d like to think that there are other woodworkers out there who, like me; get as much enjoyment out of the challenge and process of making a project as we do from seeing the completed work. This box was no exception to that and if pressed as to how long it took to make I’d tell you I have no idea! I’m quite pleased with the results so here’s a photo essay of the finished piece.


You recall the difficulty with trying to cut dovetails and eventually running out of the Flamed Oak to have enough for the box. Notice that the doweled joints are on the shorter side of the box rather than the longer side which is more customary — not enough material left to get the inside length needed for the plane. As before, rabbets were cut first on the tablesaw and then trued up with the skewed rabbet plane. The dowel making process is best explained with these pictures.


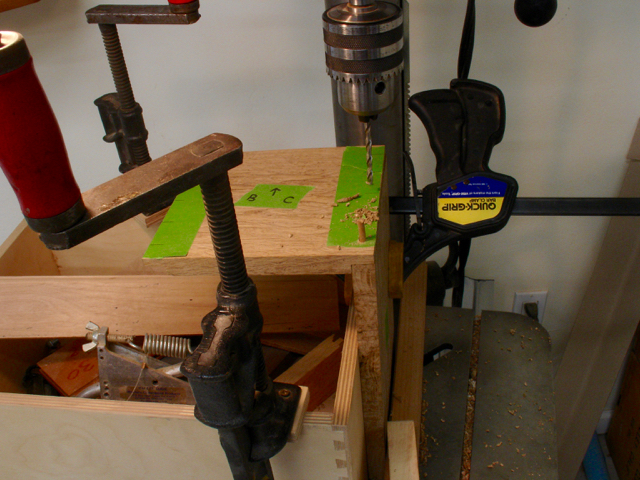
Drill Press Set-Up
Drilling the holes and keeping them accurate required kind of a Mickey Mouse setup. I needed a way to keep the long side 90° to the drill bit so came up with the setup you see here. The box is what I keep shaper cutters and parts in so after lining up the bit it was clamped to the drill press table. Hole locations were previously marked on masking tape and after the first hole was drilled, a peg was inserted to ensure each subsequent hole would be aligned. Notice all of the green masking tape on the sides to help keep myself straight — it works for me!
Assembly was the next step and was done using Old Brown Glue, a liquid hide product I like to use. Dovetails provide a mechanical lock to a drawer or box which pegged joints don’t have. Just in case of a joint failure it’s good to know that hide glue is reversible without serious damage to the wood. After 24 hours cure time the ebony pegs were cut flush, followed by a block plane and finally a smooth plane with an extremely tight mouth. The face grain of this wood has some pretty good workability with planes, not so much with chisels though.


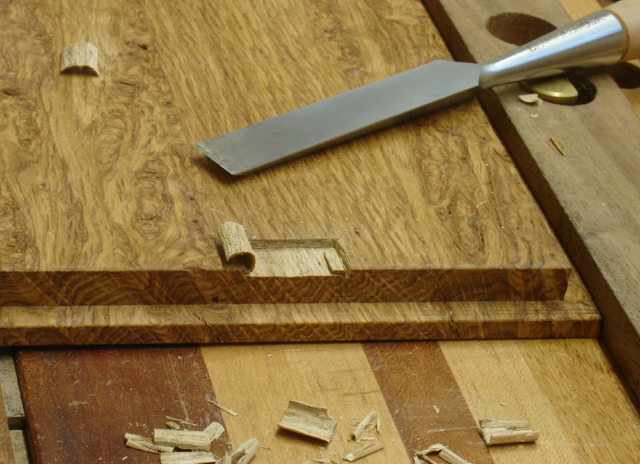
Mortising for Latch
The lid for a sliding type box is always tricky since you want to hide the grooves. Since this wood is so cool looking I used a small piece of it to fill the space at the opening. After working with this wood I figured a breadboard end wasn’t the way to go so broke the rules and attached it directly to the end of the lid with ebony pegs and Gorilla Glue — small as it is I doubt it will be a problem. After oiling the entire project it needed some type of locking mechanism to prevent that lid from just sliding out on its own — yes, a piece of Flamed Oak can be mortised! Just like in carving, the wood cut cleaner and somewhat easier going against the grain.
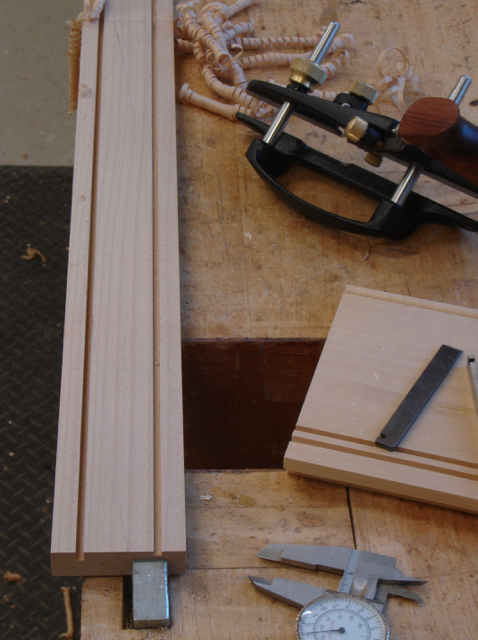
Creating the Blade holder
The final step was creating a way to store the blades safely with the plane. Veritas does sell a leather roll but I wanted something different. The solution was to use the plow plane to cut 1/8″ wide grooves of different depths in a piece of Alder. It is twice the length needed so that it can be cut in half to create a bottom and top. The reason for the different depths is to accommodate the varying widths of the blades. I have space for eight of them, the plane came with 5 and I hope to get the beading blades soon. The over-all thickness of the blade holder equals the distance from the skate to the guide rods. In this way, when the plane is strapped into the box it also secures the lid. The finish is Watco Oil (natural) and my 3 part hand rubbed top coat.
Hope this inspires you to tackle a project like this for one of your special tools — beats the heck out of the factory supplied cardboard box in my opinion!

This turned out great. I may have to do something similar for my plow plane.
LikeLiked by 1 person
Thanks, don’t you hate it when life gets in the way of your woodworking? Sounds like school is keeping you busy but sure that whatever you’re doing will be worthwhile.
LikeLike
Pingback: Beaded Frame & Water Gilding Experiments | Woodworks by John
Looks great, did you keep you shop notes with your sketch? I’m fixing to build one for mine and I’m think the best way for me to start is to fashion the carriage/saddle in which I’ll suspend the plane first… that the box will take care of itself once I work that out and then I’ll only need to make sure I keep clearance and cutter box placement in mind so removing and replacing the plow doesn’t cause consternation. Is that about how you approached it?
V/R, Shannon
LikeLike
Hi Shannon, I’m guessing you saw my blog on the box but just in case, here’s the link: https://woodworksbyjohn.com/2017/05/16/small-plow-plane-box-complete/ I used 10/24 brass inserts to attach the fence and I remove it when it’s inside the box, it’ll just lay next to the plane. As far as shop notes pretty much all I have is the blog. Let me know if there’s something I can answer for you, don’t mind questions! It’s been some time that I created the box but should be able to point you in the right direction! Thanks for your compliments and reading the blog — John
LikeLike