

Smooth Plane prior to assembly
This sliding door is taking up most of the available floor space I have in the shop. Roughly 5′ x 7′ means that when I have it on sawhorses now to do the finish work I can barely get around it, good thing I’m on the slender side! Hit that point where there’s a definite light at the end of the tunnel. The glass was ordered today, didn’t realize that because it’s tempered most glass shops are unable to cut it so it’ll be here in 7-10 days. Since it’s in a door tempering is required by code and a wise move, well worth the added cost. Before assembling the door each piece was smooth planed to remove those inevitable planer mill marks. Even though there’ll probably be some minor sanding required after assembly my preference is to always have hand planed surfaces.
The assembly went pretty smoothly thanks to the help from my wife, getting everything to line up and moving quickly to avoid having the glue set before the clamps were in place is always stressful to me. The plywood (Cherry) has the first coat of Osmo PolyOil applied already. We did it in two steps, in the morning half was assembled and left clamped until late afternoon when we completed the process. Notice the cauls by each clamp, these worked well in spreading the pressure across the 5″+ wide pieces and also elevated the wood off of the clamps so there wouldn’t be any staining. Each side of the joint was taped to catch the squeeze out from the glue. Even though I could have gotten to the up side of the door, the back side was impossible; this seems to have worked. I have an ancient set of Jorgensen I-Beam clamps that are 6′ long and even they developed some bowing as the pressure was applied!


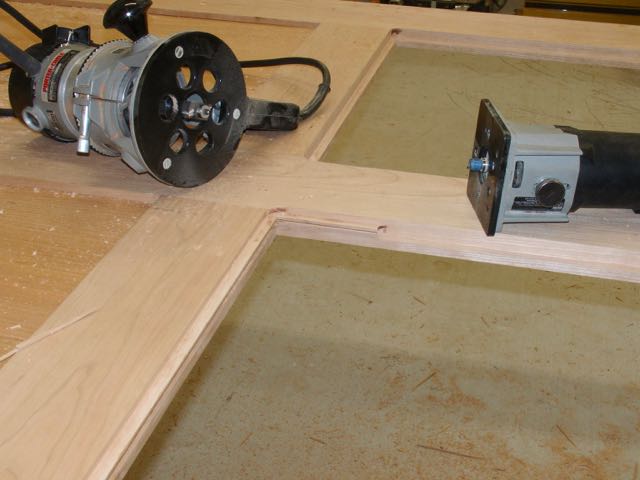
Glass Recess
The next morning it was time to cut the recess where the glass will sits. If you recall, each board had a 1/4″ x 3/8″ deep groove cut into all of the inside edges. This accommodates the plywood and now that groove needed to be turned into a recess for the glass. That was done by first making two passes with a 3/8″ rabbet bit in the router followed by a flush bit with a top mounted bearing to finish it off. You can see the process in this picture. Once the routing was complete the corners were squared off with a chisel.
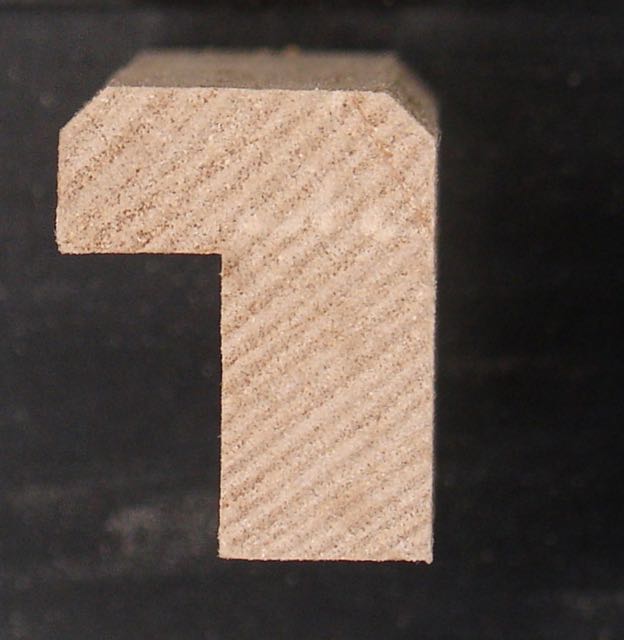
Glass Stop
See this little piece of wood? Unless you’re a woodworker folks wouldn’t believe how much time it takes to mill something like this! First the stock needed to be milled to 9/16″ x 3/4″. Next the 45° chamfer was cut on both sides on the router table. Last of all was removing the required amount so that it retains the glass and lays flush with the top of the door. This was accomplished on the tablesaw with a dado set. The glass will sit in a bead of silicon and the glass stop will be secured with 23 gauge pins. All that remains for the glass stop process is to miter them to fit the opening.
Since this project is taking up most of the shop floor space I’m contemplating putting it in the garage for the finishing process. I’ll do 2 coats on each side so the plan is to do one in the morning and if it’s dry enough to flip by late afternoon flip it and do the other side. Just repeat that until it’s finished. One last step is to make a router template for the inset door pulls. Shouldn’t be any problem being complete before the glass arrives.

Pingback: OSMO Polyx Oil: Is this my new go-to finish? | Woodworks by John