
Celtic designs seem to hold a fascination for many of us, myself included! There’s just something mesmerizing about how the lines go under, over, and around in an endless loop with no apparent starting or ending point. Much like an Escher (one of my favorite fellow Dutch guys!) drawing — they really capture your attention. Mary May recently had a video lesson on carving this design so I thought it was time to take it on. A friend of mine from Las Vegas does these beautiful carvings on a large scale and Mike inspired me to attempt this one.
Transfer of Design
You know how these senior moments get, hopefully between being able to refer back to Mary May’s video and this blog (notes to myself) I’ll remember how to do this the next time! This carving is on a 6″ square piece of Basswood and began with transferring of the design. It is taped onto the wood and using a red pen lets me see which lines have already been traced. The piece is oversized and then cut to the 6″ square afterwards. The slight notches in the centers were cut with a coping saw and filed smooth.

Design Outlined
First up was to outline the design with a #39 V-tool trying to keep the depth to about 1/16″. I’m thinking that the reason this is done is to remove some of the material before going in with gouges that actually outline the clover. Similar to cutting a small relief before cutting a dovetail I suppose this prevents the gouge from undercutting the line since the waste is partially removed. In any case, using a small mallet for the longer straight cuts gave more control.
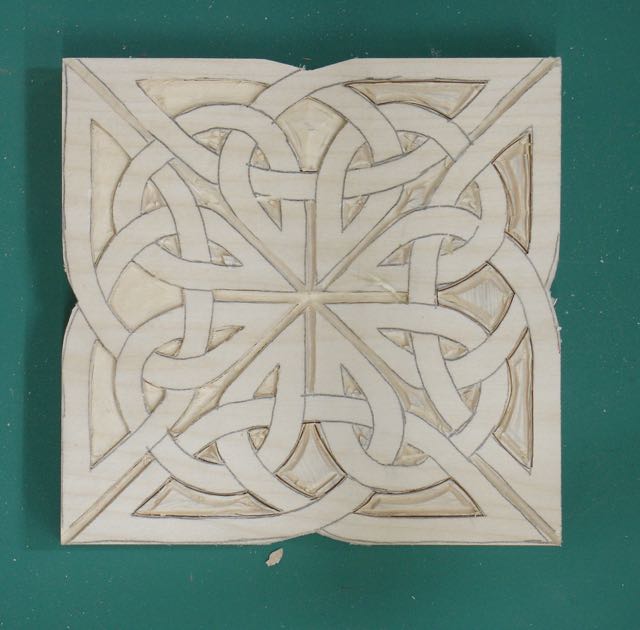
Background Complete
Here’s where I’ve learned that having the correct sweep gouges is critical for repetitive designs. Most of the curved areas required either a #3 or #2 and the straight areas were outlined with a double bevel #1. A #2/5mm is the smallest and flattest gouge I have and it was used to bring the background down. A problem area were the diagonals going from corner to corner; although my template size was correct at 6″, tracing was probably slightly off so the #2 wouldn’t fit in that area. Note to self, future designs need to be based off of the tools I have!

Over/Under Shading & Half Complete
The next step is to identify where the design goes under and over. Shading in each junction was the way to go and even then a few were missed. The proper gouge is selected to match the curve and then gently rocked to about half the depth of the loop. A #3/6 or #2/5 removed enough wood to give the illusion of one piece going under the other. Need to be careful on the shorter pieces and leave enough height for the near loop to go under. The final step was cutting a slight chamfer on all the edges. I didn’t want to use any sandpaper, preferring a surface that only reflects tool marks. Using a #2/10 worked for that. Oh Boy! is this ever a case for figuring out the proper grain direction.
The final step was the finish. I prefer a natural finish but decided that since I’m experimenting anyway let’s go for an antique look. Two coats of wax free shellac was used to seal it and then the only product I could find locally was a water-based gel stain from Min-Wax. It was brushed on and then removed from the top of the design with a cotton rag wrapped around my finger. Hey, I like it — first one came out okay!


