
The expression of “down the rabbit hole” came from Greg Merritt who writes a blog called HillBilly Daiku. He’s been doing some Kumiko woodworking and got me intrigued, I laid some of the blame on him and his response was that he didn’t mind shouldering some of the it! There have been a few articles in Fine Woodworking about this technique as well by Michael Pekovich which inspired me too. Internet research had me checking out video’s and books and falling down that “rabbit hole” even more! Sounds like it’s right up my alley — lots of time, lots of patience, and at least worth .50 an hour if someone were to pay you for it, but a great process to get into and escape from the world!
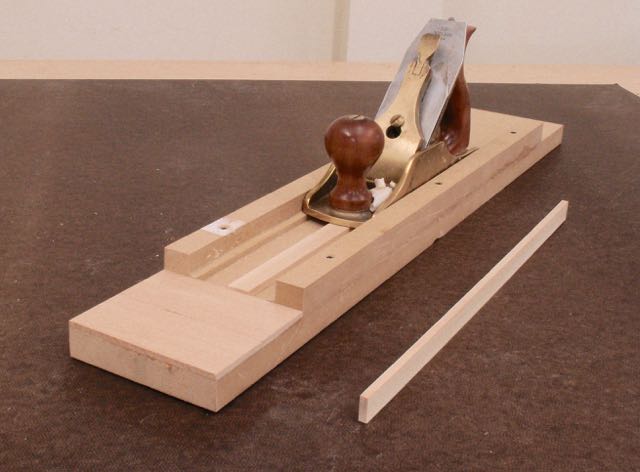
Thickness Jig
My first question was the size of the pieces which Greg (HillBillyDaiku) suggested shouldn’t be more than 1/4″; I decided to go with 3/16″. For width my choice is 5/8″. The eventual goal is to make display tables with a Kumiko insert sandwiched between tempered class that could be sold through a gallery to compliment their sculpture sales. There are jigs needed to accomplish this so that’s where I started. The first is this one designed to make all of the pieces an exact 3/16″ thick. It is made of MDF and sized for my smooth plane. The runners on the sides are L-shaped so the plane rides exactly 3/16″ above the bottom, the stop at the end is 1/8″ so the pieces stay in place.
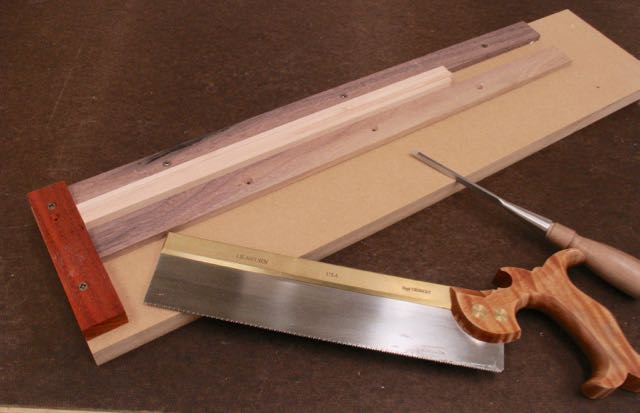
Lap Joint Cutting Jig
The next jig’s purpose is to cut the lap joints. There are a number of ways to accomplish this but I want to keep it hand tools as much as possible so liked this concept. The pieces are held in place by screwing the loose stop tightly against the boards to sandwich everything together. Joints are laid out carefully and cut by hand with a crosscut saw. The Walnut boards sandwich them together are 5/16″ thick. When I just hit them with the saw that tells me I’m at the required depth. A 3/16″ chisel is used to remove the waste and we’re good to go. Here’s a practice lap joint I made — I like it!


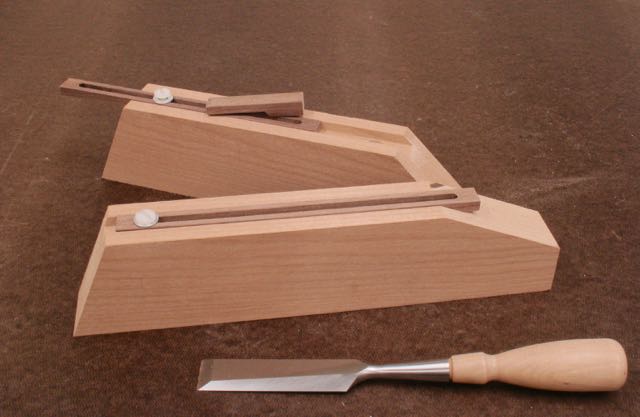
Angle Jigs
Last of all, these pieces need to be cut at precise angles of 45°, 22.5°, and 67.5°. I’ve seen this done in video’s in a few different ways so will ask for advice. Mine have adjustable stops and I’ve had success using a 1″ wide bench chisel. You can also use a block plane which I’ve tried as well but it seems that could eventually mess up the guide block. Mike Pekovich uses the chisel and said he preferred it to the plane. Seem to get good control with the chisel and holding the Kumiko with that little Walnut piece you see laying on the back jig. These can easily be held in the vise while the other jigs are held between dogs on the work bench.
The first step will be to make the strips needed for the designs. I’m using Basswood that has been planed to 5/8″, the process is pretty straight forward — here’s a photo collage to explain it.


Wow, you jumped in with both feet!
I’m liking your process thus far. As to the trimming jigs. I have experimented with using a chisel and a plane. Both work. I prefer the plane simply because I can trim a group of pieces at one time. I’m looking forward to seeing what you put together.
LikeLiked by 1 person
Can’t wait to see what you make with this new technique!
LikeLiked by 1 person
Pingback: Journey down the Kumiko “Rabbit Hole” Continues | Woodworks by John
Pingback: First Kumiko Box | Woodworks by John
Pingback: Is Leather my new “Rabbit Hole”? | Woodworks by John