


As many of you know, working on a project begins with various bits and pieces and then after a long span of time you actually begin to see things take shape, that’s the case with the sofa table project. Yesterday I could actually see in 3D what had only been on paper and in my mind; makes for a great day! It’s far from complete and there is much work to be done before completion but we’re well on the way. As you can see, the intricate Kumiko portion of the design still needed to be done so that kept me occupied for a time. The picture on the left shows the completed inset which was done this morning.
One jig for 67.5° the other for 22.5°
What I enjoy about that process is that it’s detail oriented and one of those things you get into and the next thing you know, 3-4 hours have gone by. Wonderful isn’t it? No news, no politics, no TV noise, just music on Pandora and working with your hands! Always learning and I found a YouTube video by Mike Farrington showing how he does this work. It really helped me out, I’d been cutting the 67.5° angle 1/3 and then 2/3 and it was tough getting them consistent. In his video he cuts one end completely at that angle, then the 22.5° at the other end and trims them to fit the space. Only after they’re fit does he trim off that 1/3 to create the 2/3 pocket for the locking piece. I tried it and it worked well for me — Thanks Mike!
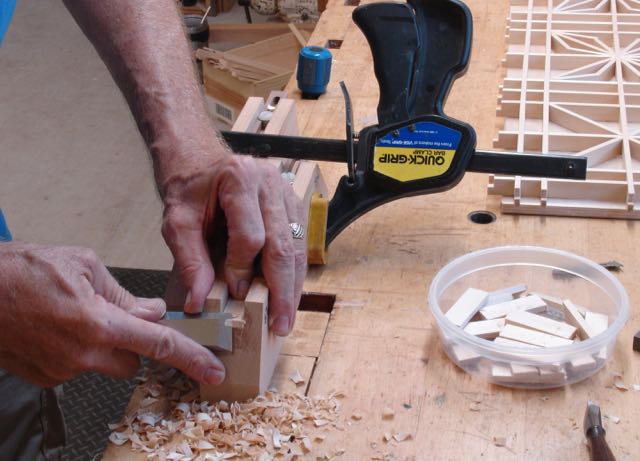
I’ll pass along something that I’ve found helpful with the Kumiko work. After dry fitting all of the wings the next step is cutting that little key that’s cut at 45° at both ends. One end fits in the corner and the other goes into the 2/3 pocket cut at 67.5°. This project called for 12 of them and you’d think they should all be the same length, well; almost! My method is to get adjust the jig for a good fit and then try the in each location. If it fits fine, if it’s too long a bit more needs to be taken off the end. For me it’s tricky to hold that small piece out and trim both ends equally to maintain the point. Some type of shim was needed so I took an old feeler gauge set for setting spark plugs, trimmed it so it will lay across the jig, and used that — works like a charm!


It’s a little awkward holding the feeler gauge and cutting but you can see what a nice, thin shaving I was able to get. My left pointer finger is a bit numb which makes it hard to play guitar! Now it’s time to finish the table and make the dowels to float the top. The Kumiko will be installed after the top is finished, the rim pieces that secure it need to be scribed and mitered which is quite a process.

Hi John I have followed your blog for quite some time and enjoy reading about your different projects and how you go about making them. Hope you are enjoying Arizona. The reason I am contacting you is that I will be going to Las Vegas at the end of February and wonder if you can recommend any local woodworking places of interest (tool stores, lumberyards, galleries, etc) that would be of interest to visit. I am a retired technologist that has been an amateur woodworker all my life. I live in Alberta, Canada and we have a Lee Valley store and some availability to domestic and exotic hardwood but I enjoy visiting local woodworking related establishments when I travel.
Regards Ron Critchlow
LikeLike
Hi Ron, nice to hear from someone who follows my blog — appreciate that! The only place that comes to mind is Woodworkers Emporium. It’s a local tool store that I’ve been doing business with and taught the occasional class at for years. No comparison to Lee Valley though. As far as wood supply goes I used to mail order and drive to Phoenix to pick up my exotic and hardwoods. Enjoy the time there, be sure to check out Red Rock Canyon west of the city — John
LikeLike