
If starting the new year with Charles Douglas’s gilding workshop in Seattle wasn’t wonderful enough, I was also commissioned by Sheri Farabaugh to make three frames for her. She’s an artist that I made a frame for last year. Three of her paintings have been juried into the Cowgirl Up show which will be held at the Desert Caballeros in Wickenburg, AZ in March.
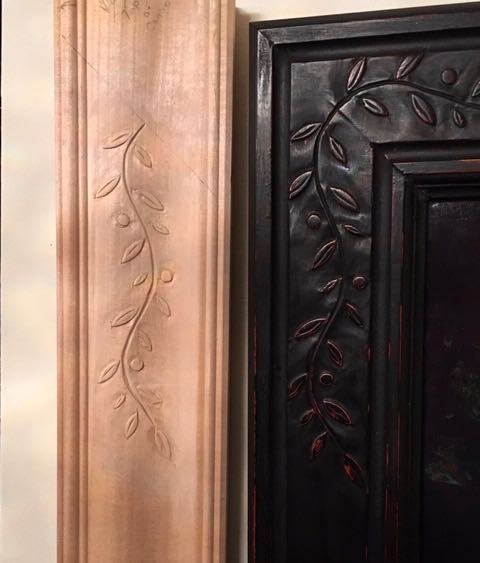
Olive Carving
Sheri came to the shop and house to see some examples of the frames and had tentatively decided on one that had a small vine of olive leaves carved in each corner. The original frame had a flat profile so we wanted to see how it would look on a frame with some coves and rounds to it. I carved the motif on the curvier frame molding and you can see how it compares. After seeing one of Diane’s paintings on the wall with an Art Deco, over-lapping leaf pattern she decided it was preferable so ordered two of those with the black over red clay finish. Her original intent was to get only one frame but decided that having the same frame on two of the paintings she had juried into that show would make a better presentation — I’d agree! There is an additional frame of a different style which I’ll talk about in another blog.
From my first exposure to working with wood in junior high school in the early 60’s to this day I doubt that I’ll ever tire of the process. There’s something magical about being able to take a rough piece of wood and transform it into a thing of beauty or else create a useful item. It’s a combination of power tools (my apprentices) and hand tools to refine the material. After selecting the material, in this case 1 1/16 thick Basswood from Peterman Lumber here in Phoenix it is cut to workable and required lengths, jointed by hand planing, then brought to required widths. The profile is 3″ wide and consists of a long, angled face, a mitered sight edge, and a rabbet. After cutting those on the tablesaw, hand planes are used to refine the surface and remove any marks left by the blade.


After I’m satisfied with the profile the next step is to miter the corners, cut a slot for the biscuit to reinforce the corners, then glue and clamp the frame overnight.
-

- Frame members ready for assembly
-

- Frames assembled and glued, dry overnight
Now it’s time for the creative part, the carving! This carve is much more complicated and time consuming than the first one we looked at, the Olive branch. Each corner takes about an hour to reach a semi-completed stage. So important to keep track of which gouge is used on each element of the leaves and remembering which way the curvature goes from the corner. I’ve been known to get so caught up in the pleasures of carving that a mistake can occur which I won’t notice until it’s too late! I use notes and a piece of the molding with annotations reminding me which chisel is used.
-

- Patterns used for the design
-

- Initial cuts for each leaf, notice my “cheat sheet”
-

- Creating the illusion of one leaf layering over the next. Adding veins and molding the leaf.
-

- Lightly sanded and ready for final inspection!
The first frame completed is sized at 18″ x 24″. The other 16″ x 20″ and I’ll wait until it’s done before starting the finish process. Here is the finished frame along with a close up corner detail.


There’s always some final scrutiny and quality control before the finish goes on, really hard for me to stop and say “that’s it, quit obsessing!”

Nice work!
LikeLiked by 1 person
Pingback: Gallery News and Third Frame | Woodworks by John