
Before sharing the progress of the third frame I’d like to tell you about the Anticus Gallery located in the Kierland Commons area of Scottsdale. The owner, Phillip Payne; has re-branded his gallery to a fantastic place to visit, browse, and shop. It was formerly named Desert Mountain Fine Art but Phillip and his staff have created a gallery unlike any other! Besides the art work, including Phillips’ own sculptures; you’ll find jewelry, furniture, and an eclectic collection of books. Adding the books invites you to come in, browse, and enjoy the over-all atmosphere of the entire gallery. Diane and I went there last night for a jewelry trunk show featuring Craig Vandeman who was there to explain his process. They plan to have “happenings” every Thursday night so contact them to be placed on their email list and stay informed. Of course, I invite you to see my work there as well — they have a variety of beautiful jewelry that would go great in one of my boxes!
Parts is Parts!
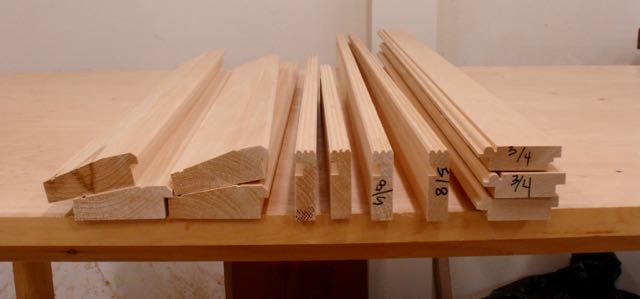
The frame commission currently underway is for three frames. The first two were covered in my previous blog and are for stretched canvases and feature carved corners. The other one is for a 1 1/4″ thick stretched canvas so needed a different frame design. It consists of two pieces; a 3/4″ thick panel plus an outer banding that is 2 1/4″ wide. I’ve been told that I tend to get long winded when sharing the enjoyment and satisfaction of working with wood but can’t help it. This picture shows the profile for the two carved frames on the left, the other two profiles make up the third frame. The expression is: “a picture is worth a thousand words” so I’ll use that approach, feel free to contact me if you have any questions.
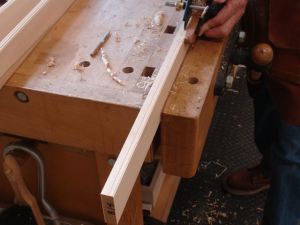
After milling the Basswood to the required sizes and shape, the pieces for the panel required a beaded sight edge, a rabbet for the painting, plus another rabbet/tongue to attach the outer band. The outer band required a groove for the tongue on the panel plus beading the edge. That was accomplished with the Veritas small plow plane fitted with a beading cutter.
-
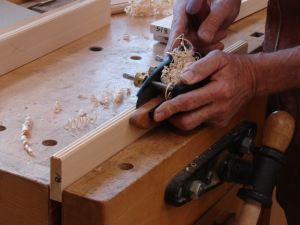
- Setting in the bead
-
- Cutting beads, tricky on thin edge like this
The assembly of the frame was in two parts. It began with the panel having slots cut for biscuits prior to glue up. Once assembled the tongues were fine tuned and the outer banding mitered and assembled with glue. I don’t usually use nails or mechanical fasteners on my frames but in this instance added one 18 gauge brad at the bottom of each corner.
This frame has a sight size of 12″ x 36″. Before the finish process any slight variations will be refined, brad holes filled, and entire piece will be sanded. Time is care and this frame should be a perfect complement to my clients painting.

")
The next steps are to get the finish applied to all three of them but you know there’s always that final step, scrutinizing the work and making sure it’s up to my standards. In the meantime, if you’re in the Phoenix area it would be great if you’d visit the Anticus Gallery at Kierland Commons. We’ve only begun to explore that area but there are many interesting shops and restaurants to see.
