
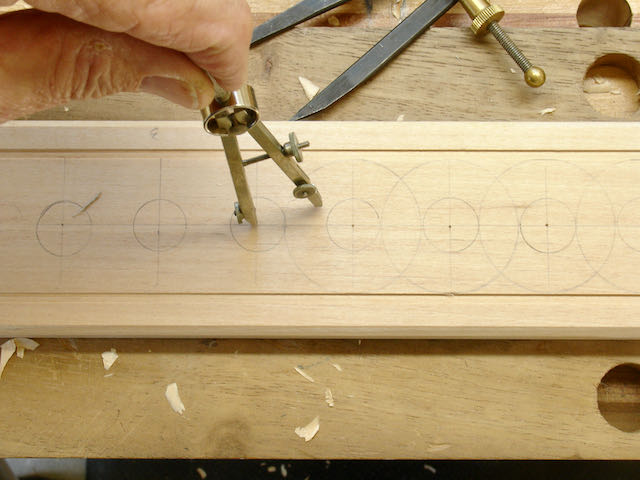
In my latest blog I mentioned that I would write up the process I used to get the Guilloche design onto Frame #205 and here it is! Although it does seem rather complicated once you figure out your pattern and concentrate on the work it’s not too bad. When I first began carving I’d look at other carvers work benches and marvel at how many chisels they had. When you do a relief carving you can usually do the majority of your work using a V-tool. I soon learned though that if the design calls for repeating arcs or circles it’s really important to have the proper sweep and width of chisel/gouge to accomplish that. Quick review; the sweep refers to the arc of the chisel where #1 is flat and as the arc increases the numbers go up (#11 is almost a U shape). The width is expressed in millimeters. I’ll explain the process I used with pictures and captions, there may be other ways to go about it but this worked well for me. First work was done on paper. After drawing lines that represented the space available I drew a circle in the center that space based on the size of the gouge I would use. That was a #8/13 which yielded a 11/16″ circle. A compass was then set from the center of that circle to the outer edge of the space available to draw the outer circle. Next, another 11/16″ circle was drawn; it is located on the center line and just touches the outer circle drawn with the complass. At this point I set a divider from the center points of the 11/16″ circles. This measurement is referred to as a unit. Sounds confusing but I believe the pictures will clarify it for you!

After locating the center of the frame the divider was used to lay out 6 units in each direction. 
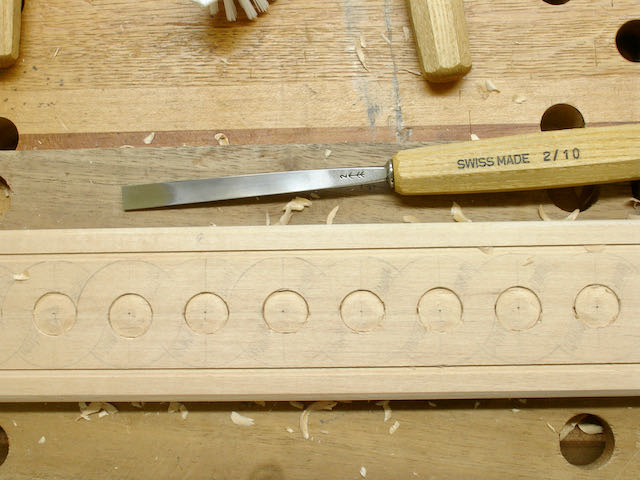
Using a template, 11/16″ circles were drawn — total of 13 for each side of the frame

Use a compass and draw the outer band from each center point 
Carefully shade where the design goes under and erase where the design goes over — concentrate!


A #8/13 gouge outlined the circle, hand pressure only since Basswood is fairly soft 
A #2/10 gouge was used upside down to create the center element.

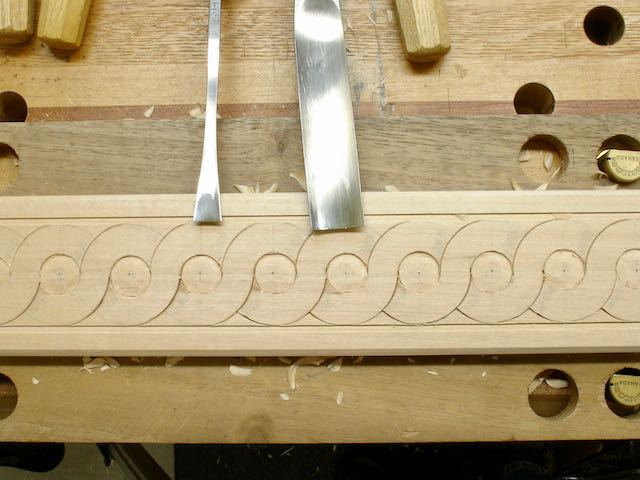
I found that a #5/23 was good for the long curve that went from the center and a #5F/12 for the rest. 
A #2/5 was then used to remove the triangular piece between each circle.


The final step was to cut the overlapping circles. This was done with a #2/14, I tried to cut this in one pass and keep the transition smooth. The same gouge is used at both ends of the Guilloche

So there it is, everyone always asks how much time did that take and each side of the frame took just under an hour and a half; so about 6 hours total time. For me though, I try not to be overly concerned with how long a project takes; rather my goal is to meet the challenge I’ve set for myself. Not having this be my “day job” allows me the freedom to have that mindset. I’m always happy to share what I’ve learned so if you have any questions feel free to contact me. Next will be finishing the frame which will probably be several coats of black Casein followed by shellac and wax. I’ll share the results of that as well.

Pingback: 2020 Ends – 2021 Begins! | Woodworks by John
Hi John,
Your blog has been an inspiration to, and I don’t mean that in a general sense. My wife is a portrait painter who has been working as a university gallery director in Dallas; I work at a philosophy company publishing books and make things as a hobby. We’ve recently decided to take the plunge into doing what we love, and my wife has left her job to paint full-time (or rather, whenever our toddler lets her!); I’ve still got my day job, but will be making custom frames for her portrait commissions.
Reading about you and your wife really made us think: this seems like good work and a good life!
I normally make hardwood float frames, still simple, but nicer than what’s usually commercially available. But I know I need to start branching out as clients will want some different things. And I was wondering if I could ask you how you make a particular custom profile. Normally, I wouldn’t reach out to someone I don’t know to ask, but you’ve been so generous in your blog posts, that I thought you wouldn’t mind.
I really like the simplicity and elegance of the designs below (If the pictures don’t come through, it’s the Monkypod and Australian Lacewood frames in your gallery). I particularly like that the quality and character of the wood is so much a part of the design; I’m very keen to make custom pairing with different woods and sometimes even wood that the client provides that has some sentimental value (my wife has heart for memorial portraits).
I certainly understand if it’s a “trade secret,” but if you would be willing to share with me the process for creating the profiles for frames like this, I’d be very grateful! I have a router table, but I haven’t experimented much with doing different passes with different bits, etc. Even if you could recommend what bits to use to create it, that would be a huge help (these little guys get expensive, and I’m trying not to get more than I need!).
I think it will be a while before we’re anywhere near what you and Diane are doing, but here’s hoping! Your blog posts have certainly made some things seem more possible than the before.
Thanks & Peace, Christopher
[image: image.png] [image: image.png]
On Tue, Dec 8, 2020 at 5:46 PM Woodworks by John wrote:
> woodworksbyjohn posted: ” In my latest blog I mentioned that I would write > up the process I used to get the Guilloche design onto Frame #205 and here > it is! Although it does seem rather complicated once you figure out your > pattern and concentrate on the work it’s not too bad. Wh” >
LikeLike
I’m honored! I’d be happy to help you, one of the reasons I started blogging (other than my career as a teacher) is that when I started my framing journey information was pretty scarce. It’s easier to “talk” via email so feel free to contact me at eugster96@cox.net By the way, the technique on that Monkeypod frame is accomplished by cutting a cove with a table saw, that’s a technique from furniture making.
LikeLike