
Ouch!!
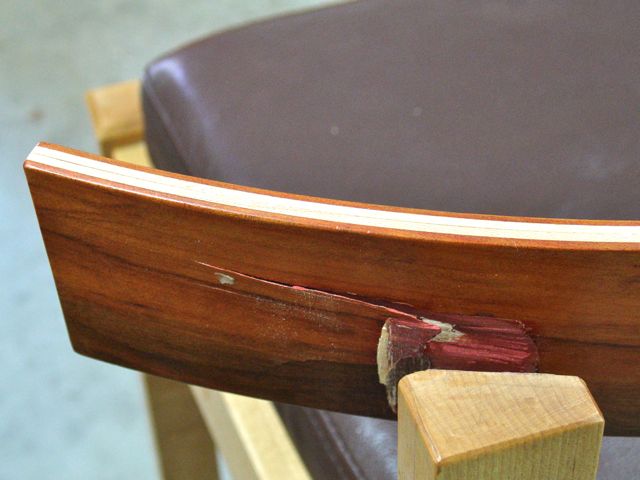
In my last blog I mentioned that a previous client of mine called me with the news that one of the stools I made for him had an accident. He told me the stool has survived many parties and grandkids but just couldn’t take being toppled onto the floor. This is how things looked when he brought it by. Apparently the back got tangled in something which brought the stool down. Just a side note, you always hear that the glued section of a piece of furniture is stronger than the original wood. This was proven here, it’s the wood that failed, not the glued up joint.
 The back of the stool is a curved, laminated piece that consists of 2 pieces of Chakte Kok sandwiched around two pieces of Maple. Each piece is about 1/8″ thick, they were laminated together with plastic resin glue. The way they are attached is with epoxy and a single screw that has been concealed with a Maple plug. There was very little room to countersink the screw and then apply the plug. As you can see, the screw ripped out of the one side so it needed to be removed. The other side was still attached but the top of the leg has some cracks in it. I decided against trying to drill out the plug to remove the screw, there just isn’t enough meat to firmly re-attach everything. Epoxy and clamping over-night seemed to be my only option.
Trying to put parallel clamps on a curved surface like this stool back wasn’t going to happen! My first step was to create a caul with the same curvature as the back of the chair for clamping. A short piece of Alder fit the bill:
-

- Copy Cat used to copy curvature
-

- Traced onto the caul, marks indicate leg width
-

- Initial forming with Jack plane
-

- Trial and error, note how the leg split!
-
- Refining shape with a block plane
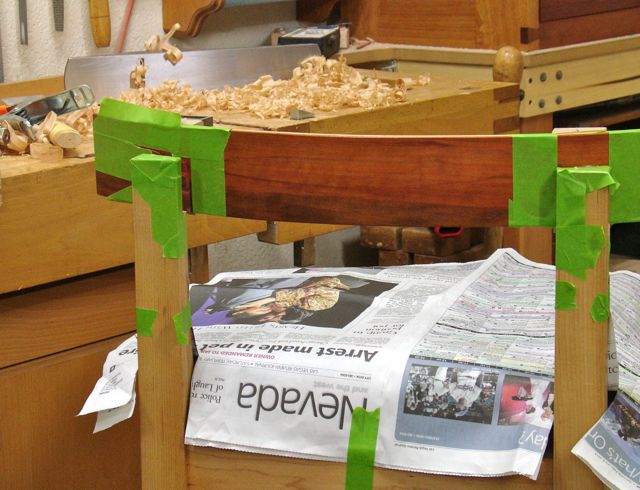 Once the fit on the caul was acceptable it was cut in half, one for each side. To protect the surrounding wood everything was taped off and the leather seat covered. The cauls were attached to the front of the back with double stick tape. After a dry fit it was time to do it! I’ve mentioned before and most woodworkers will agree that glue ups are always stressful. All of your work can be ruined by one mishap — now add the fact that this is 5 minute epoxy and there is a definite time frame. Suffice to say, I was pumped up! Forgot to take a photo of all the clamps used but there were enough to do the job. Although the directions for the epoxy said you only need 30 minutes of clamp time I allowed overnight time before removing the clamps. Kind of held my breath and crossed my fingers that I wouldn’t hear any popping or cracking noises as the clamps released the pressure — all was silent!
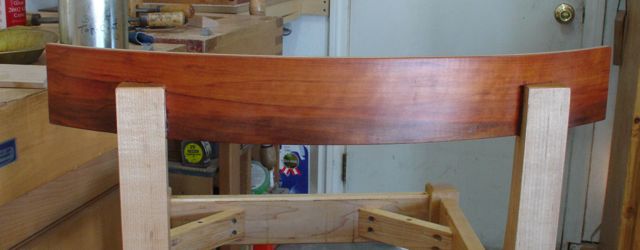
Clamps removed
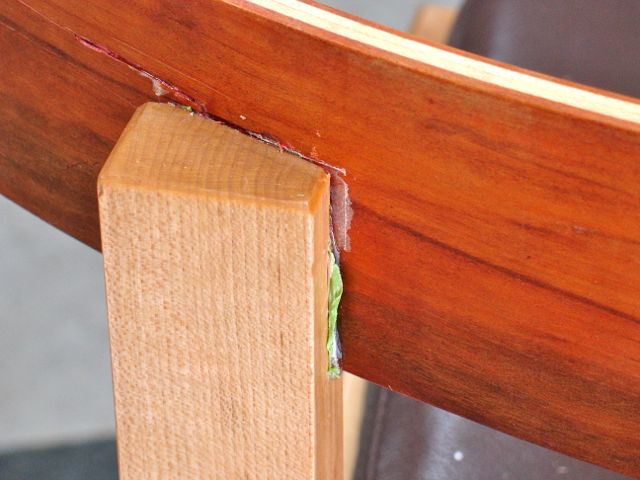
After removing all of the tape there was still a bit of residue from the epoxy which was removed with a sharp chisel and X-acto knife. The large split was smoothed down as well. Really glad that the finish I use is so simple to rejuvenate and hide minor imperfections. It’s a 3 part mix of turpentine, boiled linseed oil, and poly urethane that is wet sanded into the wood. I did an initial application with 400 grit paper and then additional coats rubbed in with denim. These were buffed out, since the front of the back had a few scratches on it it too was re-coated. Here’s what it looks like now, much better if I do say so myself.

Looks good John, thanks for sharing how you did it. Your “Special Finish” does it again.
LikeLike
What a fine looking repair! Esp with an epoxy lamination. Very nice work.
Can you mention the ratios of the finish you mention. I’ve often used BLO and turps, but haven’t tried mixing poly with it. It seems to me that there might be a conflict in curing rates between the BLO and poly. What makes it work? Thanks.
LikeLike
Bob, I’ve sent it to you in the form of a PDF document, let me know if it comes through. One thing I’ve noticed is that Watco has changed their formula within the past few years to comply with EPA regulations. It doesn’t seem to dry as well plus the odor changes but — what can we do! I wouldn’t use the finish on interiors due to odor, stick with shellac there. In corners and crevices it’s important to dry completely to avoid a residue.
LikeLike