
I tend to keep a pretty clean shop, something needed when it’s as compact in size as mine is. As a general rule, everything is in it’s place, that’s how I function the best. However; when you can’t find common tools like a tape, square, or pencil it’s time to clean!

Time to Clean!
It seemed like every horizontal surface was covered with something as this panoramic view shows. Not only is it dangerous, I hate to waste time looking for something just to find it’s “hiding in plain sight!”
Work has progressed on the Mechanical Cellarette to where I see that proverbial light at the end of the tunnel. Whenever I’m involved in a complex project my mind usually goes back to my running days. Until an unsuccessful knee surgery in 2011 I was an ultra mountain runner. My favorite race is one I did on about 4, even numbered years in Prescott Valley, Arizona. It’s called Man against Horse and as the name implies, you run the 50 mile course against folks on horses! Projects are like races, you do the training/research and you’re pumped up and going along strong. About 15-20 miles into it things start to slow down as you realize this is a long one and there are many obstacles yet to overcome. In this particular race, you can see the finish line when you’re about 6-7 miles from it and that’s where I feel I am now on this project. There are a myriad of little details I need to be aware of to complete the project successfully.
First off, once the casework was assembled I needed to have a way to maneuver it around the shop. A pair of furniture dollies from Harbor Freight with cross pieces that support and incase the legs was just the right thing. Don’t know how they sell them so cheaply, you can’t even buy a set of casters for their price!


This will allow me to get around all 4 sides for the final sanding, finishing, and installation of the top and mechanics. The final location for this piece is in a second story office and thankfully, there is an elevator but these dollies will make getting it in position much easier.
The next detail was to make corner blocks. These serve two purposes, one to reinforce the corners and the other is to attach the top via oversized holes. This allows for wood movement as humidity levels change. These needed to be notched around the legs. You can make these with a simple rub glue joint but for this project they are glued and screwed. Adds a little more to the process but with the reputation Bubinga has of being difficult to glue it was worth it. This meant drilling and countersinking the angled bracket. Is Bubinga a hard wood? Check it out, this is the first time I ever broke one of these screws and I’m using hand power, not a powered screwdriver. Even with pre-drilled holes and beeswax coated screws I managed to snap one off!


All that remains is drilling the oversized hole to attach the top.

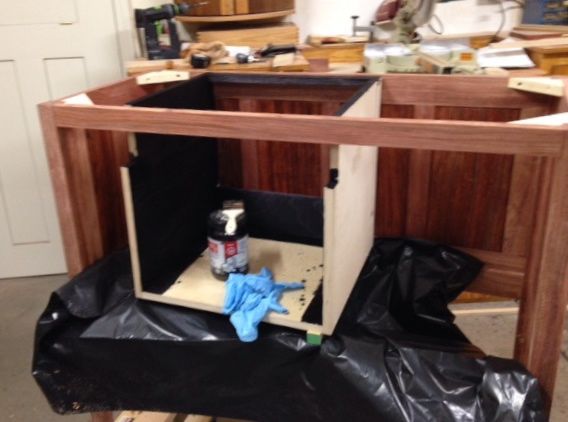
Housing for Auton 1000-A
The Auton lift needs to be encased in a box like structure which, due to the design of the cabinet; had to be built in place! When used as an appliance lift the installation is relatively straight forward. Simply create an opening in the counter top, locate the unit on a shelf below, center it in that hole, and you’re good to go! Details here are a little different. Once the correct height below the top was calculated with the four “support beams” you see below the box, the entire unit will be installed onto it. Next the top will be fastened securely to the sides of the box to maintain the correct clearance between it and the lift unit. The outer edges of the top will be secured in oversized holes in the corner blocks to allow for any wood movement.
Blacked out
Yet another detail at this stage is the box i.e. Mechanical Cellarette that is attached to the lift. Essentially this is a five sided box, mirrored on the inside and the two outer faces. The back will have a black laminate to help make it disappear. Speaking of disappearing, black dye was used on all visible interior parts to make them go away! Just like a set for a play, if it’s flat black your eye won’t be drawn to it. Unlike a TV lift system that has a single lifting point at the back where it is unseen, this lift has the mechanism at each side which is exposed when the unit is open. I had some black dye left over from a picture framing project which serves this purpose well.
As far as the box itself goes, it is made of 3/4″ plywood. The construction is butt joints, glued and screwed together. The top needs to be able to give way in case there is an obstruction as it closes. This will be accomplished by attaching it to the box with dowels. Once everything is installed and adjusted it will be taken to a glass shop for the installation of the mirror. The bottom piece of mirror needs to be removable to access the lift adjustments.
To wrap up this detail, mounting holes need to be drilled into the Auton lift framework –they forgot this step before the unit was shipped!
So what’s left? The lid needs to be banded prior to installing the marble to conceal that plywood edge. Final sanding and double checking for any flaws needs to be done before applying the oil which is next on my schedule. The finish will take more than a week, allowing 24 hours drying time between each coat. The box section needs to be mirrored which will be outsourced. My tile man needs to cut and attach the marble to the top and inner panels. Like I mentioned at the beginning of this blog; I see the finish line but there are still a number of miles to go and mountains to cross before I get there!

You’re the most organized person I know!
LikeLike
Pingback: Mechanical Cellarette — Final Details | Woodworks by John