

Coat 1 of many! Tried and True Danish Oil
I’ve mentioned the stress of glue ups and this one was no exception. Before I get into that though I’d like to share this picture showing the first coat of the Tried & True, Danish oil on the top. I think it looks phenomenal! It really brings out the beauty of the Bubinga chosen for this project. The large, open section in the center is where the hidden bar compartment will come up. It, along with the two side areas will be inlaid with the Italian Marble. For the last 50 years or so the finish of choice for me was Watco brand Danish oil. I used it during my public school teaching career, private students, and pretty much every project made by me from boxes to furniture. The top coat is one I learned about at San Francisco State during the 70’s from a workshop taught by Art Espenet Carpenter, a well known artist/woodworker of the time. So, if this is such a great finish, why do I now go to the Tried and True brand? Blame it on the EPA and their restrictions on solvents, emissions, etc. for forcing the company to change the formulation to meet their requirements. I’ve been in contact with the people at Watco and they admit to the changes but also say it’s essentially the same product — my hands on experience tells me different! It’s now stinky, oily, and doesn’t act the same so it’s time to try another product. In my test samples I’ve been impressed with this product and will use it on my personal Armoire as well. Many advantages but mainly it contains no solvents or petroleum products. It comes from flax seeds and uses natural honey as a wax and is 100% food safe. I suppose that over-all the EPA has our safety in mind but it’s very hard to find the original finishing products that have proven themselves over the years — okay, time to get off my soapbox!

1/2″ Mortise for legs
Prior to final assembly the main crossmember needed to be mortised into the legs. This piece will be the main support for the mechanics of the cellarette so is quite substantial. The mortise is 1/2″ thick by 1″ deep and about 1 1/4″ wide. After cutting them with the hollow chisel mortiser the tenons were cut on the tablesaw with the dado set which was still installed from the previous operation.

Trimming Tenons
They were cut slightly oversized as I like to trim them to final fit with hand tools like this rabbet block plane shown in the picture at the left. The assembly went in stages, first the back which is made up of the two legs, bottom and top stretchers. Gorilla glue is used for this assembly. The next day the front was assembled, this time Gorilla glue for the mortise and tenon joints and the Lee Valley Cabinetmakers glue for the long tongue and groove joints.
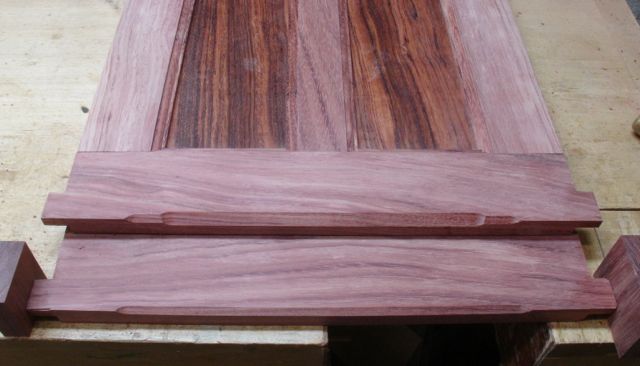
Bottom Apron
The initial intent was to use a beading tool for some decorative bead work on the piece. Unfortunately, this wild grained Bubinga just didn’t respond well to the beading tool so that plan had to be modified. After experimenting with various router bits I found that the safest one for this particular batch of Bubinga were straight cuts rather than coves and rounds. I ended up using a 45 degree chamfer to create this design on the bottom apron. The design was almost accidental. After making a few shallow passes the stop blocks were moved closer together which resulted in this interesting arch design. It’s mimicked on the front as well. The same bit is used on both sides of the top edge so everything is cohesive.
After some final fitting of the joinery and several dry fits it was time to “go for it”. My preference would have been to assemble it with the legs down on the floor but there was just too many pieces to juggle and finagle into position. Here is the results, even though most glues say you can remove the clamps after an hour or less my preference is leaving it clamped overnight. Can’t wait until tomorrow!


John,
Great looking chamfers. It almost looks like lamb tongues on the ends!
Jay
LikeLiked by 1 person
I’ll use that when I describe it — lambs tongue sounds so elegant and traditional. Thanks Jay!
LikeLike