
With the help of my friend Randy, and a rented truck from U-Haul the Cellarette made its way home. After about 115 hours of actual work and countless hours of planning and worrying I’m very pleased to have it complete. My client was excited to get the piece and told me it was more than he expected. Having never seen one of these in person I think we collaborated well and came up with a great design. I took a few pictures inside of his office but they didn’t turn out the greatest. He took many more and promised to send them to me and I’ll be more than happy to share them on this blog. I did want to take a video and post it to YouTube before delivery. The inside of the shop isn’t the most elegant setting for this beautiful (if I do say so myself!) piece but didn’t want to attempt taking it in my clients office. It took me a number of “takes” to get the video you see here:
There are always a few final details to work complete. Once the lift unit was centered and level as possible it was time to attach the back. The final step before buttoning things up was to make some type of cable management system which you see in the left hand photo. Needed to make sure of clearance and no possibility of pinching the wiring. The back is a piece of furniture grade, Mahogany plywood which needs to be removable in the remote possibility the unit needing service. It was finished with Danish oil; I chose to attach it using slotted, oval head brass screws and finishing washers. This adds to the authenticity — I didn’t think that a masonite back attached with a nail gun would be true to the Victorian Era of this piece!


Installation of the Leg Tips
One other detail was to attach the leg tips from Lee Valley to the legs. In one of the posts about this piece I explained the process needed to get them fitted. Now that they’re installed I really like how they enhance the Victorian/Edwardian Era appearance of the unit. In the previous post I discussed how their tapered fit was achieved. Although they are supposed to be a friction fit and held on with a single brad my I decided to use a thin coating of silicon seal in case there is any wood movement as our seasons change. Usually not much of an issue in the desert but — you know me! Also played it safe by pre-drilling that hard Bubinga.

Auton Adjustment Tool
This left me with the dilemma of what to do with the adjusting tool for the lift unit. First of all, I doubt it will ever be needed due to the quality of the lift mechanism from Auton. But …… what if? Knowing that if I gave it to the owner it would be in a drawer somewhere, someone would look at it and wonder what in the world it was before tossing it into the nearest garbage can! Using some hardware for mounting pictures in their frame I created a secure, hidden place for the tool under the lower, left corner.
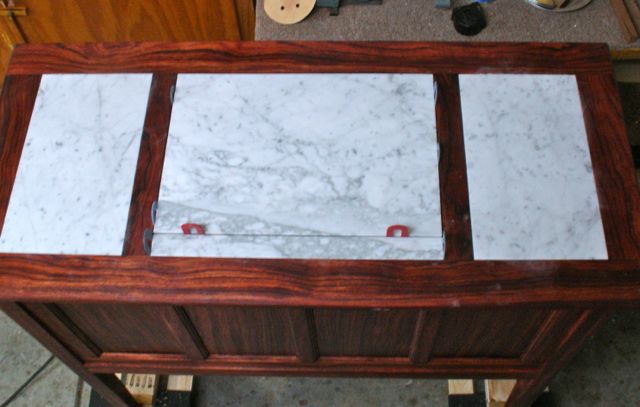
Italian Marble Set in Place
Now it was just a wait and see for the tile man to come over to fit and set the top and we’re good to go. I like how that vein runs through the center section where it opens. After allowing things to cure overnight the unit was given its final cleaning and coat of Liberon Black Bison wax. All in all, a very complex but rewarding project to build. Nothing like a challenge to keep you motivated and awake at nights wondering how it’ll all come together. The most rewarding thing about any project comes when it’s obvious the client is more than pleased with the work.
Glad I was able to share this project with you, my blog readers and I’d welcome your comments about how it came out. Not sure I’d want to go into production on it but at least now I know more about it than I did several months ago!

It was worth all your worry John! Or, maybe a better way of saying it is that all your worry paid off with a very handsome piece. Very nicely done!
LikeLike
Thanks Bob, great challenge but not ready to go into production!!
LikeLike
Very nice!
LikeLiked by 1 person
Pingback: How to Make a Mitered Box on the Tablesaw | Woodworks by John
Pingback: How to Add Keys or Splines to a Mitered Box — Cat Box Completed | Woodworks by John
Pingback: Portable Easel and Woodworking Challenges | Woodworks by John
Pingback: Shop Happenings & A SawStop Trick | Woodworks by John