
Now that the Mechanical Cellarette can be put on the completed list it’s time to concentrate on a custom order for an Etsy client. This particular order has been one I’ve been doing convo’s on for quite a while. The lady is in no rush, thank goodness, because I did tell her how involved I was with the Cellarette. The purpose of this box is to hold keepsakes of her cat:
 This is the nameplate for it and if you notice the little defect between the I and the C, so did I! They’re making a new one at Trophies of Las Vegas with no questions asked. I’ve been using them for years and Whitney thought that perhaps a piece of metal lodged underneath the nameplate as it was being cut. Good excuse for a bike ride to pick it up when it’s done!
Planing edge on Leopardwood
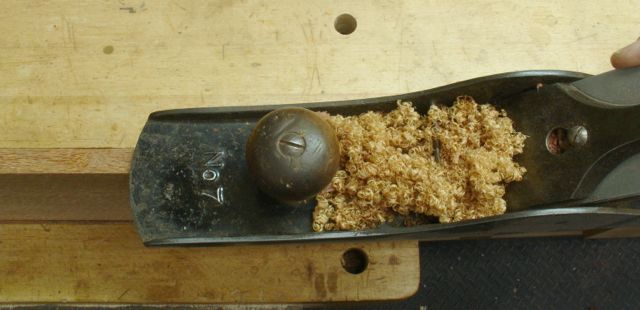
My client had seen this listing on my Etsy store which started a series of convo’s for a custom one made to her specifications. Being a cat owner myself (Ali is on my lap as we speak/type?) it was easy to imagine the bond she felt towards hers and the mementos she wanted to keep. I had some difficulty getting the Leopardwood but as luck would have it, a good friend was headed to Phoenix and offered to stop at Woodworkers Source and pick a piece of it up for me. It is a beautiful wood but feels rather waxy and as you can see in the picture, has a very indistinct grain structure. The plane creates dust rather than a shaving and this is edge grain! The box will be constructed using mitered corners with Maple splines for added strength and decoration. It’ll have a hinged top and a heart shaped lock made of brass. Size is approximately 5″ wide by 8″ long and just under 5″ tall.
Since mitered corners can be tricky to assemble and cut I thought I’d share my method with this pictorial essay. Using a sled that slides in both miter gauge slots for stability is the first thing I believe is important. Also you need to be certain your blade is tilted at 45 degrees, I use a electronic angle gauge for that. You may notice that the fence of the sled is adjustable. Always check for 90 degrees before you start to cut your stock on a scrap piece of wood. Note: click on the first picture and you will see it full size plus the caption, you can also click the next arrow to advance the tutorial.


Since you want your grain to be continuous as it goes around the corners you need to constantly flip the board over after each cut. The first piece is cut with the show side down, then a stop block is placed for its length. By using a spacer that is equal to the difference in the box sides you’ll be able to have exactly the same length pieces. In this instance the long side = 8″ and the short = 5″. That makes the size of the spacer 3″. Always lay your pieces down the same way they come off the saw, this board was selected for the light streak about one third of the way up.

Free clip-art
The lid of this box will be a carved and copper gilded cat image. It looks like this. After scaling it to the top panel it was carved out and is in the process of being gilded with Copper. The unusual aspect of the construction is that this panel will need to be gilded and sealed before the box is assembled. The way to build a good box with a nicely fitted lid is to build it as a cube and then separate the two later. Here’s what it looks like now, the next step is gilding it which is scheduled for tomorrow morning. I’ll do a separate blog about the carving and gilding of this cat in the next blog.

All the parts fit

Pingback: How to Add Keys or Splines to a Mitered Box — Cat Box Completed | Woodworks by John