

Free clip-art
In my last blog about this Etsy custom order I shared my method of making a miter cornered box. The client requested a copper gilded lid with an image of a cat. We choose this one from free internet images available from the internet. The first step you need to do is transfer this to a program on your computer that has rulers so you can size it to fit whatever you size you need.
Carving the Design

Transferring Design to Lid
An image size of about 3″ x 5″ was needed for this box lid, once it was printed out center lines were drawn on it and the lid to position the image. I used carbon paper. My wood choice for carvings such as this is usually Basswood. Because of its even grain it is a very popular wood for carving, works easily and holds detail well.
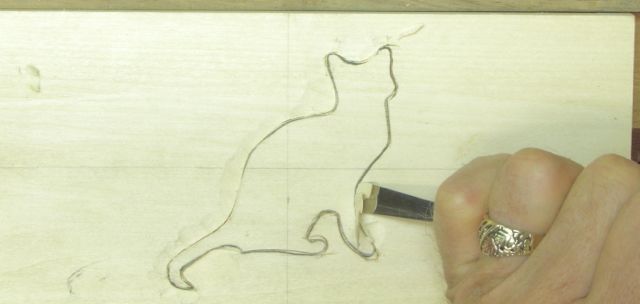
The first step to carving anything is to outline the desired shape. There are a number of methods you can use to accomplish this. Some carvers use only a carving knife for this process which requires a pretty strong hand to control the cut. Others will use a V-tool or parting tool, striking it either with a small mallet or simply pushing it in a very controlled manner, following the desired outline.


I didn’t mention my custom tool with the golf ball handle yet! When trying to outline with just a carving knife I found it difficult to see the line when making curves — my hand was in the way. It’s also hard making a tight radius because of the way your hand is positioned. My solution was to take a double bevel skew chisel (garage sale find) that needed a handle. I love using golf balls on files so did likewise for this. Now you can hold the chisel upright with only the tip cutting the outline. Because you’re vertical, not only can you see the line but the ball handle allows you to pivot around curves quite nicely!
Gronding out design
Once it’s completely outlined the next step is “grounding out” the design. What that means is you remove the wood to make the design stand proud. There are any number of tools you can use to accomplish this. My personal preference is a small, shallow gouge (#3/10mm) but your design will dictate which tool will work best for you. Once the image has been outlined it’s time to work on the background. This step is pretty personalized, you want it to look hand worked but not so rough that it looks “hand worked”! As a general rule I prefer to remove all of the original surface using a variety of gouges, generally #7, #8, and #9. My goal is to evoke a sense of motion, kind of like you’d see in a cartoon picture where they want to indicate something’s moving. Again, very personal and you should develop your own style.


Gilding the Design
For projects such as these I use oil gilding and Dutch gold. Now just so you know, Dutch gold leaf is one of several terms for what’s commonly known as composition metal leaf. Since I’m a Dutchman I like that term but it can also be called composition metal, scalage metal, gold foil leaf, metal leaf, etc. Anything to differentiate it from actual gold leaf and the water gilding process which is much more complex and time consuming than using metal leaf and oil gilding size as I will discuss here.

Burnisher/Sealer
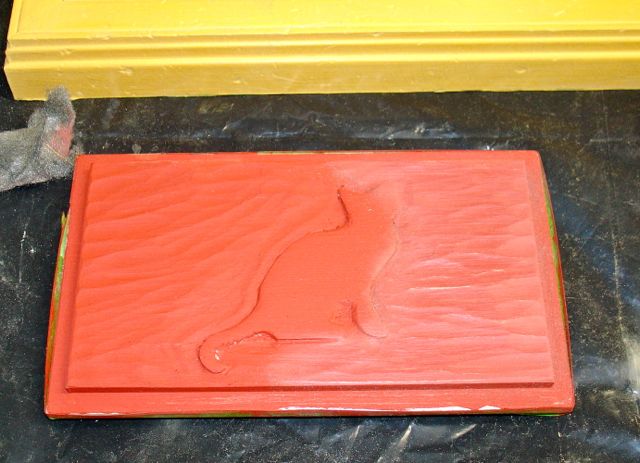
The first step is sealing the wood to attain a smooth surface. You leaf will telegraph anything through it. I decided that since I was in a carving/gilding mood I would do a frame and another lid at the same time. The lid for the box will be copper gilded so used a red, burnisher sealer from LA Gold Wholesalers. The yellow is from Rolco Labs.
Steel wooled burnisher/sealer
After this dries you can burnish it with 4/0 steel wool to give it a shine. I recommend using only oil free steel will for this such as Liberon’s. You can see the difference here. This is where oil gilding and water gilding differ. Oil gilding can not be burnished once it’s applied whereas in water gilding the gold leaf is burnished with an agate stone to get that true gold shine on your work. In any case, for this application oil gilding is just fine.
Now it’s time to apply the gilding oil to the project. My preference is the slow set which sets up in 10-12 hours and gives you a long window of application, they say up to 24 hours. You can also use a quick set oil that sets in about 1-3 hours. The major problem with them is that dust will settle on the surface so the longer time means more dust possible — especially true since we had a wind storm but all that being said it seems to me that the slow set provides a better bond. Once ready for gilding it’s a matter of laying the leaf on the surface. Metal leaf allows you to handle it with your fingers and I use my leaf layer (piece of waxed MDF) to accomplish it as you can see in this slideshow:
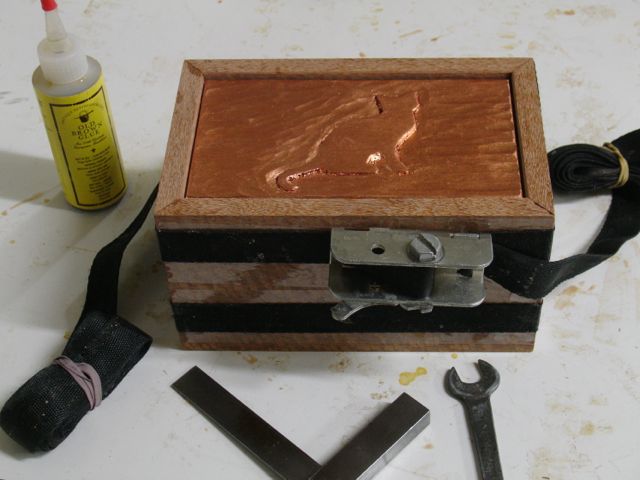
Assembled Box
One thing about composition metals is that they will tarnish so need to be sealed. I use platinum, wax free shellac that is mixed up fresh and apply it with an air brush. Wait at least 24 hours for the oil size to dry completely. That’s done so the box was glued up as you can see. Next step will be cutting the slots for the keys in the corners, sanding, separating the lid from the box, attaching the hardware, and then final finishing. But that’s for the next blog!
